Strawberry Sugar Cookie Cut Outs: No Spread, No Chill, All Natural

Whelp, it has been 3 years. I can explain, but later. I made up this recipe today as a Valentine’s gift to my family and wanted to share. I honestly don’t know if anyone is still out there to find this recipe, but if you do IT’S YUMMY. I canceled all my email services and lead capture software when I took a long blogging break and don’t have a good way to notify you I’m back. So If you find this post, leave a comment so I know you’re here.

2 sticks (1 cup) unsalted butter, softened

1 cup sugar

2 eggs

1 tsp vanilla extract

1.2 oz freeze dried strawberries, divided

2 tsp cream of tartar

1 tsp baking soda

1/2 tsp salt

2 3/4 cups unbleached all purpose flour

Granulated sugar for rolling

additional for frosting

1 cup powdered sugar

2 Tbs liquid egg whites (optional)

1 Tbs heavy cream (optional)

1-2 Tbs water

Preheat oven to 350 degrees.

Using a food processor or coffee grinder, pulverize freeze dried strawberries into a powder. Use a fine sieve to strain out the chunks.  Set aside.

Cream together the butter and sugar until light and fluffy.  Beat in eggs and vanilla, scraping the bowl as necessary. 

Beat in 3/4 of the strawberry powder, reserving the remaining 1/4 for the frosting. 

Beat in cream of tartar, baking soda, salt and flour. 

Roll out on a sugared surface to 1/4 or 3/8 inch thick.  Cut into desired shapes and place on a greased baking sheet.  Bake for 10 minutes or until set but not brown.  Cool on the pan for 5 minutes, then transfer to a wire rack. 

For frosting, mix powdered sugar and remaining strawberry powder. Stir in egg whites, cream and water until desired spreading consistency. Spread frosting on cookies with a knife and set out to dry. Frosting will self level somewhat.  If you want to leave out the egg whites and cream, just water can be used to thin the frosting to desired consistency. 

The Secret to Homemade Flaky Layers Biscuits

A few weeks ago our church put on an event called Homespun University.  Volunteers taught classes on a topic they enjoyed and we could choose from a large variety of things to learn about including organization, home decor, self defense, cake decorating, herbs, essential oils, and scripture study. One of our members is a retired professional baker who owned his own bakery for years. He offered a class on biscuits and I jumped at the chance to learn from him.

Before I got married I baked a lot of biscuits, but they weren’t the best.  Sometimes they were hockey pucks.  It worried my husband so much that he begged his Aunt to have me over for a biscuit baking lesson.  Then I entered the fitness phase of my life and biscuits became a thing of the past.

Recently I started balancing real baked goods, with actual wheat flour into our rotation. Sometimes I’d rather have a tiny bit of a real treat than a full serving of a sugar free, grain free blech. It’s all about portion control and activity level to make it balance out in the end.
I bought the Magnolia Home cookbook (How does Joanna cook like this and stay so thin?) and excitedly tried her biscuit recipe.  It had way tooooooo much butter and they were just ok.

The recipe I’m about to share with you is better.  A lot better.  I tried it first with all-purpose white flour, but I’m going to try it again with my home ground fresh hard white whole wheat flour.

First here are the secrets:

  1. Use COLD butter.  Keep it in the fridge until just before using it.
  2. Don’t overwork your butter.  Cut it in until it’s the size of peas not fine crumbs.
  3. Don’t overwork your dough.  Kneading is for yeast breads, not biscuits. It’s ok to have some flour that isn’t worked in at the first.  As you lightly roll it into layers it will work in.
  4. Don’t roll the biscuits too flat.  There isn’t yeast in these so keep them tall, so don’t’ press out all the air that’s forming from the baking powder reaction.  I leave mine about 3/4 inch thick before cutting.
  5. Don’t twist the cutter.  Twisting the cutter seals the edges and keeps the biscuit from rising into layers.
  6. Brushing the tops with milk before baking, makes sure there won’t be a dry flour dust on your biscuits from the rolling flour.
  7. Use a HOT oven temperature.  This quickly seals the outside crust, trapping air inside and forcing a higher rise.

Flakey Layers Biscuits

3 cups All Purpose Flour

4 tsp baking powder

1/2 tsp salt

10 Tbs Cold Butter

1 1/3 cups Cultured Buttermilk

2 Tbs Honey

Preheat your oven to 450 degrees. Makes 12 biscuits.

In a large bowl whisk together the flour, baking powder and salt. Cut the butter into slices then add to the flour mixture and use a pastry cutter to work into the flour until the butter is the size of small peas.

In a glass measuring cup, beat together the buttermilk and honey.  Then pour into the flour mixture.  Stir just until it has mostly come together, then dump out onto a lightly floured counter.  Gather dough into a ball.

Dust a rolling pin with flour and with a light touch, roll the dough out about 1/2 inch thick. Fold the dough into thirds, then roll again and fold into thirds again.  Repeat one more time.  Lightly roll the dough about 3/4 inch thick, then cut with a biscuit cutter.  Instead of bunching up the scraps into a new ball to roll out again (which would destroy your layers and overwork the dough) slide them together on the counter and push bath together, keeping your layers intact to cut again.

Brush the tops with milk and bake for 8 minutes or until golden on top.

12 biscuits; 220 calories each, 10g fat, 26g net carbs, and 4g protein

Made with Hard White Whole Wheat Flour 218 calories, 10g fat, 24g net carbs, 5g protein

If you try it, let me know how it goes!  If you want to see it in action, let me know and I can do a facebook live video.


How to Switch to Homemade Ketchup

This is a post I really hope my kids don’t read.  It could ruin everything.  Kids, if you’re reading…stop now.  See…it’s just spinach.  Move along.

Are they gone?  Shhh.  Lean in a little closer.

I’ve been secretly replacing the ketchup in their favorite bottle with homemade.  Gasp!

Their favorite brand is made with High Fructose Corn Syrup and while the effects on blood sugar are about the same as table sugar, the effects on gut health are way worse than that.  High fructose corn syrup is a pre-biotic that firmicutes thrive on.  Don’t let that name fool you.  Firmicutes don’t make you FIRM or CUTE.  Think F for Fat.  Studies have shown that people with higher levels of firmicutes in their gut biome struggle with weight control versus people with higher levels of bacteroidetes who tend to be naturally thin. Source

In our quest for health, I’ve been slowly getting HFCS out of our diet.  I started with switching from Aldi peanut butter to Costco’s organic peanut butter, where the ingredients are just organic peanuts and salt. It was a little more expensive but not too bad. The kids are eating it, but have been asking for their old peanut butter back (sigh.) Then I switched from Aldi grape jelly, to Welch’s made with real sugar.  They like it even better, because it spreads well. It’s still a lot of sugar, so next stop is buying all fruit jam or making homemade.

I decided to be a little more stealthy when it comes to their ketchup. I noticed the bottle was half empty.  I made a homemade version and filled the bottle back up, shaking well. When it gets half empty again, I’ll repeat the process.  Pretty soon the bottle will be 100% homemade ketchup and the kids might not ever notice.

Here’s our recipe, which I adapted from Whole New Mom.

Homemade Ketchup

6 oz Tomato Paste

1 oz Apple Cider Vinegar (2 Tbs)

2 1/3 Tbs Erythritol (You can use Turbinado sugar or 1 2/3 Tbs honey instead.)

1/4 tsp garlic powder

1/4 tsp onion powder

dash cayenne

dash allspice

1/2 cup water

Whisk everything together and chill.  If you want it super smooth, use a blender. It makes about 12 oz of ketchup, which fills our bottle halfway.

I’m also working on a homemade BBQ sauce.  In the meantime, I’ve been buying  this one.

What do you think?  Are your kids ketchup fans like mine are?

Dump and Go Freezer Meal: Meatball Casserole

It’s time for meal #4 for our Fill your Freezer in 7 days blog series!

This comforting recipe can become fitness friendly with the use of Barilla Protein Plus Pasta.  It’s made with lentils, chick-peas, flax and other protein rich legumes.  Our local Wal-mart and Target both carry it and occasionally Target has coupons plus sales for great stock up prices.  If your local store doesn’t have it, Prime Pantry carries it for about the same price.

Any pasta will work in this dish, even gluten free pasta, so pick what works best for your needs.

Starting with frozen meatballs makes this super fast to throw together, but I’ll include a recipe for homemade meatballs at the end, just in case you prefer to do it yourself.

Meatball Casserole

Serves 8

1 jar, 24 oz, marinara sauce

3 cups water (just fill the empty sauce jar up and shake it up)

32 oz Turkey meatballs

14 oz bow tie or penne pasta

2 cups Mozzarella Cheese

For freezer cooking, pour the marinara, water and meatballs into a gallon baggie.  Press out air and seal.  Freeze.

For Oven Baking:  Thaw bag, pour into a baking dish with dry pasta and stir to combine.  Cover and bake at 350 degrees for 30 minutes. Top with cheese and bake uncovered for 15 minutes longer.

For Slow Cooker: Thaw bag and pour into a 4-5 quart slow cooker. Top with cheese and cook on low for 3 hours.

For Pressure Cooker: Thaw bag and pour into your instant pot.  Cook at high pressure for 5 minutes. Use quick release on the pressure.  Top with cheese and let stand a few minutes until it melts.

For Skillet: Thaw bag, Pour into a skillet.  Bring to a simmer, then cover with a lid and cook for 15 minutes.  Top with cheese and stick under the broiler until golden brown.

Homemade Meatballs

2 lbs Ground Turkey (or Beef, chicken, pork, venison, etc.)

2 eggs

1 cup Milk (Use Unsweetened Almond Milk of Dairy Free)

1 cup Italian style Bread Crumbs (Gluten Free: use Almond Meal or Gluten Free bread crumbs plus 1 tsp Italian Seasoning.)

1/4 cup parmesan cheese (Skip if Dairy Free)

2 Tbs Dried onion flakes

1 tsp salt

1/2 tsp pepper

Use a mixer to combine everything together.  Roll into 1 inch balls and place on a baking sheet with a rim.  Bake at 400 degrees for 15 minutes.


Dump and Go Slow Cooker or Pressure Cooker Quinoa Enchilada Casserole

It’s recipe 3 for our fill your freezer in 7 days challenge.  I hope beyond just giving you a few recipes, that I spark your imagination about how to adapt some of your favorite recipes for the freezer or even create some new flavors.

If you pre-dice your chicken, or used browned ground meat instead, this dish can be made in a skillet in just 20 minutes.  I love how in the slow cooker, it’s hands off until the end.  It’s truly a fix it and forget it situation.

This recipe is both fitness and family friendly.  To add calories and filling power, my growing kids serve theirs over a plate of tortilla chips, then top with sour cream and extra cheese.  I skip that part, then we all top it with shredded lettuce and chopped fresh tomatoes and salsa.

Be sure to rinse your quinoa before throwing it into your mix.  It removes the saponins that can taste bitter.  Since the grains are so small, I line my colander with a tea towel.

Dump and Go Quinoa Enchilada Casserole

1 lb boneless Chicken Breasts (If you bought it frozen, keep it frozen.  Thawing and refreezing raw meats changes the texture in an unappetizing way.)

1 Tbs taco seasoning mix

2 cans black beans, 15 oz each, drained and rinsed

1 chopped onion

1 cup dry quinoa, rinsed

1 can red enchilada sauce, 20 oz

1/2 cup water

Place all ingredients in a gallon baggie and freeze.  To cook, thaw just enough to be able to get everything out of the bag.  Pour into a slow cooker and cook on high for 3-4 hours, or on low for 6 hours. Shred the chicken with two forks and stir into the dish.  Top with shredded cheese, then replace the lid for a few minutes to allow it to melt.   Serve with a toppings bar.

To make in the pressure cooker, follow the directions above, except cook at high pressure for 10 minutes, following the manufacturers directions for pressure release before opening the lid.

Toppings suggestion:  Tortilla chips, shredded lettuce, fresh diced tomatoes, green onion, cilantro, sour cream, cheese, salsa, diced olives.

The leftovers reheat pack well in a thermos for hot lunch on the go.

Nutrition facts:  1/6 of the recipe without cheese or toppings yields: 381 Calories; 7g fat; 37g net carbs; 30g protein


Lime Chicken Tacos: A Freezer Meal That’s Slow Cooker and Pressure Cooker Friendly


Any meat that has to marinade makes a great freezer meal. Just don’t thaw it and refreeze it.  If your meat is already frozen, you can pour the marinade on it and put it back in the freezer.

Therea re two ways to make this into a freezer meal: 1. You can cook the meat through and then freeze it shredded and ready to serve, which saves time at the dinner time.  2. Or freezing it uncooked and in the marinade makes the freezer day prep super fast and easy. If you remember to pop it in the slow cooker or have an instant pot for faster cooking, this is a great option.

You’ll need 1 gallon freezer bag for this dish and then just your favorite taco toppings at time of serving.

I love how this dish is easily adaptable for all allergy and fitness needs.  For example, gluten free friends can use corn shells, or make a taco salad over corn chips. Keto friends can skip the honey and the shells or chips and make a big taco salad with full fat sour cream and cheese.  Dairy free friends can use avocado instead of dairy toppings.

Lime Chicken Tacos

Serves 4

1.5 lbs chicken breasts (These can be the ugly ones that are too thick or mis-shaped to grill)

1 Lime, zested and juiced

1 Tbs Olive Oil

2 Tbs Apple Cider Vinegar

1 tsp Honey

1 can, 4 oz, Green Chilies (If doubling the recipe, no need to double the chilies.  It saves money to use just 1 can while still giving great flavor.)

2 tsp Ground Cumin

2 tsp Chili Powder

1 tsp Minced garlic

A few dashes of cayenne if you like it hot

Combine everything in a Gallon size Freezer Baggie, press out the air.  Seal, Label and freeze.

To slow cook, place contents of the bag in a slow cooker and cook on high for 3 hours or on low for 6 hours. Shred with two forks and stir to coat in sauce.  Serve with a slotted spoon or tongs with your favorite taco toppings.

To Pressure cook, place contents of the bag in a pressure cooker. Add 1/4 c of water and cook at high pressure for 10 minutes.  Wait until pressure is reduced, or use quick release to bring down the pressure and remove the lid safely.  Shred chicken and stir into sauce. Serve with a slotted spoon or tongs with your favorite taco toppings.

Suggested Condiments: Tortillas 6″ or Tortilla chips, Shredded Lettuce, Diced Tomatoes, Diced Red Onion, Shredded Cheese, Sour Cream, Salsa, Guacamole

This is recipe #2 in our series, Fill your Freezer in 7 Days. Find more here.

Philly Pepper Steak Sheet Pan Freezer Meal

This delicious meal is fast to put together and cooks with hands off time.  Letting you pop it in the oven in the evening and unwind from the day’s tasks while it cooks.

You’ll use two 1 gallon freezer bags for the assembly.  The meat will marinate in the freezer, then cook up tender and flavorful.  It’s easier to slice cooked meat than raw meat, so I prefer to slice it after cooking.  If you know you’ll be too stressed to slice it at the time of cooking, slice it now, then reduce the cooking time in step 1 to 12 minutes.

If your family is on a regular diet, grab some sandwich rolls to make these into sandwiches. If you are gluten free you can serve it over brown rice, or low carb eaters can dish theirs over spaghetti squash or cauliflower rice.

This recipe is for 4 people, adjust as needed for your family:

Bag #1:

1 lb Flank Steak, or any boneless lean roast 3/4 inch thick.

2 Tbs cup Apple Cider Vinegar

1 Tbs Worcestershire Sauce

1 tsp Onion powder

1 tsp Garlic powder

1/2 tsp Salt

1/4 tsp Pepper

1/4 tsp cloves

Bag #2

2 Green Bell Peppers,Sliced

1 Onion (red or yellow), Sliced

8 oz Sliced Mushrooms

1/2 tsp Salt

1/4 tsp Pepper

Seal both bags, pressing out all the air first. Then label with the recipe name, today’s date, and the bag #.  Freeze.

Additional Ingredients: Provolone Cheese Slices and Sandwich Buns or Rice.

Cooking Instructions:

  1. Preheat oven to 400 degrees.  Line a rimmed sheet pan with parchment paper for easy clean up.  Place the steak in the middle and bake for 20 minutes (30 if it is still frozen.)

2. Spread the contents of bag #2 evenly around the outside of the steak. I doubled my recipe so I had to put veggies on top of the steak too.  Bake 15-20 minutes longer or until veggies reach desired tenderness.  Remove steak to a cutting board and cut into slices.  Return to the baking sheet and use tongs to stir it into the veggie mixture.

3. Top all with Cheese slices and bake for another 10 minutes or until cheese is gooey.  Serve on buns or over rice.

Picky Eater Ideas: Not everyone is a fan of peppers, onions and mushrooms.  You can substitute any vegetable for them including broccoli florets, zucchini strips, or Long green beans.

Do you have tips for helping kids eat their veggies?


Fill Your Freezer in 7 Days

I have a love/hate relationship with freezer cooking.  I love the idea of healthy, budget friendly, ready to warm up and serve food at my fingertips.  This run through the field of blooming tulips vision of freezer cooking has left me falling on my face in a surprise pile of cow dung every time.  There are some definite tripping hazards that I’d like to prevent before we get started.

#1: Cooking sessions that take ALL DAY, completely wear you out, and destroy your kitchen.    Honestly my freezer cooking sessions (all 2 of them) have been so draining that the pain did not outweigh the benefits.  It took years before I was willing to try it again.

#2 Meals that are so thick and so frozen solid that if you do not remember to thaw them out ahead of time (overnight in the fridge is NOT long enough) that it will take 3 hours to heat them through.  At that point the edges will be burned and the middle will be sort of warm.  Bon Appetit!   I use freezer meals for emergencies and I don’t always think to thaw in advance.

#3 Picky Eaters! It’s a big letdown when you’re standing in your perfectly clean kitchen, feeling like Martha Stewart with your freezer meal fresh out of the oven, and then have your family decide they don’t like it.

To make this viable a few things have to happen:

  1.  We need healthy recipes our families already love or are sure to love.
  2. We need the meals to thaw quickly or cook quickly without thawing.
  3. We need the cooking session to be SHORT!  Ideally less than 3 hours.
  4. We need minimal mess when we get done
  5. Plus we need not to tie up our good pans in the freezer, have room to store these meals in our freezer, and not pack them in containers that will leach toxic substances into our foods.

Here are a few Suggestions to make this go better:

  1. Skip the foil pans.  Aluminum will leach into the food and it does it at an accelerated rate as it’s heated.  If you can’t avoid the aluminum pan or foil, place a parchment paper (preferably unbleached) barrier between the aluminum and your food first.
  2. While plastics can also leach hormone disrupting chemicals into your food, they are less likely to do it at super cold temperatures.  Even BPA free plastics are harmful.  When public outcry demanded the removal of BPA, the plastic industry had to find a substitute to keep plastics from getting brittle.  They chose BPS which has the same hormone disrupting properties as BPA.  I still choose gallon freezer bags for my freezer cooking, I just make sure my food is cooled completely before I bag it and remove food from the bag before reheating. For heating, glass; stainless steel; and silicone pans are your safest bet.
  3. To make freezer cooking sessions short, I focus on dump recipes in the following categories:

Sheet Pan Suppers

Slow Cooker Meals

Instant Pot Meals

& One Skillet Meals

These meals all fit into freezer bags and take up the least amount of freezer room as possible, thaw easily, and require a minimum of prep time.  They are almost all meals-in-one needing no side dishes or just a tossed salad or bread and butter to round them out.

Tomorrow, I’ll be back with our first dump and go freezer recipe: Sheet Pan Pepper Cheese-Steak.

Does your family have favorite recipes that are sheet pan suppers, slow cooker meals, instant pot meals, or one skillet meals?  Have you had any experience with freezer cooking?  How did it go?  Send us your tips!


Makeover Strawberry Pretzel Salad

Strawberry Pretzel Salad is more dessert than salad, and it’s one of my favorites.

The original recipe is packed full of sugar, excess butter, artificial coloring, and hydrogenated fats.

I saw some opportunities for nutritional improvement without sacrificing much flavor.  I started by reducing the amount of butter by half…and honestly it still was plenty.  I also cut the sweetener amounts way down and then substituted Truvia or Erythritol for the sugar.  I got rid of the hydrogenated fats by swapping out the whipped topping for protein rich Greek yogurt. And ditched a pile of sugar and artificial food coloring by using homemade gelatin from light cranberry juice that was colored with vegetable powder instead of box gelatin colored with food dye. This healthier version is worthy of potluck suppers.

Healthier Strawberry Pretzel Salad

2 cups (about 5 oz) roughly chopped pretzels (gluten free work too)

6 Tbs butter, melted

3 Tbs Erythritol or Truvia

8 oz Neufchatel Cream Cheese

8 oz Unsweetened Greek Yogurt

1/2 cup Erythritol or Truvia

1 lb fresh strawberries, hulled and sliced

2 cups Low Calorie Cranberry Juice, look for an aspartame free variety.  I got mine from Aldi and it has 5 calories per cup.

1 Tbs plain Gelatin

  1.  Sprinkle gelatin over 1 cup of cranberry juice.  Let stand for 1 minute.  Microwave on high for 1 minute or until dissolved.  Stir in the remaining cup of cold juice and chill until thickened.  (About 30 minutes to an hour.)
  2. Meanwhile, preheat oven to 350 degrees. Stir together pretzels, melted butter and 3 Tbs sweetener. Press evenly into the bottom of a glass 9×13 pan.  Bake for 12-15 minutes or until golden.  Cool to room temperature.
  3. Beat together cream cheese, Greek Yogurt and sweetener until smooth.  Spread over cooled crust.
  4. Top cream layer with sliced strawberries, then pour thickened gelatin over all.  Chill for 3 hours or until set.Note: If you don’t let the gelatin thicken before pouring, it will sink to the bottom and make your crust soggy. I learned from experience

It makes 8 generous servings each with 262 calories; 16g fat; 20g net carbs and 8g protein.  I enjoy a piece for breakfast, or a snack, or both.

For the same size serving, the original recipe has 510 calories; 29g fat; 57g net carbs and 4g protein.

Have you given a favorite recipe a healthier makeover?  I’d love to hear about it.

This post contains amazon affiliate links.  Linking to the products that I personally use in my home. If you choose to purchase anything through one of these links, I will receive a small commission.

Grab and Go Muesli Breakfast Cookies

I’m constantly on the lookout for ways to simplify our lives, and if it makes us healthier too, it’s a double win.  Breakfast cookies are one of those double wins and are easy to grab and eat for a healthy breakfast on the go or an after school snack on the way to music lessons or sports practice.

I made these Muesli breakfast cookies last week for the Fit Mama meal plan and it was instant love. I had three the first day, one at breakfast and at each of my snack times. Inspiration for the recipe came from Sweet as Honey and I tweaked it to simplify the number of ingredients and to fit into the macro nutrition profile I needed for the Fit Mama plan.
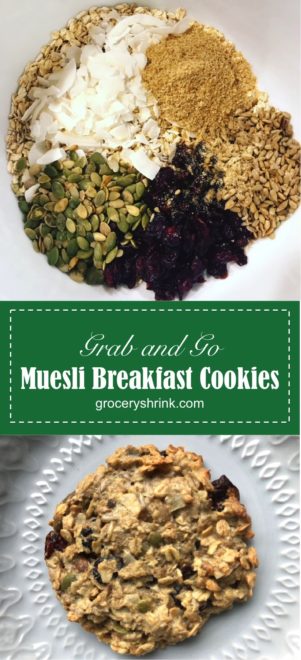
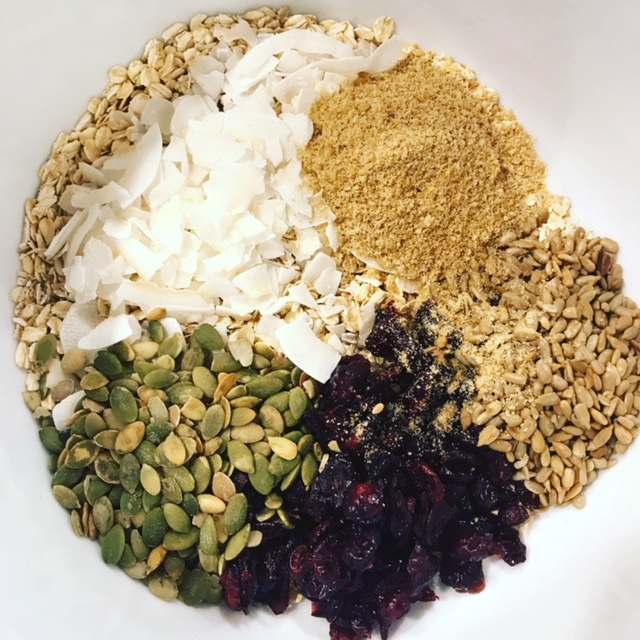
I can imagine all sorts of different variations just by changing the type of dried fruit and seeds or nuts added.  Different fruit options include: dried blueberries, golden raisins, apricots, cherries, strawberries, apples, dates, bananas, mango, papaya, pineapple, prunes. Prunes are shockingly delicious despite their old person stereotype and taste sweeter than dates without as many active carbs . Nuts and seeds might also include macadamia nuts, almonds, pecans, walnuts, pistachios, cashews, filberts, or cacao nibs.

I love dried fruits and nuts so much that it’s easy for me to overdo it and gain weight on them even though they are healthy foods.  By baking them into these cookies, there’s instant portion control.

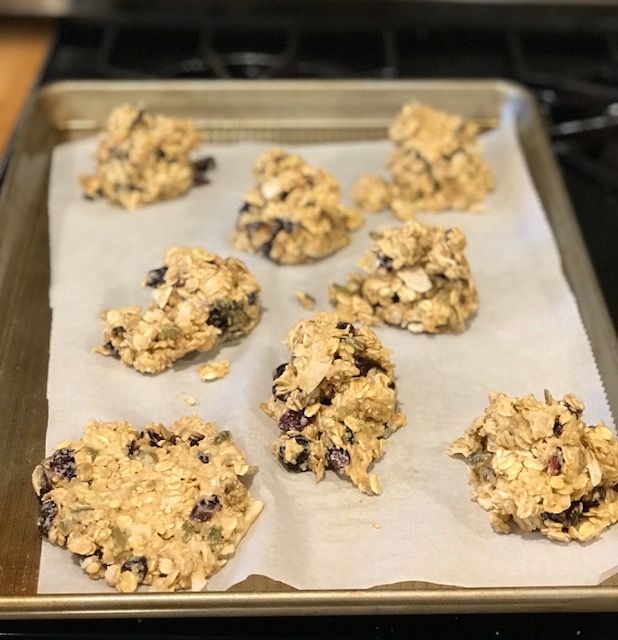
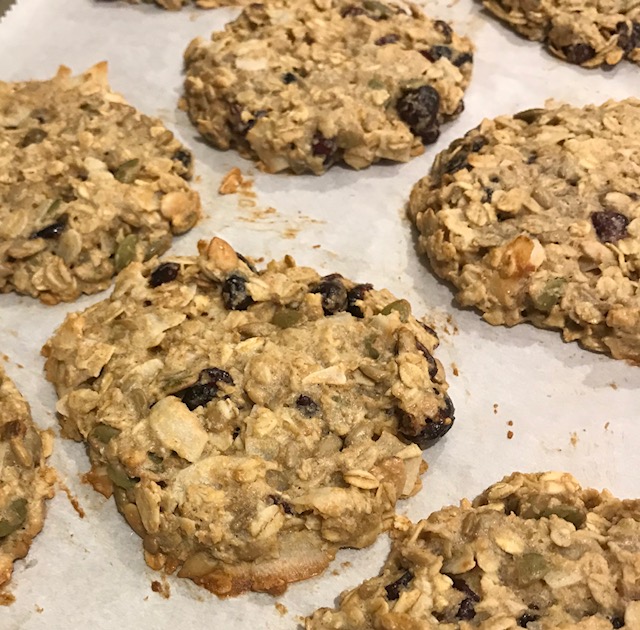
After dropping the dough onto the sheets, you’ll want to use a silicone spatula to flatten and shape them into cookies.

Something you need to know about these is that they are HEALTHY and they taste like it.  They aren’t super sweet, just sweet enough to be pleasant.  More the sweetness of a piece of honey wheat bread instead of the sweetness of a chocolate chip cookie.

For that reason, I’m going to share the small recipe first.  It makes 4 large single serving cookies, enough for your family to taste them before you waste large amounts of ingredients.

I found everything except the unsweetened coconut at Aldi.  I also chose to use Great Value Sugar Free Syrup from Wal-mart instead of honey to keep the macros in fat burning zone. If I were making these for kids, I would use honey or real maple syrup as listed.

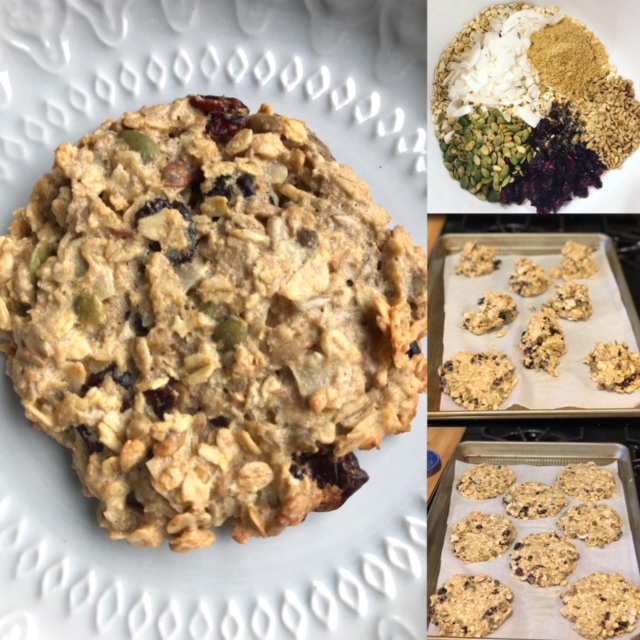
Muesli Breakfast Cookies, Small Recipe

3/4 cup Old Fashioned Rolled Oats

1/4 cup Unsweetened Coconut Flakes

1/4 cup Whole Wheat Flour or Almond Meal

1/4 cup Craisins

2 Tbs Pepitas (Shelled pumpkin seeds)

2 Tbs Sunflower Seeds

2 Tbs Fresh Ground Flax Meal

1 Egg

1/4 cup honey or real maple syrup

2 tbs melted coconut oil

Preheat oven to 350 degrees and line a baking sheet with parchment paper. Combine all ingredients in the order given and shape by 1/3 cupfuls into 4 large cookies onto prepared baking sheets. Bake for 20 minutes, or until golden brown. Cool completely before moving so they don’t fall apart. Enjoy with your favorite warm beverage.

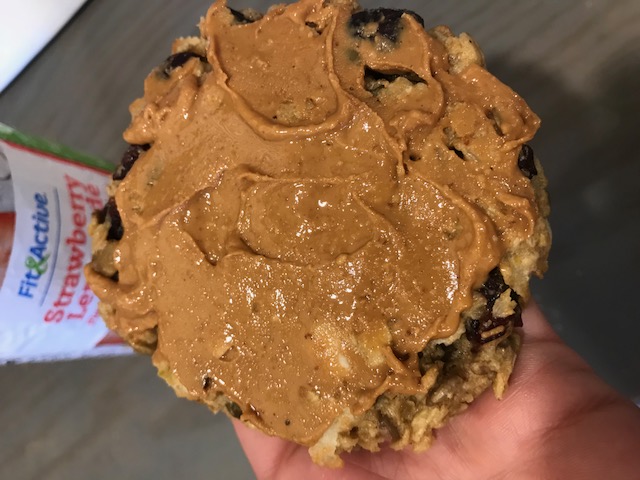
They are also really good frosted with Natural Peanut Butter.

Muesli Breakfast Cookies, Family Size Recipe

3 cups Old Fashioned Oats

1 cup Unsweetened Coconut Flakes

1 cup Whole Wheat Flour or Almond Meal

1 cup Craisins

1/2 cup Pepitas

1/2 cup Sunflower Seeds

1/2 cup Ground Flax Meal

4 eggs

1 cup Honey or Maple Syrup

1/2 cup Coconut Oil, melted

Preheat oven to 350 degrees and line a baking sheet with parchment paper. Combine all ingredients in the order given and shape by 1/3 cupfuls into 16 large cookies onto prepared baking sheets. Bake for 20 minutes, or until golden brown. Cool completely before moving so they don’t fall apart. Enjoy with your favorite warm beverage.

Made with Sugar Free Syrup instead of honey, each cookie contains: 270 calories; 16g fat; 24g net carbs; 7g protein.

The batter is moist enough that I think I could stir in some vanilla protein powder for extra sweetness plus protein.  If I try it out, I’ll update with the results.

Do you ever have call for grab and go breakfasts? What’s your favorite?