Resurrection Rolls: An Easter Recipe

While I was working on next week’s meal plan, I came across a video I made 5 years ago that was never published.  Brandon who is now 9, was just 4 years old and while I was watching the video today, Grant (5) walked over and said, “Hey, is that me?”   I’m a little envious over my hair and smaller waistline (which is coming back thanks to Fit Mama.)  This video was taken a few months after we moved into our fixer upper and about a year before the illness that would leave me bed bound for months and never quite the same physically or emotionally. It’s a little nostalgic and surreal to watch it.   I’m excited to get back to that healthy place again and each day is closer than the last.

Traditionally this recipe is made with canned crescent dough, and if you are a busy mama and the thought of making homemade dough puts you over the edge, just buy it.  Really….it’s ok.   Making your own isn’t too hard though and the dough can be made in a stand mixer or bread machine on the dough cycle.

In my meal plans, I automatically break the recipes into 4 different sizes.  It’s not that my subscribers couldn’t do the math. but I don’t want them to have to think about that.  Then they can use their energy interacting with family around a table full of good food.

Crescent Rolls

Ingredients

Servings

2 4 8 12
Butter or coconut oil, melted 2 Tbs 4 Tbs 1/2 cup 3/4 cup
Yogurt or applesauce 2 Tbs 4 Tbs 1/2 cup 3/4 cup
Eggs 1 1 2 3
Milk or water 4 Tbs 1/2 cup 1 cup 1 1/2 cups
Sugar 2 Tbs 1/4 cup 1/2 cup 3/4 cup
Salt pinch 1/2 tsp 1 tsp 1 1/2 tsp
Yeast 1 tsp 2 tsp 1 Tbs 4 tsp
Hard White Whole Wheat Flour 1 cup 2 cups 4-5 cups 7-8 cups

Cinnamon Sugar

Ingredients

Servings

2 4 8 12
Cinnamon 1/2 tsp 1 tsp 2 tsp 3 tsp
Sugar or Stevia 2 Tbs ¼ cup 1/2 cup 3/4 cup

If you are gluten free, you can try an all-purpose gluten free flour with xanthan gum in place of the wheat.  I haven’t tried it personally but the butter and egg content will help this dough stick together and it should work well.

  1. Place the ingredients for your crescent rolls in the bread machine overnight (in the order listed, except add the flour before the yeast.) Set a time delay dough cycle so that they will be ready in the morning about 1 hour before breakfast.

2. Turn your oven on to warm (between 100 and 120 degrees)

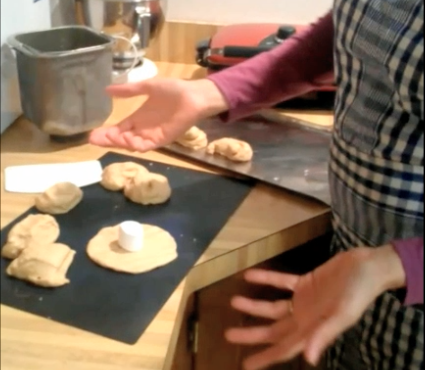
3.  Roll the dough ¼ inch thick and cut with a 3 inch biscuit cutter. OR break off a ping pong ball sized piece and flatten it into a circle with your fingers. Place a marshmallow in the middle of the dough and wrap it completely sealing the edges. The marshmallows are perfectly white, showing Christ’s purity as he was placed in the tomb. Some recipes I’ve seen have the children roll the marshmallow in butter and cinnamon-sugar showing the embalming of Christ and his anointing with spices.  We skip this step–but you can do it if you like.

4. Spritz the rolls with cooking spray or brush with butter. Roll the balls of dough in cinnamon sugar and place on a greased baking sheet. Sit the rolls in the slightly warm oven for 20-30 minutes or until they have risen slightly.

5. Remove the rising dough and preheat the oven to 350 degrees. Bake for about 15 minutes or until they are golden brown.

Before eating, instruct the children to break open their rolls. They will find tomb is empty!


Our Grocery Shrink Plus meal plans empower you to efficiently cook nutritious and cost affective food for your family. Become a member and download your first plan today.

Little Chocolate Pots

This recipe has changed my week.  It’s one of the rare “health” foods that my kids are crazy about. I tested it for next week’s FitMama meal plan and thought I had double what I needed.  But my oldest daughter is singing a solo at district contest for the first time today and Monday she walked in the door a complete emotional wreck.  When I handed her a little chocolate pot, words were no longer necessary.  I loved knowing it was a tiny bowl of superfood to nourish her adrenals and her brain.  It wasn’t a false stab at comfort food that would fill her body with garbage and drag her down further.

The tiny little bowls were from Big Lots.  At $2 each they were an affordable splurge.  I love the texture in the stoneware on the outside and the crackle glaze inside.

The only unusual ingredient in this recipe is Xylosweet.It’s a sugar free sweetener derived from probiotics+corn that I feel ok about using.  It tastes like sugar without messing with your blood sugar. You can use any sweetener you prefer or have on hand.  Another good choice is Monk Fruit In The Raw.  You can also use Truvia, but if you find it bitter, pick one of the other two.

Superfoods:

Coconut Oil: thermogenic to boost metabolism; nourishes the brain and helps memory; reduces inflammation and boosts the immune system; nourishes skin, teeth and hair; anti-fungal and anti-microbial

Unsweetened Cocoa Powder:  Rich in fiber, protein, and anti-oxidants; boosts metabolism

Collagen:  Builds strong hair, skin, and nails; soothes the lining of the intestines and helps with digestions

Eggs:  Full of protein, vitamin A, Vitamin B and zinc.  Good for your eyes, brain and heart and reduce the risk of metabolic syndrome.

Cinnamon: Boost metabolism, helps regulate blood sugar, good for the heart and aids in circulation

Little Chocolate Pots

½ cup refined coconut oil, melted*

¼ cup ground xylitol**

Pinch salt

¼ cup unsweetened cocoa powder

¼ cup collagen

2 large eggs, room temperature***

½ cup hot water with ¼ tsp cinnamon****

1.Add all but the eggs and hot coffee to a blender and blend well.

2.Add eggs and blend well, one at a time. (If your eggs are too cold, the coconut oil will solidify too soon.)

3.Slowly drizzle in hot coffee while blending. Blend well. The hot coffee will “cook” the eggs.

4.Pour into 6 small ramekins. Cover with plastic wrap and chill at least 2 hours or until firm.

6 servings: 242 calories; 21g fat; 9 net carbs ; 7g protein

*Refined coconut oil does not have coconut flavor. If you LOVE the taste of coconut, you can use unrefined pressed coconut oil. MCT oil won’t work, because you need it to harden when cooled.

**You can use any no calorie sweetener you prefer. I grind my xylitol in a little coffee grinder. It helps it dissolve better. If you are subbing all the sweeteners with honey, this is not the meal plan for you. The fat burning process with these specific ingredients rely on no sugars

***The temp of the eggs is super important here. I didn’t remember to take mine out ahead of time, so I ran some really hot water in a mug for each egg and dropped them in. They stayed in there for 3-5 minutes and were warm enough for this recipe.

****You can change the flavor by subbing hot coffee or mint tea

If you are looking for a weight loss plan that works with your busy schedule.  Check out FitMama. The food is prepped ahead so it’s ready to heat up and eat whenever you need it.  Healthy food could soon be as easy for you as grabbing a bag of chips.

Here’s the meals for the first day for the March 12th Fit Mama Plan.  We have a private facebook group too, so if you need help with ingredient substitutes for preferences we’re on it :).

Breakfast: Guacamole Eggs

Snack: Little Chocolate Pots

Lunch: Salmon Chef’s Salad

Snack:  Giant Frozen Eggnog

Dinner: Grilled Steak with Asparagus and Whipped Cauliflower

Snack: Hot Creamy Peppermint Sipper

This post contains affiliate links.  Thanks for supporting us :).

Chili Dog Enchiladas

This recipe uses a few convenience items to get dinner on the table in a snap.  Since we usually cook from scratch, this change of pace feels really special.  Haha, yep, hot dogs are special.  This will only taste as good as your hot dogs are, so I recommend splurging a little on the all beef or turkey ones.   Read more

Chocolate Chip Snickerdoodles

chocolate-chip-snickerdoodles

This is the kind of cookie that kids grab by the handfuls after youth group, and insist everyone in their family try.  It’s the kind of cookie that gets teenagers out of their bedrooms and into the kitchen for some meaningful conversation.  It’s the kind of cookie that garners requests like, “When are you making these again?  Will they be done by the time I get home from school?”

It’s not low carb, low fat, or low anything.  It’s not high fiber, or highly nutritious.  Just delicious.  If you are on a weight loss plan, proceed with caution.

chocolate chip snickerdoodles 3

Chocolate Chip Snickerdoodles

1 cup butter, softened

1 3/4 cups sugar

2 large eggs

2 tsp vanilla extract

1 tsp salt

1 tsp baking soda

1 tsp cream of tartar

3 cups all purpose flour

12 oz mini chocolate chips

1/4 cup sugar

2 tsp cinnamon

Preheat oven to 350 degrees.

Cream butter and sugars until light and fluffy.  Beat in eggs, one at a time, beating well after each addition.  Beat in vanilla extract.

Beat in salt, baking soda and cream of tartar.  Scrape the bowl, then add flour 1/2 cup at a time and beat in well without over mixing.  Scraping the bowl from time to time.

Fold in chocolate chips.

In a small bowl, combine remaining sugar and cinnamon

Roll dough into walnut sized balls and roll in cinnamon sugar mixture. Place 1 inch apart on greased baking sheets.

Bake for 10 (soft) – 12 (crisp) minutes or until golden brown. Cool on the baking sheet for 5 minutes before transferring to a wire rack to finish cooling.

chocolate chip snickerdoodles 2

A Family Friendly Yard on a Budget

Our house has so many projects! My foyer has been primed but not pained for several months now and I’m still not done with my built in bookcases or trim in the living room.  Already my heart is turning outside.  We have a couple of gorgeous months ahead of us and I would LOVE to add a firepit and some swings to our yard and just hang out there with my people.

back-yard-before

Two weekends ago we piled our driveway full of brush and yard trimmings, revealed our raised beds and split enough wood for two winters. Then last weekend we built 4 more raised garden beds, and mulched around trees and pathways.


pathway to school

Here’s a close up of the bushy area to the right after cleaning up. The yard is looking almost pretty.  The two days working together as a family was really fun and bonding, except for the poison ivy that I found. It’s the city’s job to keep the fence clean 😛 We can work on our side, but the other side remains a jungle.  I suppose there’s more privacy that way.

under the deck

Darren is talking out loud about building a seating area under the deck.  I’ve been talking about it for years and he would respond with all the reasons why it was a bad idea.  Now, it appears it is HIS idea and I’m all for it. Above is what it looks like today, sigh.  There’s a LOT of work to be done.  But I’m envisioning removing the wall covering on the side facing this, and the side facing the yard to the right.  We’d like to leave the covering on the back wall, because that is the north side and blocks the worst weather for us.

Then I’d like a slew of comfy seating and eating areas where our huge family can gather.  (Just my husband’s immediate family is 28 people.)  Something with the feel Centsational Girl created here:

901fd840058babb0f75307a4df689358

This will be the most expensive backyard project on our list because we’ll need to jackhammer some extra footings that aren’t being used anymore, and bring in several yards of gravel to create a temporary floor.  Concrete would be ideal, but it would be around $10,000 to pour a spot this big.

c472ce7d082360464e48225a33f02e20

Here’s another inspiration photo from Redoingit.blogspot.com. They have a fabulous tutorial there on making outdoor curtains from canvas drop cloth and plumbing fittings.

how-to-build-a-diy-firepit-for-60

While we save up the cash for the gravel floor, I’d like to build a fire pit like this.  I go back and forth on the kind of bottom to put in the pit. The flat stones as shown here would make shoveling out ashes a snap, but we have a couple of bags of sand that the previous homeowners left and it would make a free floor that drains well.  The stone blocks are a lot more expensive in my area than described in this tutorial (more than double) but I have seen them on Craigslist recently (I was just too slow to text and they were already sold, sob.)  While we do the necessary clean up work, I’m going to keep watching for another good deal.

with-swingset

This simple swingset can be built for less than $100, even after modifying the plans to make it taller and wide enough for 3 swings.  We had a hard time figuring out where to put the swings with all the trees and tall back fence.  Darren finally had the idea of turning it sideways (we already plan to take out the tree right by the garden beds) so the kids would have more room to swing without hitting the fence.  It’s not as aesthetically pleasing to me as one turned the other direction, but I’ll be able to see it from the house which was really important to me.


Creamy Pumpkin Mousse: A Weight Loss Recipe

I’m so excited about the flavors of autumn! Apples, cinnamon, maple, pumpkin, acorn squash….Yes please!  All of it.

Here’s a super simple recipe that is sure to please your fall cravings, but is still cool and refreshing for those warm afternoons.  It takes less than 10 minutes to prepare and is low carb.  If you’re following Trim Healthy Mama, this would be an S. The few carbs that are in it are naturally present in the Greek Yogurt and Pumpkin.

Pumpkin Mousse

Creamy Pumpkin Mousse

1 cup pumpkin puree (not pumpkin pie filling)

1 cup plain Greek Yogurt (I used fat free but any fat content is fine.)

1 cup heavy whipping cream

1 1/2 tsp pumpkin pie spice

1 tsp liquid vanilla stevia

4 packets Truvia

(If you aren’t counting carbs and just want to use sugar, I recommend 1/4 cup real maple syrup or honey to replace the stevia and Truvia.)

Put everything in an electric mixer with the whip attachment and whip until soft peaks form.  You’ll be able to see the trace of the beater through the mousse and the lines will stay when it is ready.

Transfer to 6 serving dishes and chill until ready to serve.  I’ve found my stevia sweetened things taste better when chilled for a couple of hours.  It helps the flavors blend and makes the stevia less bitter. My kids gave this 2 thumbs up even before chilling.

For a new prep-ahead weight loss meal plan every week, click here.

screen-shot-2016-09-12-at-11-21-19-am

Baked Creamy Spinach Chicken Flautas

When you need an easy dinner idea, a packable lunch, or a substantial snack, I’ve got your back.  Here’s what I love about these little cuties:  everything is hidden inside.  Onions…check.  Spinach…check. My kids didn’t even notice.  Just bit right down and gobbled them up.   Sometimes you have to be stealthy with the veggies.

chicken spinach flautas 4

Baked Creamy Spinach Chicken Flautas

1 chopped onion

1 tsp minced garlic (or garlic powder)

2 cups fresh, chopped spinach

1 can, 4 oz green chilies

1 tsp ground cumin

2 cups cooked shredded chicken*

1 brick, 8 oz neufchâtel cheese

20-6 inch tortillas (I used flour, but corn works if you want to call them taquitos)

  1. Preheat oven to 400 degrees.
  2. In a large skillet saute onion and garlic until very soft.  Stir in spinach and cook until wilted. Add green chilies, cumin, and chicken.  Heat through.
  3. Push everything in the skillet to the outsides, making a whole in the center.  Put the neufchâtel cheese right there and stir it around until it softens and melts into a creamy liquidy pool. Then stir it into the chicken mixture.
  4. Place 2 Tbs of the mixture onto the edge of a tortilla and roll up tightly.  Place seam side down on a baking sheet.
  5. Bake for 15 minutes or until golden brown and crisp.

Serve with dipping sauces like: salsa, ranch dressing, sour cream, or guacamole.  For dinner add side dishes of tossed salad and cut fruit.

chicken spinach flautas 1

Zucchini Chocolate Cupcakes

At 3 pm everyone at my house gets the munchies.  I’ve taught my kids to be self-reliant when it comes to food.  It’s a habit of years of dealing with chronic illness. Now that I’m doing a bit better, I want to take back some of the kitchen control.  I like my kids learning to cook and make do, but I’m not loving the mess they leave behind.  It’s going to take some steady supervision to change the bad “clean up after yourself” habits I’ve allowed.  In the meantime, I’m being proactive by preparing after school snacks.  Rename these “muffins” and you can serve them for breakfast too :).

Chocolate Zucchini Muffins

Zucchini Chocolate Cupcakes are loaded with veggies, fiber and protein.  You can choose how you want to sweeten them.  I used a mixture of xylitol and sucanant.  To get the right texture, you should include real sugar for at least 1/3 of the sweetener.

You can also be creative with the flour you use.  I used fresh ground whole wheat flour, unbleached flour or a gluten free flour blend (if it has xanthan gum in it) will also work.  If you are using an alternate flour option, add it gradually and stop when the consistency is cake batter right.   Some flours (like coconut flour) absorb a ton more water than wheat flour and you will need quite a bit less.

Zucchini Chocolate Cupcakes

1 1/2 cups Nonfat Plain Greek Yogurt

1 3/4 cup sugar

2 eggs

1 Tbs vanilla extract

2 cups shredded zucchini

1 1/2 tsp baking soda

1/2 tsp cinnamon

1/2 tsp cloves

1/4 cup cocoa powder

2 1/2 cups flour

1/4 cup mini chocolate chips

  1. Preheat oven to 350 degrees
  2. In a stand mixer, beat Greek yogurt with sugar, eggs and vanilla.  Stir in Zucchini.
  3. Add baking soda, cinnamon, cloves, cocoa powder, stirring well after each addition.
  4. Add flour 1/2 cup at a time, stirring just until incorporated. Do not add chocolate chips at this time.
  5. Fill greased or lined muffin cups 2/3 full.  (I like to use an ice cream scoop to measure it.)
  6. Sprinkle the top of each cupcake with 1/2 tsp of mini chocolate chips.
  7. Bake for 28 minutes or until a toothpick inserted in the middle comes out clean.
  8. Cool on a wire rack for 5 minutes before removing cupcakes to finish cooling.

Nutrition Information for Zucchini Muffins

How to Freeze Sweet Corn

It’s sweet corn season!  Here’s a handy tutorial for when you have corn coming out your ears.  (Get it?  Ears.) Freezing sweet corn is fast and easy and preserves it’s fresh home-grown taste. The corn I will be showing is sugar and cream corn grown by my dad in his city garden.  They were blessed this year with very healthy corn that gave 4 ears per stalk.  That’s pretty rare in these parts.

freezing corn 1

1.  Shuck the corn outside (because it’s messy).  The shucks are a nice addition to a compost pile.

6a00e5549125f78833011572509fb6970b

2.  Wash the silky hairs off the corn.  I like to use cool running water and a terry wash cloth.  Microfiber cloths work well too.  I like a cloth better than a corn brush.  It covers more of the corn at once, so is faster and grabs the silk really well.  I use about the same amount of pressure when washing corn as when I wash my baby’s face.  Enough to clean without doing any damage.

6a00e5549125f788330115715c504f970c

The front ear is freshly shucked.  The back ear has been gently washed with a terry cloth.

6a00e5549125f788330115715c514f970c

3.  Cut any bad spots off the corn.  This corn was raised without chemicals except for what came on the seed already and has a few worm spots.  Most of it was spotless though.  If you miss a bad spot, it will turn brown when it cooks and you can cut it out later.

6a00e5549125f788330115715c528c970c

4.  Submerge several ears of corn in a large pot of boiling water. If you are freezing whole ears of corn, boil them for 8 minutes.  If you are cutting the corn off the cob, boil for 6 minutes.

6a00e5549125f7883301157250a813970b

5.  Use tongs to remove corn from the boiling water.  Run it under cold water to cool or submerge it into a bowl of ice water for 6 minutes.

6a00e5549125f7883301157250a957970b

6.  Use a sharp knife to cut the kernels off the corn.  I like to take my knife and scrape the cob to get all the milk and ends out.  We call that “cream style” on the farm.  I cut as many cobs as I can fit into a large bowl before stopping to fill bags.

6a00e5549125f788330115715c5916970c

7.  I package my corn in quart size freezer bags, and use a permanent marker to label the bags with the date and contents before filling.  A one cup measuring cup is perfect for scooping the corn into the bags.  Four full scoops is a quart.  When the bags are full, press out all the air and seal them tight.  I smoosh the corn around until the bag is nice and flat and stack them in a plastic dish tub for freezing.  This freezes the corn in nice little stacks that fit well in my freezer.

home frozen corn

8.  Even though you will be tired, be sure to clean up right away when you are finished.  Corn juice is sticky and starchy and dries hard.  It’s much easier to clean up when it’s fresh.

Thanks to my mom for picking and shucking the corn.  And thanks to my Mother-in-love for showing me how to freeze it step by step.  Remember the year my entire kitchen floor was covered a foot deep in corn?  We had 3 years worth plus plenty to share after that.

 This post originally appeared August 1st, 2009