Welcome Fall

Thank you for all your encouraging comments after my last post.  I’m not feeling nearly so overwhelmed right now and I think gratitude and the support of good friends has a lot to do with it.  I’ve found myself running to the journal to jot down things when I think of them–like the song “I need thee every hour,” especially the new arrangement by John Hudson.  Also warm and pleasant jogging weather, and my husband who has known exactly what I’ve needed to hear the past couple of days.

I made some updates to my home for fall, just using some stuff I already had on hand.  If you missed it on instagram, here are a few more photos.  If I were designing a hearth from scratch, I would have done it differently and all the possibilities would have stressed me out and frozen me. Since my rule was to use what I have, it was much simpler (I even used the screws the previous homeowner left in the brick–so yes, the wreaths are slightly uneven.)   I love how limitations FREE us to make the best decisions we can.

screen-shot-2016-09-22-at-10-40-01-am

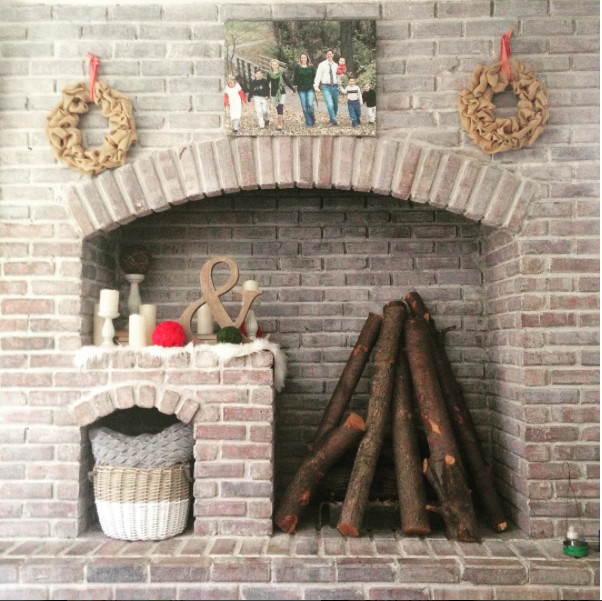
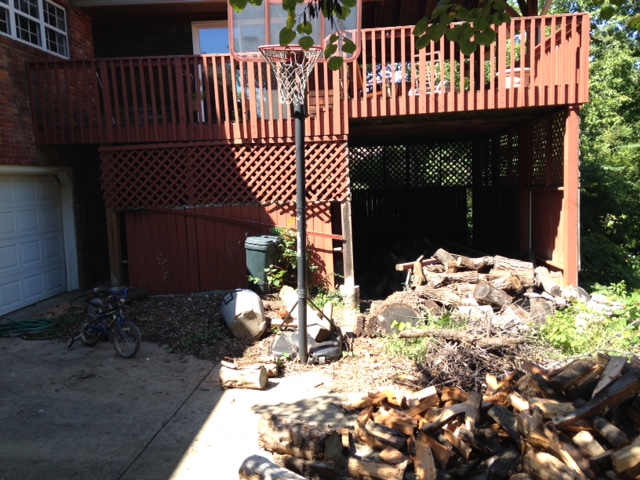
The canvas on the hearth was our family picture from 2012. The dipped basket is from hobby Lobby (as is the ampersand) and the pillow from Ikea.  I made the wreaths using this tutorial. The wood logs were dropped off by a tree cutting crew working for my neighbor.  To get these logs I had to take all 4 trees and the wood chips.  My husband was not nearly as excited about it as I was.  He has been chopping it into firewood for weeks already and is still not done.  We have a wood burning fireplace in our basement, but this one is gas.  It’s not very efficient and way too expensive to burn, so it’s we just use it for decoration.  We talked about ripping it out several times….but it’s kind of holding up the whole center of the house–and has historical significance, being made from the bricks of the old Kanas City stockyards when they were torn down.

screen-shot-2016-09-22-at-10-43-29-am

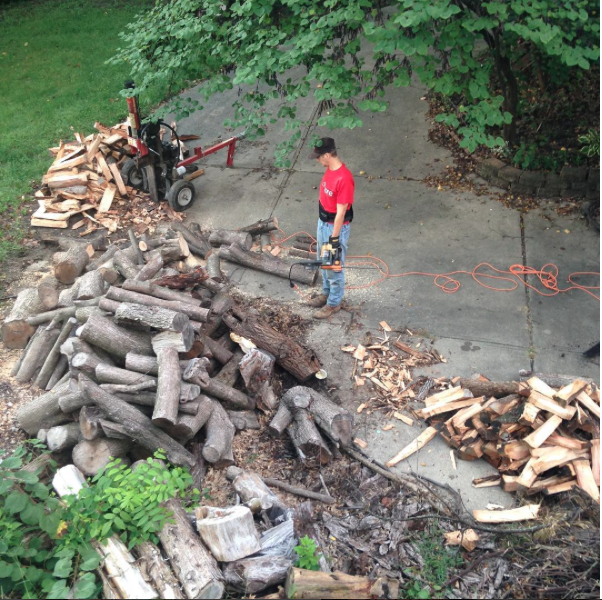
I did go and help him after I took the photo :D. (Mostly so I could protect the bigger stumps that would make nice side tables or stools for a someday outdoor seating area.)

If you’d like to know how we painted our brick, you can read about that here, and also see what the endcap looked like before we put a chalkboard up over it.

screen-shot-2016-09-22-at-10-40-18-am

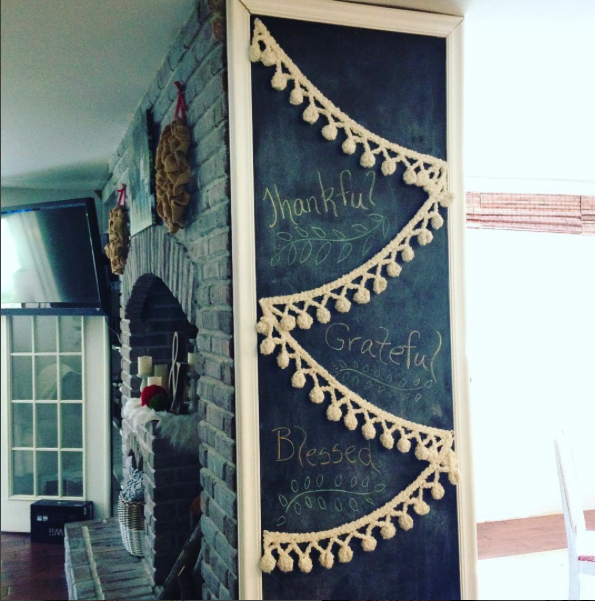
I LOVE the versatility of having a huge chalkboard here. It’s not nearly as dusty as I thought it would be.  It’s visible from the entry so we can put any personal message to guests we want on there, like “Welcome Yeoman Family!” I let the kids design it most of the time, but while they were at school yesterday I added the crocheted pompom garland (with thumbtacks) and words to remind me of my new mindset.  We skip Halloween at our house and go right into Thanksgiving.  

img_3602

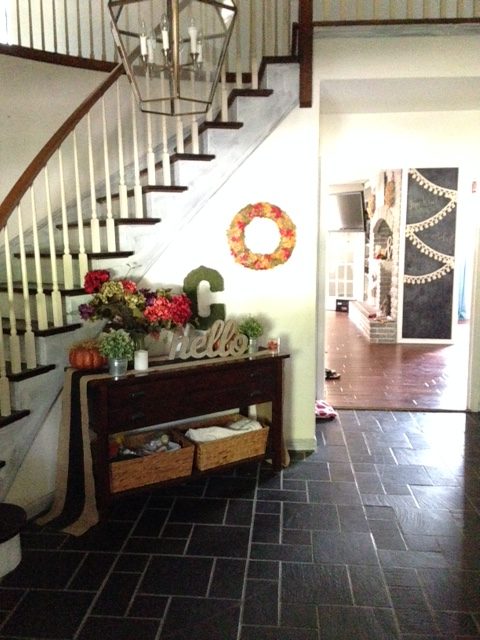
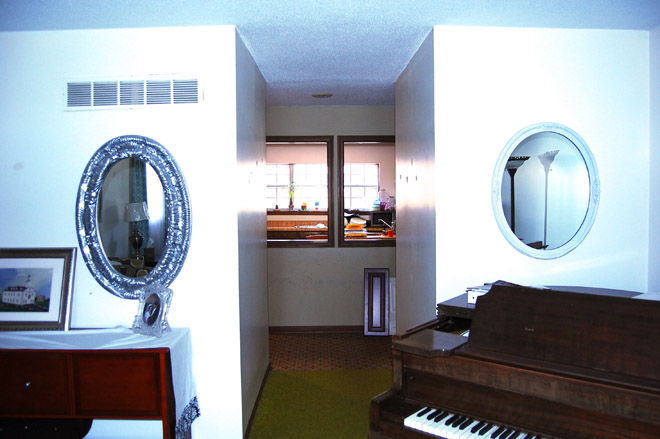
Here’s the view from the front door.  ( I primed the woodwork in here months ago and never painted it. I plan to paint the spindles and woodwork bright white, the walls a light greige, and to restain the wood tones espresso.  I’ve been half started on the woodwork for years….  Ha ha, that’s how you know this is NOT a decorating blog.) I usually keep the baskets under the table full of white blankets for looks, but with young people here, we ended up filling the left one with bubbles and sidewalk chalk since it’s convenient to the front door.

img_3599

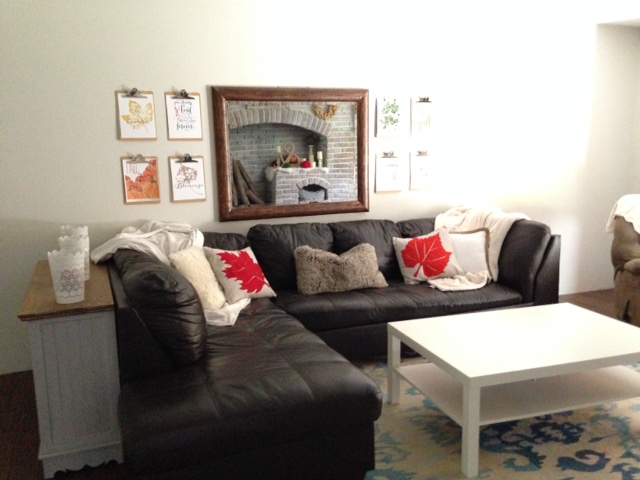
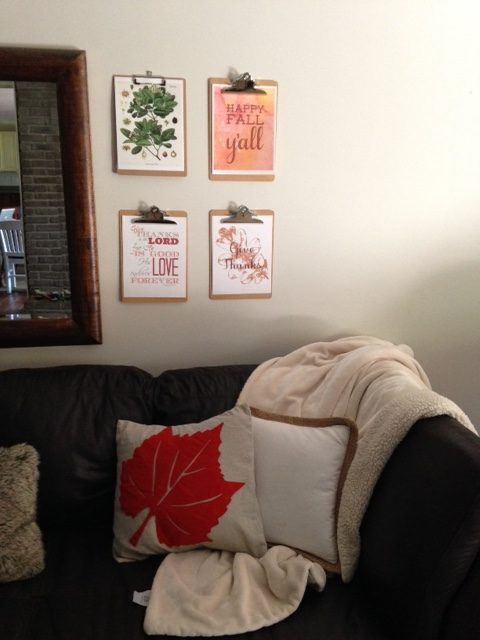
Across from the hearth is a little sitting area.  I bought the white lacy candle holders for Christmas (at Ikea) and loved them so much I never put them away.  I added a few fur throws and pillows, a couple of DIY leaf pillows, and fall themed printables for the clipboards.

img_3600

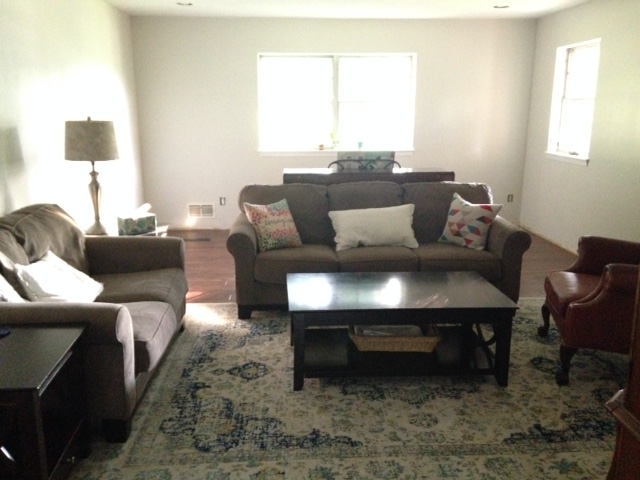
(If I had it to do over again, I wouldn’t buy a sectional this dark–BUT it fits our family, is super comfy, and the leather is exactly what I need for my allergies.  For the time being, I’m thankful to have it. When we knock some of the more important projects off our list, like a basement office for Darren, I’ll see what I can do about lighter furniture in here.) The cupboard behind the sectional holds all our board games. The coffee table is from Ikea and was only $40.  It has already taken a beating on the top.  I plan to add a stained wood top using this tutorial.  Then after a bit will move it to the basement family room (yet to be built) and build something more expensive looking, like this or this.

img_3601

This is the first year I’ve been able to pull together a collection of fall items from what I had on hand.  Every year for a LONG time, I would buy just 1 or 2 items that I thought I would hold it’s charm for me. Some were originally meant for Christmas or Spring. I prefer to keep things fairly low key, so it’s as easy to put away as it is to put out. Does fall decorating excite you or overwhelm you?

P.S.  I just saw the nester is opening her self-study cozy minimalist course.  This is the course I took spring of 2015 that CHANGED my life.  She’s opening the facebook group up to students which is what made ALL the difference for me.  I’m participating this year as I finish up my music room and foyer.
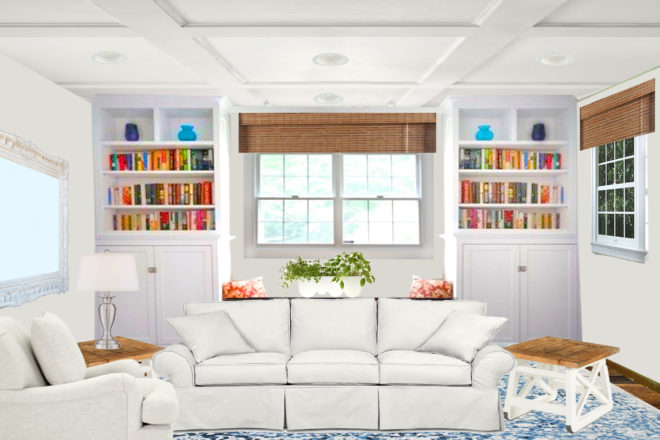
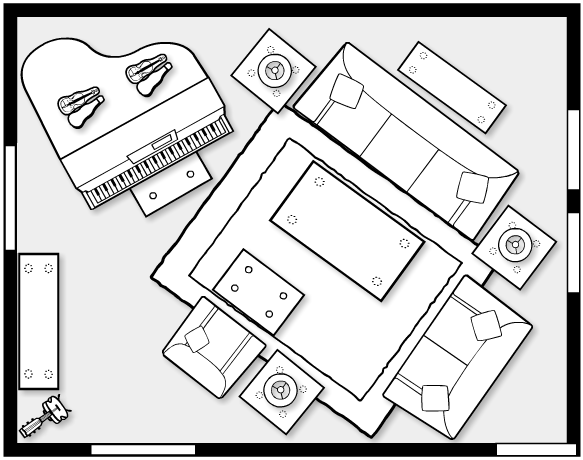
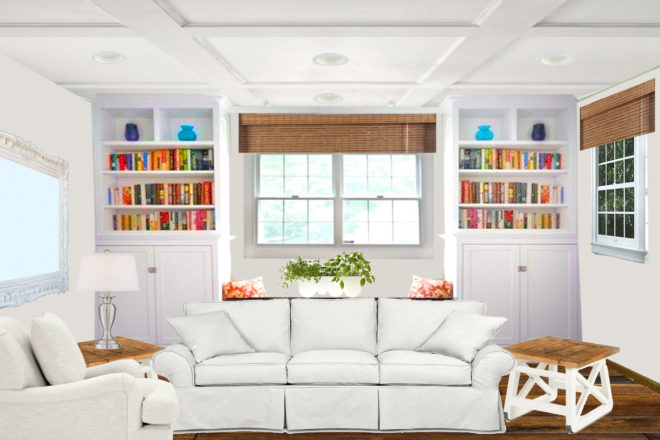
A Family Friendly Yard on a Budget

Our house has so many projects! My foyer has been primed but not pained for several months now and I’m still not done with my built in bookcases or trim in the living room.  Already my heart is turning outside.  We have a couple of gorgeous months ahead of us and I would LOVE to add a firepit and some swings to our yard and just hang out there with my people.

back-yard-before

Two weekends ago we piled our driveway full of brush and yard trimmings, revealed our raised beds and split enough wood for two winters. Then last weekend we built 4 more raised garden beds, and mulched around trees and pathways.


pathway to school

Here’s a close up of the bushy area to the right after cleaning up. The yard is looking almost pretty.  The two days working together as a family was really fun and bonding, except for the poison ivy that I found. It’s the city’s job to keep the fence clean 😛 We can work on our side, but the other side remains a jungle.  I suppose there’s more privacy that way.

under the deck

Darren is talking out loud about building a seating area under the deck.  I’ve been talking about it for years and he would respond with all the reasons why it was a bad idea.  Now, it appears it is HIS idea and I’m all for it. Above is what it looks like today, sigh.  There’s a LOT of work to be done.  But I’m envisioning removing the wall covering on the side facing this, and the side facing the yard to the right.  We’d like to leave the covering on the back wall, because that is the north side and blocks the worst weather for us.

Then I’d like a slew of comfy seating and eating areas where our huge family can gather.  (Just my husband’s immediate family is 28 people.)  Something with the feel Centsational Girl created here:

901fd840058babb0f75307a4df689358

This will be the most expensive backyard project on our list because we’ll need to jackhammer some extra footings that aren’t being used anymore, and bring in several yards of gravel to create a temporary floor.  Concrete would be ideal, but it would be around $10,000 to pour a spot this big.

c472ce7d082360464e48225a33f02e20

Here’s another inspiration photo from Redoingit.blogspot.com. They have a fabulous tutorial there on making outdoor curtains from canvas drop cloth and plumbing fittings.

how-to-build-a-diy-firepit-for-60

While we save up the cash for the gravel floor, I’d like to build a fire pit like this.  I go back and forth on the kind of bottom to put in the pit. The flat stones as shown here would make shoveling out ashes a snap, but we have a couple of bags of sand that the previous homeowners left and it would make a free floor that drains well.  The stone blocks are a lot more expensive in my area than described in this tutorial (more than double) but I have seen them on Craigslist recently (I was just too slow to text and they were already sold, sob.)  While we do the necessary clean up work, I’m going to keep watching for another good deal.

with-swingset

This simple swingset can be built for less than $100, even after modifying the plans to make it taller and wide enough for 3 swings.  We had a hard time figuring out where to put the swings with all the trees and tall back fence.  Darren finally had the idea of turning it sideways (we already plan to take out the tree right by the garden beds) so the kids would have more room to swing without hitting the fence.  It’s not as aesthetically pleasing to me as one turned the other direction, but I’ll be able to see it from the house which was really important to me.


A few things: Living Room Update etc.

I know I’ve been quiet lately.  I’ve been enjoying SUMMER with a slower schedule and time with my kids.  Here are a few updates.

  1. The hardwood floor in our living room is all finished!  I don’t have baseboards up and I haven’t started on the built ins yet.  But I did move the furniture in place just like it would be with the built ins there.  I want to live with it a little bit before I got through the expense and work of the built ins buy just to make sure I like the arrangement.  So far I really do!  You’ll notice there’s a rug down. It’s the one I bought for Darren’s office.  We are a long ways away from being able to use it for his office and I may pick something else for him then, or move it down and pick something else for the living room.  I love the rug and right now it’s the most affordable option since we already own it ;).  Everything is centered on the room, but the angle I had to stand to take the picture makes it look wonky.

Living Room before 2

Before

Living room during

Currently

Living Room afterConcept

(I’m rethinking the whole slip cover thing.  I’ll have to cut the back cushions off my sofa to make it work and it’s going to be a lot of work.  I still want to do it, just much later.)

2. I had a midlife crisis last week and bleached my hair patchwork orange. I don’t have pictures because it was too humiliating.  But it was mostly yellow with squares of orange and brown scattered through it.  My hair stylist’s son was having surgery that day so she couldn’t help me right away.  I wore hats everywhere, even to a wedding shower and denied all requests to take it off.  It was humiliating.  On phase one of the do over, she got rid of the orange and brown and I was GOLD blond all over.  It was horrifying.  The next day I was asked to lead the song service for the all area branch meeting.  I couldn’t say no because my hair was horrifying so I stood up there and sang away like there was nothing crazy on top of my head.  Three days later after multiple keratin and biotin treatments she added ash brown highlights and toned it all over.  We had to get pretty aggressive to get rid of the remaining brassiness and I was a little gray/purple for a few days.  It has settled down a little bit and now I’m REALLY blond, in a good way.  I no longer scream when I see a mirror, which is positive progress.

3. I have been healing up a lot over the last 2 months.  My hair has started to grow.  It has only been a week since the orange hair fiasco and I already have dark roots.  While dark roots aren’t pretty, I’m going to take it and love it since it’s another sign that my health is improving.  I started back to my Fit Yummy Mummy workout program, starting at the introductory level (the step before beginners….) and feel like I’m going to be able to finish this time.  While half my family is away at summer camp and my chores are reduced, I’ve been prepping foods to help with my goals.  I’ve made protein batter for pancakes and keep it in a jug in the fridge so I can cook a few fresh up in the mornings. I also froze protein shakes into popsicles molds.  It’s just almond milk and chocolate flavored protein powder, but having it in a popsicle slows down my eating process and is really fun. And I made a 4 serving recipe of Thai Chicken Salad and divided it into recycled Chic Fil A containers.

Thai Chicken Salad

If I make a family size recipe each time I cook something new, I can eat on it for awhile for no extra work.  When it’s that yummy I don’t mind eating leftovers.

4. My new washer and dryer have been in service for about a week and I love them!  They are HUGE.  One load in the new washer is worth 3 in my old one.  I used to do 3 loads a day and now I’m down to 1.  It’s the same amount of laundry but I can get through it in 1/3 of the time.


Trying on Area Rugs with Photoshop

Trying on area rugs with photoshop

The electrician will be here in just a few hours.  While we wait, my living room is in the virtual fitting room of internet rugs. For the before picture, I used a wide angle lens clipped onto my iphone to try to capture more of the space.  It worked, but the lines are off, curved and wonky, giving the room a lopsided, tipsy appearance.

The room is 20 feet long AFTER the built ins are in place so there will be more enpty space to the left than the pictures show (I blame the angle of the sofa.) I’m not aiming for perfection though, just a hint of reality so I can choose a rug with confidence.  It reminds me a bit of trying on clothes when I didn’t take time to put on my makeup, fix my hair, or wear enough spanx.  It takes more imgaination :).

The room doesn’t have proper pillows or art and feels rather stark.  I mounted some of our instruments on the wall to fill in blank space.  I think we would play more often if they were easy to just pick up and play, and amazon offers wall mounts for almost any type of musician. While I wait inspiration to strike on the cozy details, I’m going to ignore the mess and see if a rug strikes my fancy.  First no rug.  This view works best with my budget, ha ha.

Living Room Rug View no rug

Then the blue rug that was overwhelmingly the favorite in the last poll.

Living Room Rug View blue rug

And the colorful one that I find so energizing:

Living Room Rug View colorful rug

Here’s a new one that missed my search before because it’s WOOL.  It’s loops instead of tufts which sheds a little less, but still stains with food coloring.

Living Room Rug View irridescent medalion

Or a similar medalion print in deep rich blue.

Living Room Rug View blue medalion

Here’s a different blue rug that I like better, but it’s not on sale and REALLY pricey ($1649)

Living Room Rug View blue rug 2

Just for fun another pricey one ($800) in a herringbone greige.

Living Room Rug View herringbone gray

And while I’m pulling crazy dresses off the rack, that I would never buy, but secretly wish I would…. HOT PINK 😉

Living Room Rug View pink rug

and Terracotta floral

Living Room Rug View terracotta flower

When I see the right area rug, it grabs me and I know.  Sometimes it’s the 10th time I look at it, and sometimes it happens AFTER I’ve seen all the other options to be sure.  While the expense of an area rug isn’t a trifle to us, I know if I make a big mistake, I can sell it on Craigslist, or trade it with a rug ina different room.  I’m still waiting for that feeling to come. The Memorial Day sale is a really good one, but there will be a good one on the 4th of July too.  I don’t mind waiting if that means I’ll make a better choice.

I made a little video for you, showing all the rugs in succession.  Sometimes looking it at it like that makes it easier for me to choose!

Giant Feather Canvas

Feather Art 4
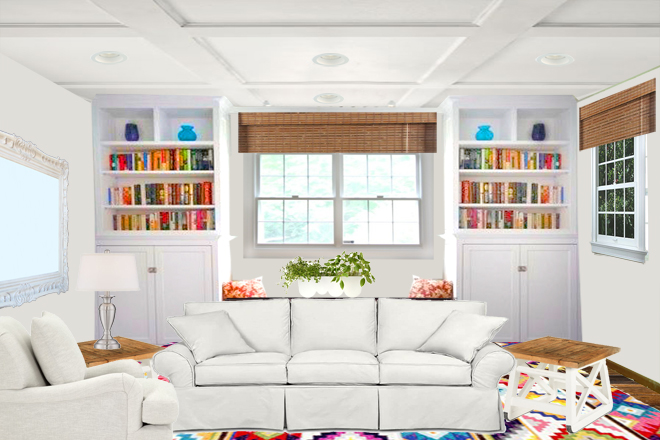
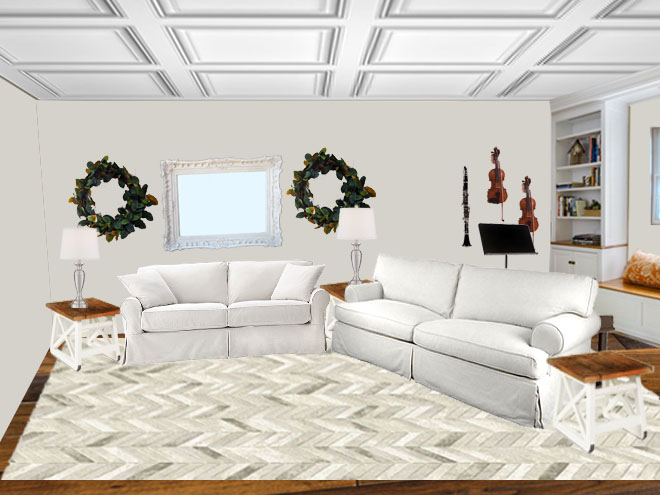
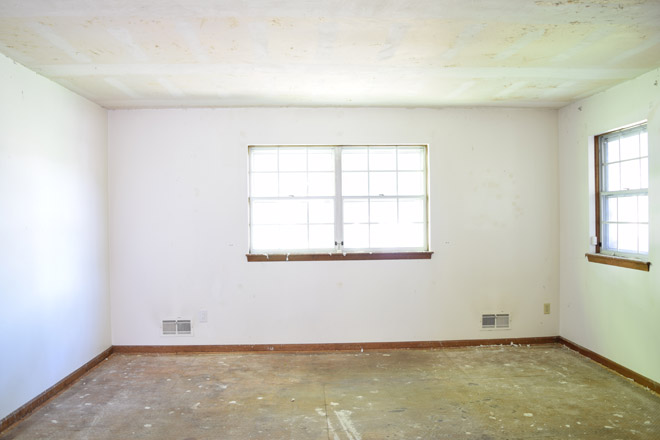
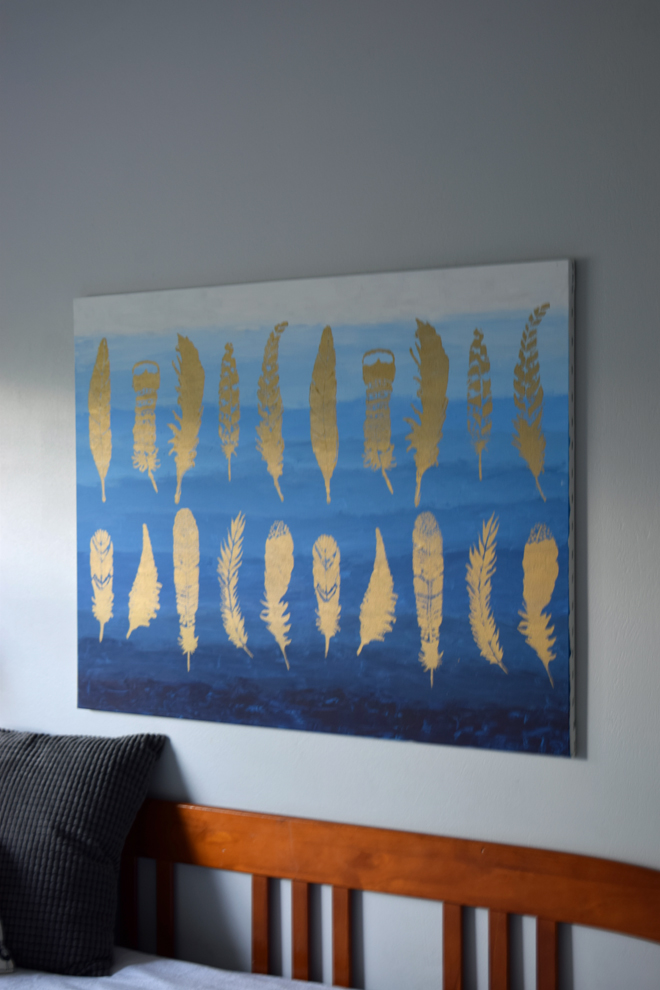
A gigantic white canvas scares me.  It is full of possiblities but begs me to choose just one.

I’ve been dreaming for years of what I would do when I got the nerve to buy a big blank canvas.  I have a pinboard full of ideas simply for a big blank canvas, but I didn’t have the courage to act on any of them.  Then my neighbor put a 30×40 canvas out at his garage sale.  For just $10 I could own it, still in shrink wrap.  So I bought it.  Step one, Dream.  Here I come.
Feather art 3

I leaned it against the wall in my room and refused to hear it mocking me. I wouldn’t make eye contact. I wouldn’t let it see my fear. Dust came.

Feathers-Stencil-Pattern-Allover-Feather-Wall-Pattern-1234

Cutting Edge Stencils invited me to look through their website and pick something to share with you.  I chose the Feathers All Over pattern.  Step two, Dream.  Here I come.

stencil-essentials-kit-stenciling_4

I set a deadline.  I told myself that if I hated it I could paint over it as many times as I wanted.  The stencil arrived gently rolled in a triangle tube. The stencil was huge and sturdy.   The packaged also included a high quality stencil level, brush and foam roller.  I  had everything I needed to begin.  1…2….3…jump….maybe tomorrow.

The deadline loomed and so did a fever.  I took to my bed and slept amid sweat.  My oldest daughter asked if there were anything she could do.  I offered her the canvas.  She and her friend mixed and striped the base with just one blue. Black made it darker and white took it the other way. I didn’t watch, I just let them do.  “Don’t worry, Kids,” I reassured.  “It wasn’t expensive.  It’s just paint.  If it’s awful we can paint over it.”  I gave them the courage I didn’t have.

They laughed and chatted while they painted and timidly invited me to inspect their work.  I ignored the splotches of paint on the sheet draped carpet.  It was perfect.  No longer white, the canvas didn’t mock.  It invited and encouraged.  I taped up the stencil and poured shimmery gold paint into a tray.  It was runny and old and separated.  I stirred it with the end of the foam roller until it looked uniform in the pan.  Then I paused.  This was too easy.  I took down the stencil and measured and centered.  I had it right the first time.  With new confidence, I filled the roller, then matted it off on a clean part of the tray.  Rolling over the stencil, the paint refused to cover the rich blue ombre.  I rolled again, covered again.  It twinkled and winked.  I overlapped the stencil beside the pattern and rolled again.

Then it was done.  A few minutes of labor and the dream stood before me in it’s flawed glory.  The too thin paint, gone over too many times, stood in the gaps where blue should have been.  My 8 year old son stood beside me and breathed, “It’s beautiful.” I pointed out the ooze and he said, “That’s why it’s beautiful.  The flaws tell you a human being did this.  It adds value.”

Big Feather Canvas

While my teenage son was away at Scouts,  I snuck in his room to make ready the surprise.  Armfuls of smelly socks and dirty dishes moved to appropriate wash stations. New sheets, fluffed up feather pillows, dusting spray and a vacuum cleaner, removed the stress of the school year.  Two nails, measured with one eye, made a resting place for original human art.  The canvas asked for one thing more, a ribbon or strip of wood to hide it’s stapled edge. I promised I would, but not yet.  The boy would be home too soon….and then he was behind me, gasping his delight and approval.  100 plans came to his mind to tidy up more and decorate more.

The painting teens made a little video of the ombre backdrop.  I tried to film the stencil rolling, but apparantly I turned off the camera when I thought I was turning it on.  It really was just like rolling paint on a wall.  I only wish I had used less paint, or thicker paint and let it dry between coats.


Nailing Down Some Living Room Details

I have a really special art project for you tomorrow, that anyone can do, even without artistic flair. I’m partnering with Cutting Edge Stencils for the project and my kids helped make it.  It’s not perfect, but we love it and can’t wait to show you…tomorrow ;).

2016-05-23_14-51-39

Over the weekend I started using Excel to write up a source list and budget for my living room project and reality hit me full in the face.  I have enough money saved right now to pay my workmen, and not much more.  That means the coffered ceiling and my rug will have to wait. I’m listing some stuff on ebay and craigslist to see if I can earn enough for the wood for the built-ins.

I made a little video for you to show my process of setting a budget for a room:

The lack of cash doesn’t stop me from dreaming though!  I like to have the ideas decided on, so when the cash comes available and the DEALS roll in, I’m prepared to take advantage of them.  There’s nothing worse than a panic of “It’s on sale, but I don’t know which one I want!”  I don’t like to be pressured into a too quick decision on something I might have to live with for years.

I’m looking for a new area rug for the living room since the old one has found a new home in my office. My first area rug was 100% wool.  I chose wool, because it was natural and thick and plush.  Plus my husband’s grandmother bought wool carpet for her home 60 years ago and it still doesn’t have paths worn in it like synthetic carpeting would.  What I didn’t count on, was the SHEDDING.  It’s like we have 5 cats and the fibers make dust bunnies all over the house.  On top of that food coloring is permanent wool dye.  So when the toddler came wandering in the room with an orange popsicle dripping behind him, there wasn’t anything I could do about the stain it left behind.

200ECCR04A
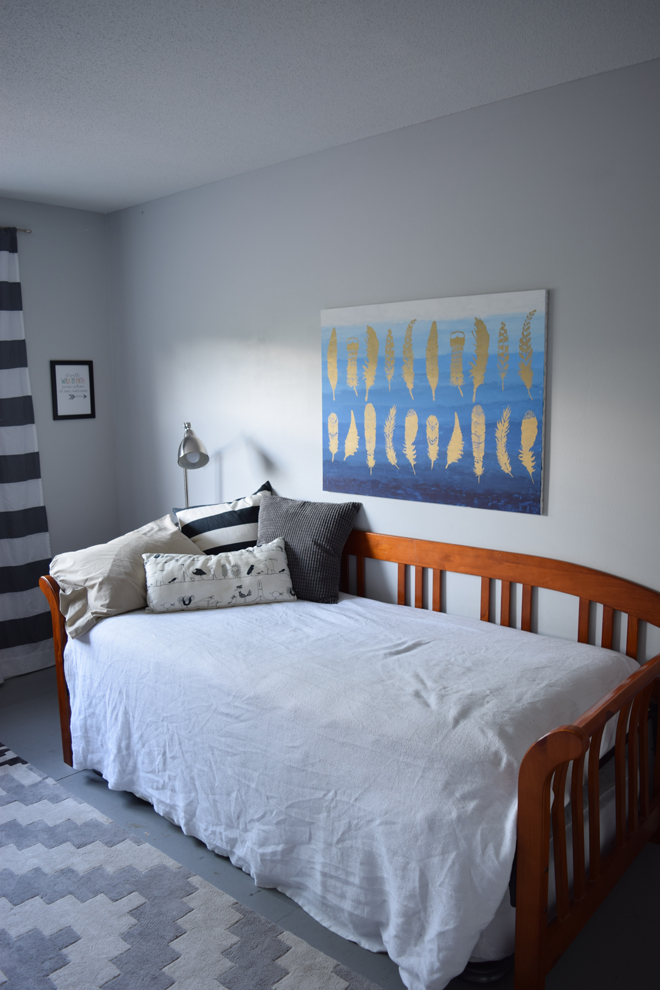
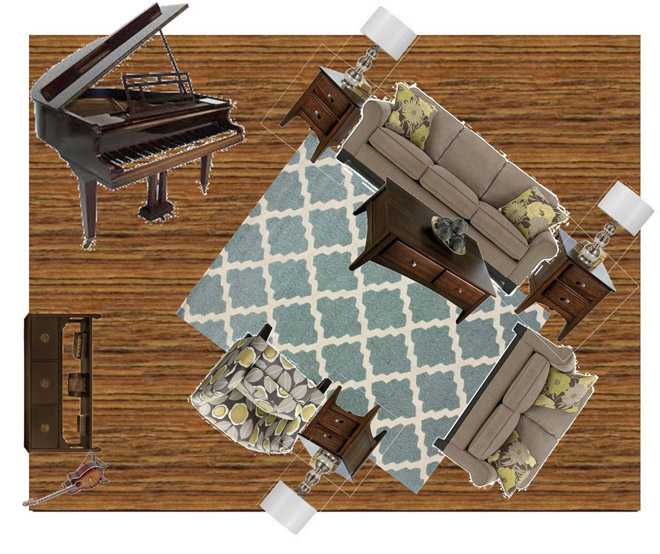
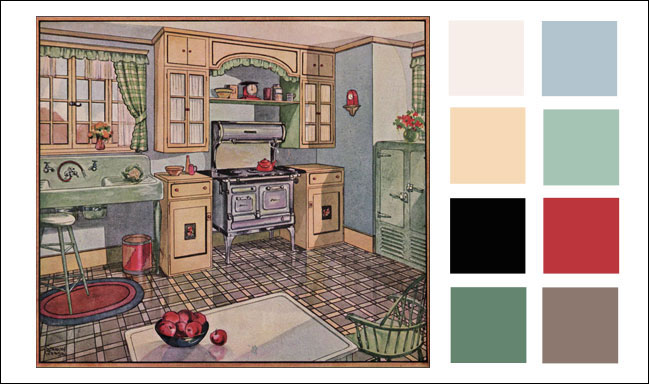
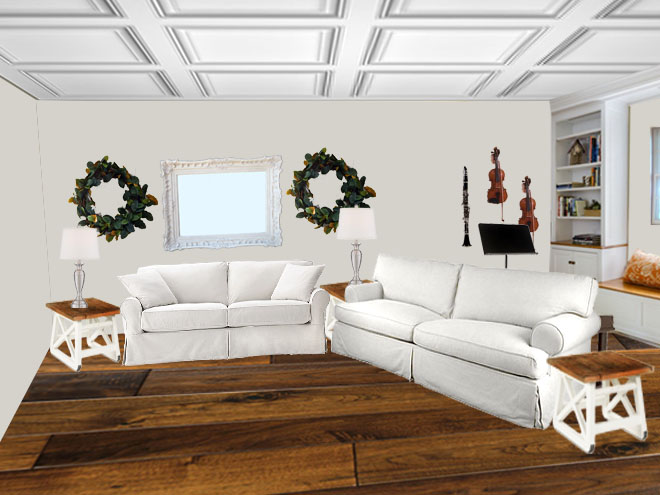
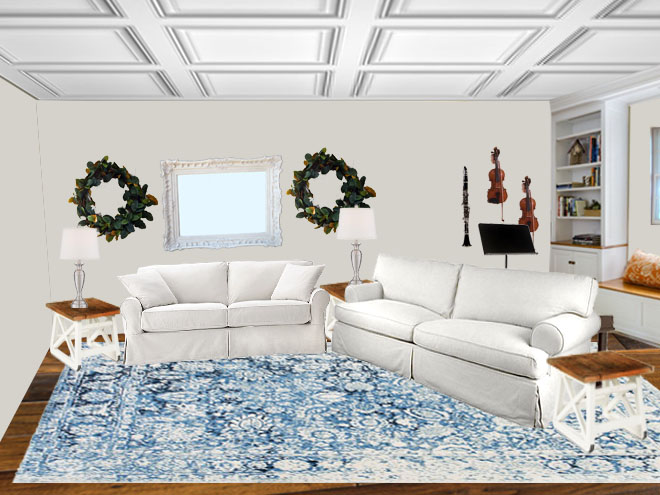
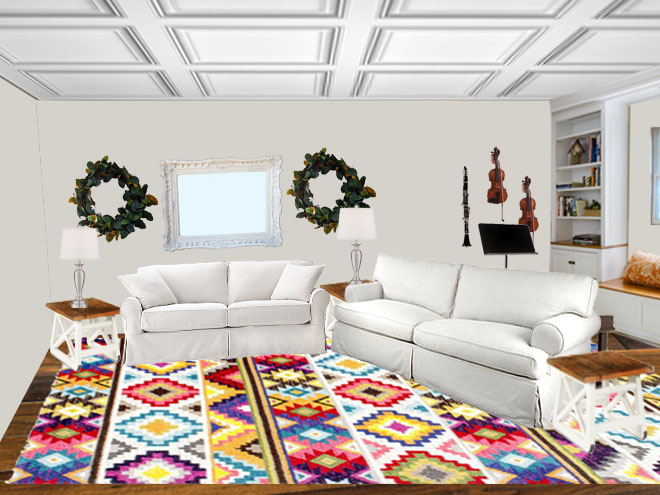
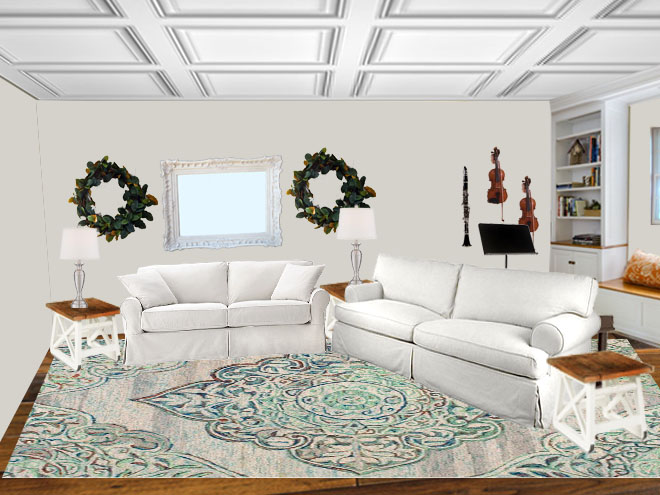
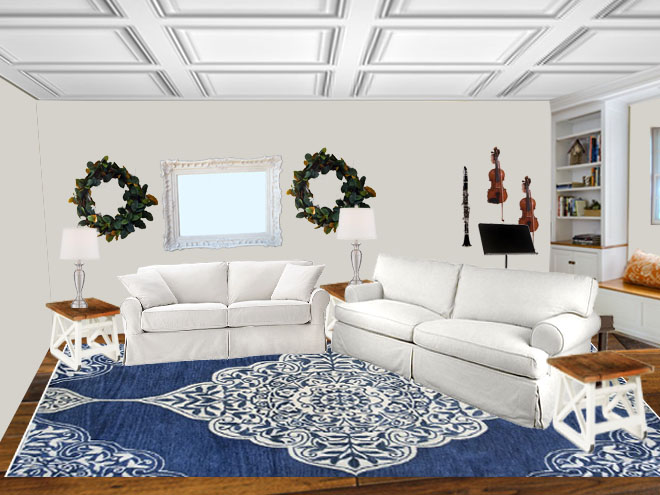
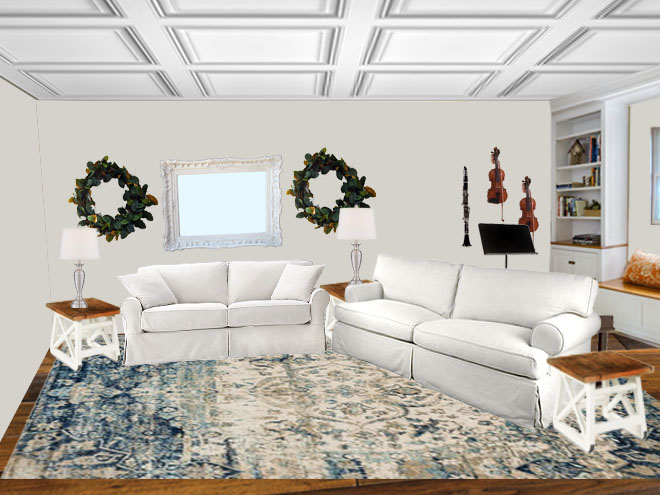
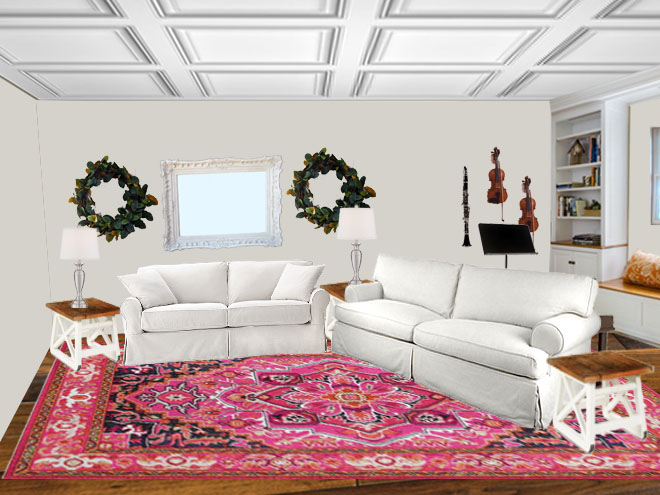
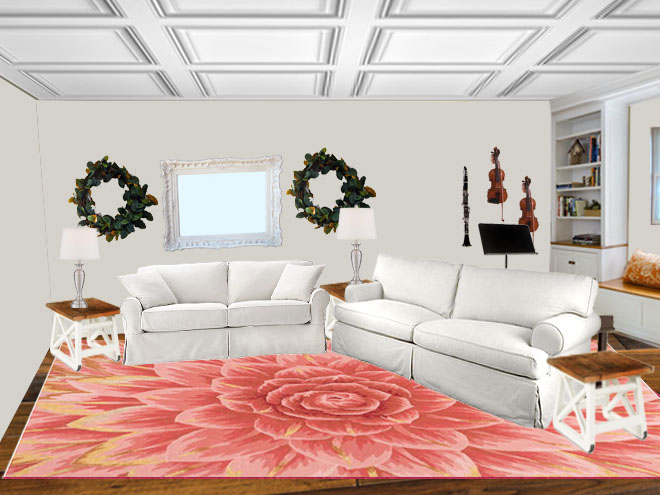
I’m shopping for a syntheic rug this time.  I love the bold colors in the Albina Ritzy Retro Rug, but am not sure how long I will love it.  I tend to get tired of bold patterns really quickly, but this one is tempting. It’s on sale for Memoral Day for just $245 for a 9×13.  That’s a really great price for a huge rug.

200GLAR05A

My other favorite is the Aerial Decorative Plumes Rug.  It’s a little pricier at $320 for a 9×12. But the more subdued color pattern might be a longer lasting favorite for me.  There’s not much rug to show in this view of the living room, but here it is with the blue rug:

Living Room with Rug_edited-1

and with the colorful one:

Living Room Battens_colorful rug

I’ll see about making a different view of the room where more of the rug shows.  I don’t think there’s enough here to make a decision about.  BUT I love how the multi-colors work with the books on the shelves.  And I equally love how calm the blue rug is in the room.

shanty sideboard

I found a tutorial at ana-white.com for bulding my built-ins!  The original is 73 inches wide, and I need each of my units to be 48″ wide. I’ll only need to adjust the lengths of the horizonal boards and will use 2 doors instead of 4.  Also, I’ll construct the cabinets as stand alone furniture like the plans suggest, but I’ll wait to add any trim or crown molding until it’s in place in the room.  That way the baseboards and crown for the room can continue seamless around.

shanty sideboard in white

Here’s another version painted white with gray glaze.  I plan to do mine crisp white.

Do you have a preference for which rug I choose?  Is there another Rug that you think might work even better?

A Living Room Plan…Maybe

This week’s frugal Friday has been pre-empted by the need to finalize a room plan before the electrician comes next week!

I need to commit to a design so I know where to place the lights, and I’m hoping you’ll look at this and help me see the flaws before it is too late.

Here’s a 36 second video showing the changes.

For those who don’t like video, here’s the before photo again.  You’ll notice there are vents and electrical to work with. I plan to use this tutorial.

Living Room Before 3 compressed

and here’s what it would look like with the flooring paint, coffered ceiling and built ins:

Living Room after

For those who prefer video, I made a little longer one with verbal explanations. The piece behind the sofa is our little piano .  It’s about 3 feet in front of the window seat to soak up all the light from the window and make a little sitting area on that side of the room. That should center the larger seating area across from the wide entrance into the room from the foyer.  The few here is as if we were standing in the dining room/kitchen looking in.

Darren said if I go with the built ins, I need to make them so they will be removeable with minimal damage and be useful as furniture in another area.  My research told me to place recessed lights 3 feet from the corners and then 4-5 feet apart after that…..so would that be from the room corner so if I remove the built ins it still looks ok, or from the corner of the built ins after they are finished?  What would you do with the lights?

Living Room Ideas

My electrician is coming early next week to install recessed lighting in the room.  Before he comes I need to make some decisions about the direction the room will go, so I know where to put the lights.  Currently this is our music room/formal living room.  It’s where I take grown up company when we want to be able to hear each other over the noise of the children.  It’s also where my children practice the violin and piano, and where I teach voice lessons.   I could see it turned into a formal dining room at some point.

The room is approximately 20 x 15 with 8 foot ceilings and 2 small windows.  The smallest window looks out onto the covered front porch and never gets direct sunlight.

Valentine Entry

The only architechtural interest in the house is a beautiful curved staircase. There isn’t any crown molding, or interesting wood in the rest of the house.  I’d like to fix that.

Here’s what I’m starting with. It looks nice and bright because I used a tripod and a really slow shutter speed to grab as much light as possible.Living Room Before 3 compressed

I’m definitely putting crown modling in the room, but am wondering if I should add a little more interest with a faux coffered ceiling?  I can use 1x4s to add texture without lowering the ceiling very far.  I’ve seen tutorials that just use the 1x4s but I like how This Old House adds small molding to the inside edges for a really finished look.

CI-Greige-Design_kitchen-with-coffered-ceiling.jpg.rend.hgtvcom.966.644

http://photos.hgtv.com/photos/viewer/coffered-ceiling-/coffered-ceiling-in-airy-white-kitchen 

Coffered Ceiling

http://www.thisoldhouse.com/toh/how-to/step/0,,20745179,00.html 

I’m thinking about building in bookcases on either side of the larger window with a window seat between them.  They would be floor to ceiling in white.

built in book cases

http://sandandsisal.com/2014/11/playroom-storage-ideas.html

b2ac1d7f9db287cf5feb6890fbb55b98

http://www.onegoodthingbyjillee.com/2014/12/gift-ideas-guys-guy.html

But with a deeper bench seat like this:

6c3a2bd778a6814d1703c2a3c3798b4a

http://www.homedit.com/62-home-library-inspiring-design-ideas/

040042267b0dfb8a3cdd932bc02010f7

http://www.bhg.com/home-improvement/remodeling/before-and-after/ranch-house-remodel/#page=9

Like this but white.

Here are my 2 delimmas with the built ins….I have ducting and electrical on the wall (but I think I could pop those out to the front of the built ins pretty easily with a solid platform) AND they would limit my tall and wide dramatic curtain options.  I think I would have to go with a simple bamboo shade hung just under the crown molding….I’m ok with that right now.  But will I be ok with it long term?  Built ins are not a temporary whim.

So why even consider the built ins?  Here’s my reasons for them:

1. Storage (most of our books are still in the attic from when we moved 4 years ago)

2. Architectural interest

3. Cozy up the room (it’s really big and I think this would make it seem more welcome) It would also give me a reason to pull the sofa away from that wall to bring the conversation area closer together.

What do you think?  Would you do the faux coffered ceiling?  Would you put in built ins?


It’s Living Room Demo Day!

Hello!  April and May have been some crazy months at the Coffman house.  Today is the official last day of school for the public school Coffmans. Homeschooled Coffman will be done in another week, and private school Coffman has 1 1/2 more weeks. The next day I will lead my choir one last time for Graduation, and then I’ll be a FULL TIME blogger.  It’s hard to wrap my mind around.  I swing between being ecstatic about the possibilities for the future and crying about the loss in the transition.

Garage sale

Last week, we had a garage sale which raised almost $400 towards our living room project. We have so many projects on the list that I didn’t know which one to do first.  Then the grand piano we were babysitting found a forever home, and it the living room it used to live in looked possible!  We already have the flooring for that space, so the cost of doing the room will be less than any other space we could tackle.  It was an easy choice.

Living Room before

This room is attached to our kitchen/dining area through a short hallway.

6 Living_Room_3803

This was the original plan for the room 4 years ago, made on the Nebraska Furniture Mart website.

Living Room

Then filled in with color via powerpoint.  I was able to buy the rug and furniture back then and live in the space along with the 1971 avocado green sculpted carpet.

Living Room before 2

Before that the room was our bedroom!  We had no doors for privacy and the front door opened up right beside us. There are no light fixtures in the space.  That plus tiny windows and a low ceiling, made it feel very cave like.

I’m making a brand new plan for the space and I hope you’ll share your opinions.  Our rug is now in my office and our furniture has scentsy wax on it and is full of nicks and dings.  Even the “new” stuff needs some sprucing.

For now it’s demo day!

Demo Day living room 4

Our missionary friends came over and helped us remove the popcorn texture.  It was REALLY messy!  I took photos and texted them to their Moms.  They don’t get to call home whenever they want, and I wanted their moms to know what hard workers they are.

Living Room Demo Day 5

Then I fed them a really big lunch.  By using the slow cooker to make the southwest chicken, the rice cooker for the brown rice, and the pressure cooker to make the dry beans, I could work beside them the entire time and still give them a home cooked meal for lunch.  We had burrito stacks with chips, rice, beans, chicken, lettuce, cheese and condiments. After lunch, they helped me remove the carpet.

Living Room Demo Day 2

Living Room Demo Day Living Room Demo Day 3

Living Room Demo Day 6

The trash service will take the carpet if it’s bagged. So we cut it into small enough pieces that it would fit in trash bags and stacked it in the garage to wait for trash day.  I don’t know about them, but I’m exhausted. It’s a good thing I can make design plans from bed :).

Kristen’s Living Room Makeover

Yesterday, I showed you Kristen’s School Room.  Today I want to show you her living room.  Just for a reminder, this is her color scheme and we’re trying to fit in a 1927 time period:

28ah-kitchen

Oh the arches!  This house just oozes with charm. You can see how it is adjacent to her sunroom and joined by a nice large cased opening.  Can you just imagine seeing that darling school room from here? See the sitting area on the left with the 2 chairs and the side table?  That’s where I imagine her piano will go. Read more