I’ll never forget the first time I walked down the basement stairs in our home. There was a pair of mannequin legs leaning against the wall. I saw them out of the corner of my eye and screamed bloody murder before my brain could actually register what was happening. It was a good thing I didn’t know about the rats yet.
The basement was weird all over, including a ceiling covered in fluorescent lights. You’d need sunglasses to be in the room if they were all on at once. The designers made that improbable by controlling the lights in sections with 3 switches installed 15 feet apart. We’d prefer to be able to light the whole space with an appropriate amount of lights with one switch close to the entrance.
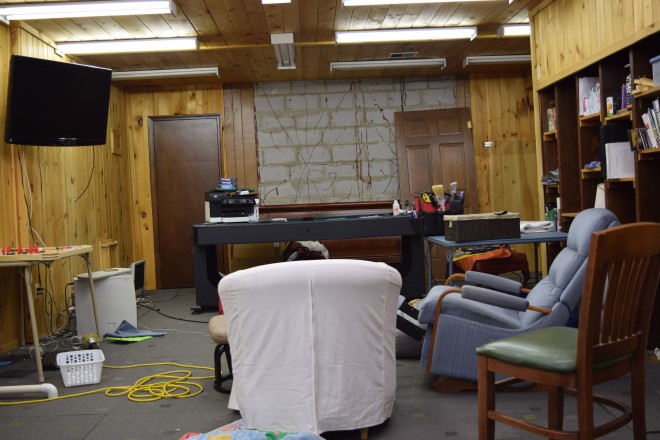
The basement has been paneled twice. The first time they used classic 1971 dark paneling which you can see to the right of the door. They covered the dark paneling in 1992 with unfinished pine. There is a toilet, sink, and shower in the basement….each in it’s own space spread out over the whole floor. There’s not one bathroom with all three. If you want to wash your hands after you pee, prepare to take a walk. Even better, they designed the toilet area to look like an outhouse complete with shaker shingle roof and newspaper insulation. We’ve already started taking that down. The shower is behind the brown door you see to the left. Also back there is a bonafide sauna with bench seats and steam rocks. So cool….until you realize that it’s probably the source of the mold. To take care of the mold we had to rip up carpet and part of the pine paneling. I didn’t know about non toxic solutions like Solumel or Thieves oil at the time, so used some harsh chemicals to do the clean up. The basement was ugly before, but now it’s both ugly and torn up…. We’ve used carpet tiles to make the room partially liveable, but I have dreams for so much more.
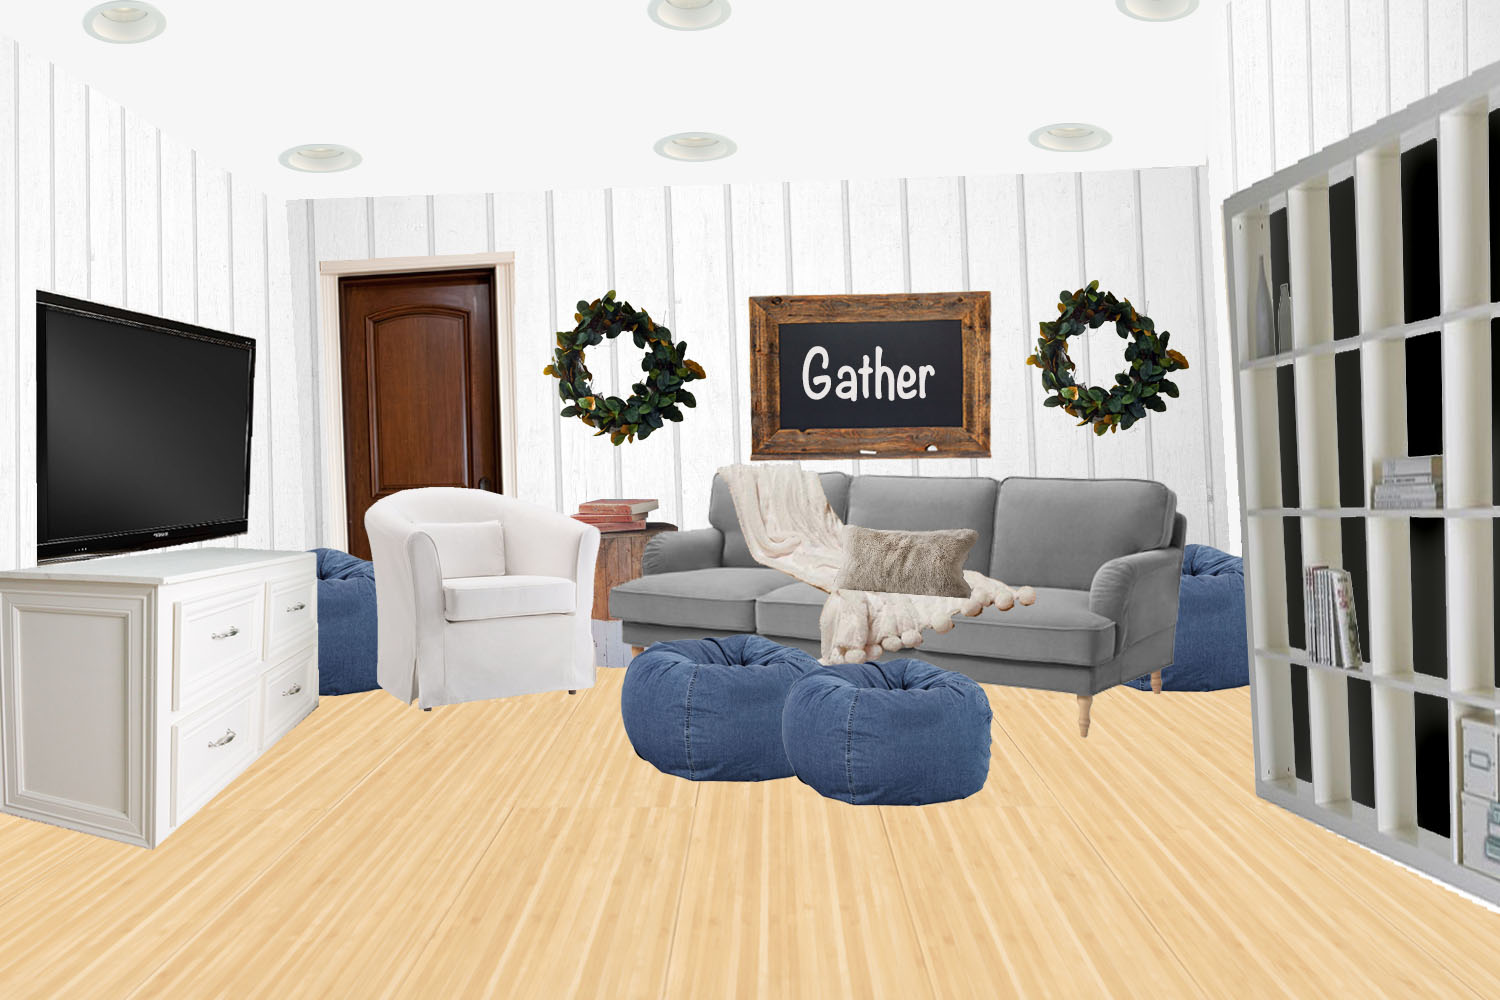
Here’s my first stab at a concept for the room. The kids love their pool/air hockey table that was left to them by my late Aunt after losing her battle with lung cancer. I have plans to move it to an adjoining space to open up this section for seating. I’d like to use this half of the room for movie nights, to host the church youth group, and for extra areas to expand into when we have our family over for holidays.
The other half of the room is a workout zone with free weights and some machines. Darren wants a smooth bamboo floor down here for the girls to practice ballet and rubber flooring where he lifts weights. It’s better for that if there isn’t an area rug (though I would normally include one to warm up the space.)
I love light, but there’s way too much light down there. We’ll need to sheetrock the ceiling to be able to remove all the fluorescent lights. In the process we’ll add some recessed lighting. That should make the ceiling feel about a foot taller.
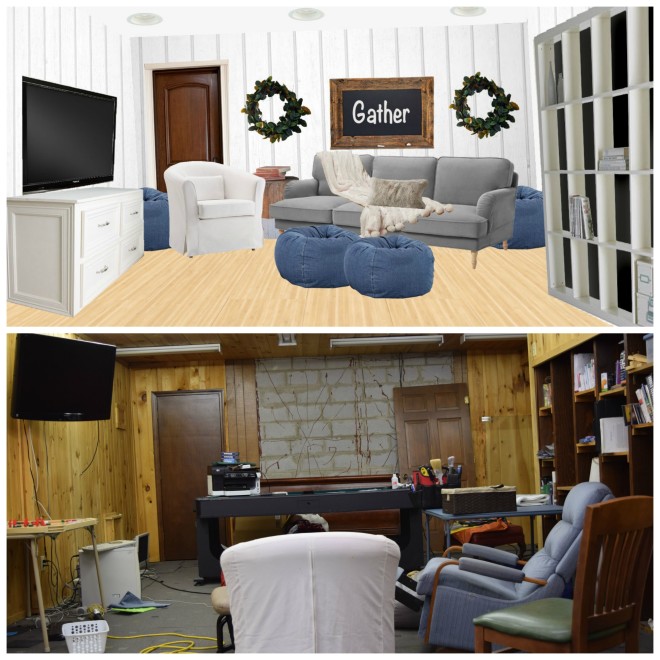
Hopefully there will be some useable wood left from the ceiling to fix damaged areas in the rest of the room. Then we’ll paint the paneling white. It’s not only a big money saver but I love the texture of painted paneling. We already own the Tullsta white chair and have some stumps hanging around to be a side table. The sofa is Ikea’s Stocksund. Foam filled denim beanbags from uglysofa.com extend the seating for kids, but are easily stacked up in the corner when it’s time to dance. The wreaths are DIY Magnolia wreaths, but I’m not sold on the wall decor just yet. After painting the built in shelves white, we’d like to use them to store DVDs and family games.
What do you think? What would you would change?
I love your “weird” house and all of the stories. (Rats, ha ha.) I mean I love that you are being frugal and patient and making it all worthwhile. It it weren’t for the creepy legs, weird lights and rats (and the foundation etc.) it would have been so much more expensive. It’s very cool how you are redoing each room and I love all of the character. Right now I’m looking into adding a sunporch and porch onto our 1920’s farmhouse and I want to do it incredibly frugally, mostly to save money, but also, I like the creativity and challenge that it brings to do it inexpensively. (My 18-year old daughter had a brilliant idea of tying my calories burned and not eaten to amount I allow myself to spend. Woohoo. Even better for weight loss AND for the project.) Anyway, your ideas and your home and your taste are all so inspiring! Thanks! Liz
Liz, your house sounds darling! I agree that it’s more fun to work within limitations of a budget. I love the calorie idea…that would help with motivation on both sides!
I think black trim along the top where the ceiling & wall meet would look great. I’m starting to see more black trim instead of white & I love how it grounds the space.
Tanya, I love crown molding. That’s a great idea.
It looks beautiful. The chalkboard ties it all together in so many ways. I’m so interested in learning about your process, is it very labor intensive?
Hi Ann, I do spend a lot of time on the drawings, but it’s really fun. I took a class from Shootfly Shoot to learn how to do it and it was worth every penny. I save so much money by creating the space virtually and drilling down the design before spending money on stuff that won’t work in the space. If you are interested in their classes I have an affiliate link in the sidebar :).
Love this! It’s white, but it is kid-livable white. And I never thought I’d say this even three or four years ago, but I love white. 🙂 I’m looking at painting my own built-in and thinking of making the back of them a color pop or using some of that geo wallpaper stuff from Target. Because even though I now love white, COLOR!
Yes! I love white but color too. Such a nice contradiction. I love the idea of a pattern on the back of your built-in. If you do it on a piece of cardboard cut to fit the space you can pop it out and change it on any whim. Even using fabric and tape (or hot glue) if you want.
Love the brighter, inviting room colors and seating! Only suggestion would be to move the white
chair away from the flow of the doorway to the other side of the built-in bookcase. But, maybe you
had to picture it this way to get all the pieces in?
Lee, That’s a great thought. We never use that door. It’s super creepy back there and I use the shower area to store my garage sale items while I wait for sale time. I do have the chair pulled up far enough to be able to open the door in case anyone’s crazy enough to go back there. We have dreams of turning that creepy space into a spa bathroom and restoring the sauna and then we’ll want access for sure. It’s a super expensive project, so I’ll have to be a better business woman first.
Such a cool space! Love the e-design! The colors are great-very inviting! Thanks for linking up at #HomeMattersParty
Thank you for visiting, Michelle, and for the encouragement! If only getting the space to look like that were as easy as making the picture was 😉
What is up with all the fluorescent lights? Why do people do that? The house we bought last year had the same kind of thing in the basement, and in the upstairs living room in the addition. Fluorescent lights everywhere!! And not even wired in properly. Just strips of lights, hung on the ceiling, plugged in to wall sockets, with cords running across the ceiling and down the walls. Did I mention that to turn them on, you have to find the right little switch on the proper cord?
Okay. Rant over. 🙂
I can totally relate to wanting them all gone, and a more useable lighting solution. 🙂
Thank you for all the ideas. This is some great inspiration material for me. I love seeing what you’ve done with your home, and how you do it frugally. Keep up the great work!