Because dust means progress. I know we’re making lots of progress, because DUST is everywhere!


But the sheetrock is done and as soon as I get this mess cleaned up–the painting can begin!
Because dust means progress. I know we’re making lots of progress, because DUST is everywhere!
But the sheetrock is done and as soon as I get this mess cleaned up–the painting can begin!
1. The Drywall guy came today. I love the feeling I get when I see that the holes are filled in. He’ll be back tomorrow to tape and thinks it will take him all week to finish skim coating, drying and sanding. Maybe I can paint on Monday? I’m breathing again.

When I took the popcorn off the adjoining family room, I found a small spot of black mold underneath. So we decided to cut out that section. Look away if you have a weak stomach.

This pile fell down–which was mostly made of racoon feces. Not cool. We knew this house needed help when we bought it, but have had a few extra surprises.
2. I’ve been thinking a lot about frugal living lately and have come to the obvious conclusion that too much stress cripples my ability to think and act frugally. And being organized helps me be even more frugal. Simplify, simplify–my motto for today.
3. Why would someone pay $395 for a Burberry scarf, when you can get this one for $7? I bought the $7 one, it’s very nice. Sometimes I think the phrase, “You get what you pay for,” is stupid. I mean, I don’t mind paying for what something is worth….but $395 for a scarf? Really? Am I getting that much more for my money?

And what about this purse? A used Chanel handbag with scratches on the buckle and creasing on the leather from “mild and ordinary use.”

Yep, it sold for $3,895 plus $35 shipping. Um, that’s how much we are saving for a used car for my husband. I’ve been thinking about this way too much and I still don’t get it. Even if I had that kind of money to throw around I know a really awesome clinic that I’d rather give it to.
4. And my High School choir is going to sing this song for our Christmas Concert. I know the composer–he’s amazing. And I was privileged to sing in the choir in this video:
When my choir heard it (while following along with the music) they said, “We know the man that wrote this. That’s Dr. Smith. He used to work here.”
I forgot Nathan had a PHD in music, because we are good friends. The kids’ statement reminded me what big shoes I have to fill in my position at the school. I really lean on Christ every day that I’m there. And I spend a lot of time at home researching the best techniques and getting advice from true masters in the field and yet I feel so inadequate. It’s in those moments that I’m reminded that God chooses weak vessels to do His work, and then when results far surpass all our expectations, there is no mistake where the Glory belongs. I have to stop freaking out though! God doesn’t want me to worry or feel stress but to trust Him completely while I do my best and let Him make up the difference.
Need. Water. Drywall.

We are challenged right now, getting our drywall guy to show up. Or call us back….
Our friend started the drywall process for us and I love his work and how that arched doorway is shaping up. He is too busy or I’d hire him to finish the job.

So in the meantime, I’m scraping more popcorn ceilings. And trying to hold it together for the family.

Soccer, ballet, violin lessons, piano lessons, tutoring, teaching voice…..IT has started. The crazies are here and the fear that gave me hives last spring has come true. That our kitchen would still look like this when the crazies come. I’m ready to bake fall cookies and homemade bread. I’m ready to have family dinners around a table and look at each other and talk.
But for now I’m being grateful. Grateful for this huge house that was ugly enough that we could afford it. Grateful for the kids to fill it up. Grateful for just enough money to do a project like this. Grateful for friends who will come and help. And for plenty of food; and air conditioning, for the kids’ school and the best job in the world I get to do there, for boxes of real hardwood floor and a 6 burner gas range ready in the garage for their moment to come. And that we are healthy and in love. Somehow remembering what I have to be thankful for makes the waiting and the longing and the taking forever bearable one more day.

Monday, I came home from my teacher meetings (Which were amazingly wonderful for reals. It is very possible that I have the best job in the world.) And Darren met me at the door with a huge silly grin on his face. Then he grabbed me and swung me around and said, “How was YOUR day?” As if he wanted me to ask, “How was YOUR day?” Right back.

Heather’s official birthday is tomorrow–the first day of school. So she ate on a leftover plate from Darren’s party.
So I did. And guess what?! Yep. Our kitchen passed inspection and we got the thumbs up to put up dry wall. So Wednesday after my last round of teacher meetings, we hooked up the utility trailer and bought 12 huge sheets of drywall. They are stacked in my kitchen right now waiting for Saturday’s installation :).

So when do we eat?
So along with this great news is a super easy recipe for you. It’s perfect for an emergency speedy family dinner–and works even if you only have an electric skillet and microwave to cook in. If you want to reduce the carbs use the glucomannan option and top the dish with parmesan mashed cauliflower instead. If you have extra time and a kitchen, you can top it with real mashed potatoes instead of instant.
Ingredients
Instructions

From periodextensions.com.au
When we thought about our kitchen and master bedroom remodel, we thought about how much we were willing to spend not how much we “ought” to spend. We committed to spending cash and not putting anything on credit cards (made easier since we don’t have any :).)
We had to wait a year for our previous home to finally sell and when all was said and done we had about $42,000 to work with. Typical remodels of this magnitude cost $100,000. We knew that meant we would be doing more of the work ourselves and bargain shopping for materials.

Even though we got it at an amazing price, our home is in an affluent neighborhood. So whatever we did we wanted to be quality. Real stone counters, real wood floors. But that didn’t mean we decided to pay high end prices for our high end stuff.

To help make budgeting easier, I opened a clean spreadsheet in excel and brainstormed a list of things that we would have to spend money on. Then I researched via the internet what average things cost and dropped a number in.

Here’s an example. The center column with numbers in it is stuff that comes out of the $42,000. The stuff on the right are things we can do much later as we save up money for it. The blank lines are for things that we will do ourselves or are budgeted in a lump with another line. And the negative number for tearing out cabinets means I got someone to pay me for the privilege of tearing them out and taking them home. (Slick, I know ;).)
This is just a snapshot of the whole project. We have other rooms included in our $42,000 budget. The bottom of the middle column is set to automatically sum so I can see if we are on budget or not. As soon as we spend something, I plug that real number in to make the budget more accurate. As always, my goal is to spend less than budgeted to make some room for extras at the end.
By budgeting this way, I could see right away that either my wood look tile floors or gas range were going to have to go–possibly both. (We found a Cragislist range and traded in the tile for real wood that can go through the whole main floor of the house.) I also saw that things like drapes, area rugs, and furniture might be years into my future, or come out of extra money that I earn by selling stuff or spending less on other budgeted remodel items.
How about you? Have you planned out a project big or small? How did you do it?
1. Filled a pinterest board with all sorts of ideas and dreams for inspiration

2. Decided on a design and layout. Hired an architect to draw the plans and an engineer to double check his work to make sure none of the walls that we were taking down were load bearing. This drawing was made by Cabinet Giant.

3. Gathered price information on our appliances; plumbing; electrical; drywall; flooring; cabinets etc. Reworked our plan when we figured out our first flooring choice was way too expensive. Our first cabinet bid from Lowe’s was $30,000! Then we went to CabinetGiant.com and did basically the same design for $7,000. We had used their cabinets before so knew the quality and weren’t nervous about that. Also, I dreamed of an $8,000 6 burner viking range. I almost scrapped that dream until I found a used one on Craigslist for a fraction of the price. I <3 Craigslist!

4. Brainstormed a work list of all the tasks big and small to complete the remodel and then put them in chronological order. This included calling around for pricing and ordering a dumpster. Then managing all the demolition tasks into the one week we could keep it before being charged extra time fees.

5. Assigned a person to each work task. I was the most available as far as time goes and the least skilled. While my husband is most skilled but least available (since he works full time; runs our Cub Scout program; is Caleb’s camping buddy; and works on the security force at church.) He taught me some of the skills I lacked (Like how to use a sawzall.) So I could do more things. But some things I just wasn’t strong enough for. Then we assigned the jobs that we were going to hire out.

6. Then I divided my list into weeks. I put way less into a week than I thought we could get done, so that we would actually get it done, lol. I found in our previous remodels that if I pack the time too tightly I get discouraged and stop working all together. Plus, I still needed to keep our family running smoothly with laundry, meals, kid activities, my jobs online, and things relatively clean. Also, Darren and I are in and out of town some this summer at alternating weeks while we take kids to camp and work there. Those weeks I left open so the remaining parent could just handle kids without the added stress of working on the remodel.

7. Once we knew the dates things were happening, I knew when to order flooring (which was when it goes on sale :).) And when to schedule our hired workers to come.
I still need to order cabinets! That’s stressing me a little. I found a mistake in my measurements which means my 24″ home organizing center won’t fit. It will save us $600 on our cabinets though. I just need to find a new place to house it and will look for a craigslist armoire to take it’s place. With so many walls gone I’m just not sure where to put it now.
Here’s a pdf to look at of my plan. I removed some of the dates for our protection.
I was going to talk about budgeting here too, but this is already so long, I’ll save it for the next post.
If you missed reading all the comments on the last post–go do it now. They have so many good ideas!
I wish I had something gorgeous to show you, but we are taking this remodel slowly. We are on schedule, but I purposefully made it a long one, so I could still keep up with laundry, the children, and housework (somewhat) while we did quite a bit ourselves.
Here are some photos of before, during and current.

The first before and After of my dining room. I can’t believe I tore this room up! And only a few months after I finished it. But the after is going to be so much more functional for us.

Here’s a before view with the hutches in place.

I used a garden sprayer to spray the popcorn ceiling and then scraped it onto the paper floor. The paper floor never adhered to the vinyl well, so I was able to roll it up in one sheet and carry the mess out.


Paper floor all rolled up. Buh bye! At this point I hollered for Heidi to help me carry it out. She also helped roll it so it wouldn’t tear down the middle.

When the floor was cleaned up, Darren sawzalled the laundry room down, just cutting through the nails and preserving the wood. We reused all the wood to frame the new wall and arched door.

Here’s the arched door all framed in.

Here’s a view of our old kitchen before we started tearing it down.

Here’s another before from a different angle

Here’s a view of the pantry studs left in the opening and plumbing sticking up from our old sink area. It was time to call for professionals to move the plumbing and gas lines that were in the walls.

On the other side of the room, the kitchen cabinets and peninsula are out. And I took the wallpaper down last Saturday.

The plumbing and gas line are gone. The vinyl floor is gone too. We’ll be taking up the residual glue this week. And to the right you can see stacks of boxes. That’s the new hand scraped wood floor getting used to the climate of the house. We still need to do electrical, plumbing, drywall and paint before it can go down. The bucket in the middle is to catch the drips from the second floor air conditioner. The plumber will reroute that when he comes back.
Just for fun here’s a before and current of the view from the formal living room.


This is a HUGE project. We are moving walls, relocating pluming and electrical. We thought about it and planned for months before digging in. I’ll share how we planned it a little later this week. And how we know if we are on schedule–and how we stay on budget, which is the hardest part of all.
 My kitchen currently looks like this. This is the new wall brought into the space two feet further than before. There is an arched doorway framed across from the washing machine. I plan to hang a cute curtain behind the opening for times when guests are around. But I do so much laundry it will be a blessing to have that doorway open and instantly accessible most of the time.
I have more photos on my good camera (this one is a cellphone pic) but I won’t be able to get to it for a week. So for now this is it. Except for some sneak peaks from where we are right now :).

I don’t know why I’m always amazed at how easy it is to keep a space clean when there’s not much in it. Makes a person think…


Ooh and we had new front doors installed with…..WINDOWS!

P.S. I woke up my blog over at Centsably Fit in time for Holly’s Summer Transformation Challenge. Who’s joining that with me? I’ll be posting measurements and starting pics tomorrow if I can find a scale around here somewhere…
This recipe is a man pleaser. It’s not Fit Yummy Mummy approved or Trim Healthy Mama approved. It’s not gluten free or dairy free–it’s just yummy. It’s easy–so easy a child could make it and get tons of compliments. And if you are hosting an early morning breakfast rehearsal for High School men, definitely bring it. Even if the center biscuits are not quite done, they will eat it all and one of them will lick the pan and then ask you to bring a double batch next time.

Ingredients
Instructions
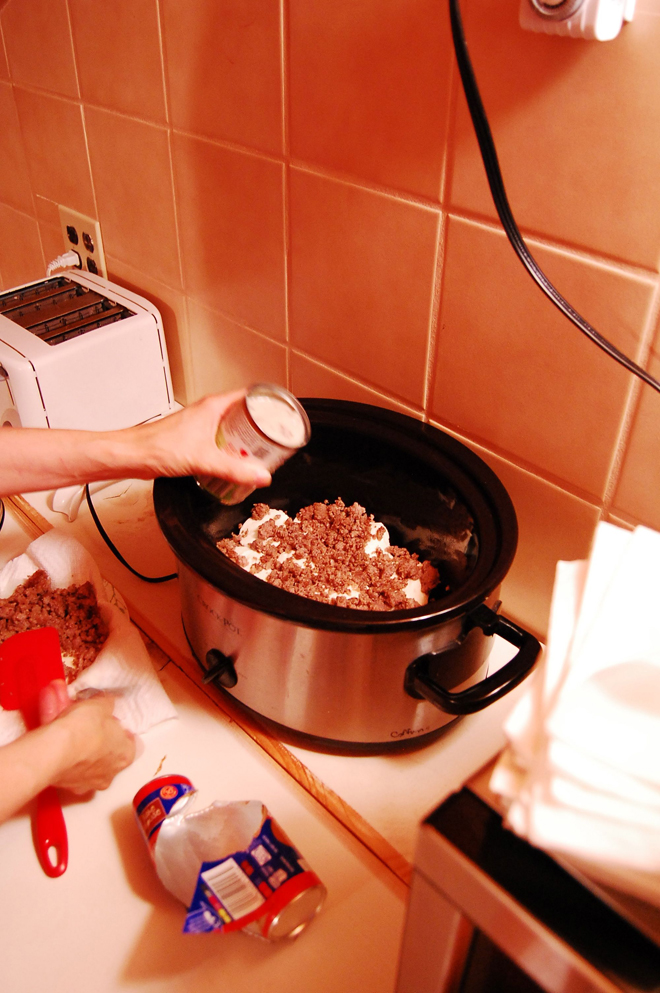
I anticipate the most frequent question asked will be, Is it safe to leave a slow cooker out on the counter this long before cooking? I’m not sure. We did it–twice. And no one got sick. I think it would be more dangerous if it sat a long time AFTER cooking since the cooking process will kill any bacteria.
If the thought bothers you, you can keep it in the fridge and get up a few hours early to turn on the cooker and go back to bed. (Allow an extra hour for a cold crock.) Or you can bake this in the oven at 350 for 45 minutes or until golden.
The first time I made this, I used homemade biscuit dough and homemade gravy made with milk and flour and baked it in the oven. It was wonderful too. I haven’t tried the slow cooker method with homemade gravy. With the 2 hour cooking time, it might make it through without curdling. If you try it, let me know. And now some photos my hubby took of the process.
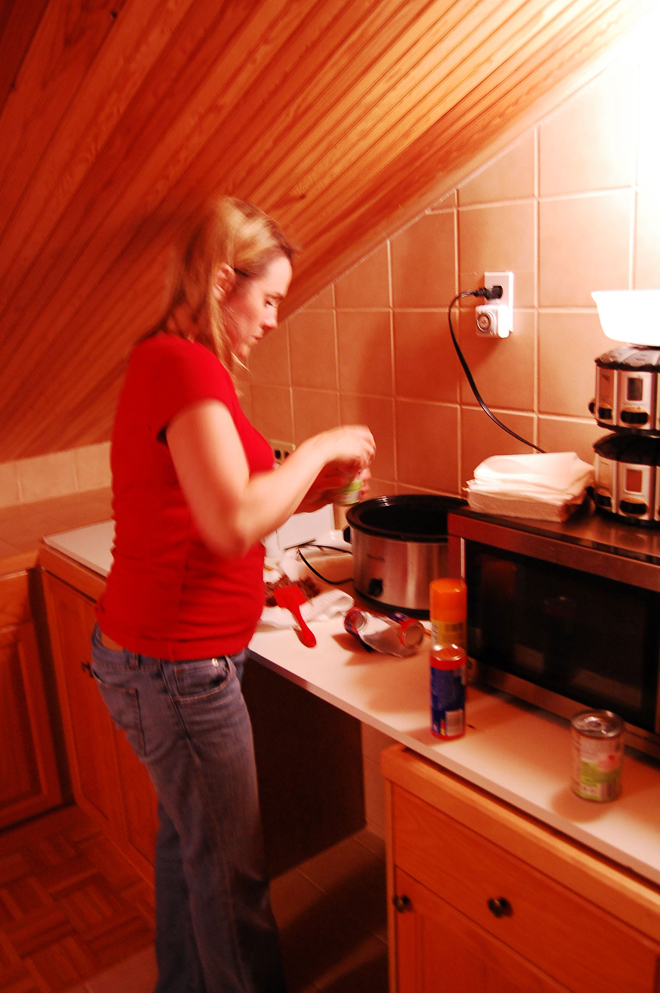


The most important part of a kitchen remodel (if you are living in the home during the renovations) is to find a place for a temporary kitchen. We were super blessed to have a kitchen in our attic ready for us!

It was wired for an electric range, sort of. The wires were just hanging free outside the box. So we decided to forgo the expense of the wiring and buying an appliance. Instead, Darren put a few boards across the gap tot extend my counter space. Perfect!
The kids carried up the appliances and dishes assembly line style. Heidi stayed up in the kitchen to put everything away and organize the space while I stayed two flights down in the main kitchen packing up what we could live without and what should go up. I love how she lined up the canisters under the eaves. She did a great job organizing it all.

The other side has a double stainless steel sing WITH garbage disposal! After this picture was taken we purchased a white counter height (mini) fridge to go next to the sink. We found out quickly that running two stories to get food and then 2 stories to bring it back was no good. Now we can have milk and a few common things up there. AND the top of the fridge is the perfect place for a drying mat to lay dishes on after hand washing.
Working in this kitchen is worlds easier than my old kitchen. I’m really learning to love it. The biggest challenge is the low ceiling. I wear platform sandals almost every day and have to take them off to work in here or I will bump my head. Even without them I can’t stand up fully one step to the right of the sink. But on the other hand the sky light makes it cheerful all day.
I love too that I’ve given myself a break from cooking EVERYTHING from scratch. A few cans of cream of chicken soup won’t kill us, but stressing to the point of damaging our relationships would be tragic.
I’m saying all this to prepare you for tomorrow’s recipe: 3 ingredient Slow Cooker biscuits and gravy. It’s yummy and easy for those stressful mornings. But it’s not from scratch and not my usual whole food nutrition. Betcha can’t wait :).