Bulk Cooking: Slow Cooked Ground Beef

As the weeks drag on without a kitchen, I’m starting to loose it a little.  Our project was delayed in an unforeseen scheduling conflict with one of our professionals and our finish date is two months in the future…..sigh.  But when it’s all said and done it will be worth it.

Part of holding it together, is making sure my family still eats while sticking to our tiny food budget, which DH lovingly raised to $500 a month (for the 8 of us) at least while our kitchen project drags on.  This allows me to buy a few more convenience items to make meal prep in our alternative kitchen space a little easier.

“If only I had a bunch of cooked up ground beef in the freezer!” I thought to myself last week.  That would make life so much better.  So I did a search on all the ways to cook large batches of ground beef–only I don’t have a stove, so it can’t use a wok, lol.

Finally I decided to try it in the slow cooker.  And it worked, beautifully–though until the very end I was sure I had wasted 6 lbs of meat.  Here’s how it played out.

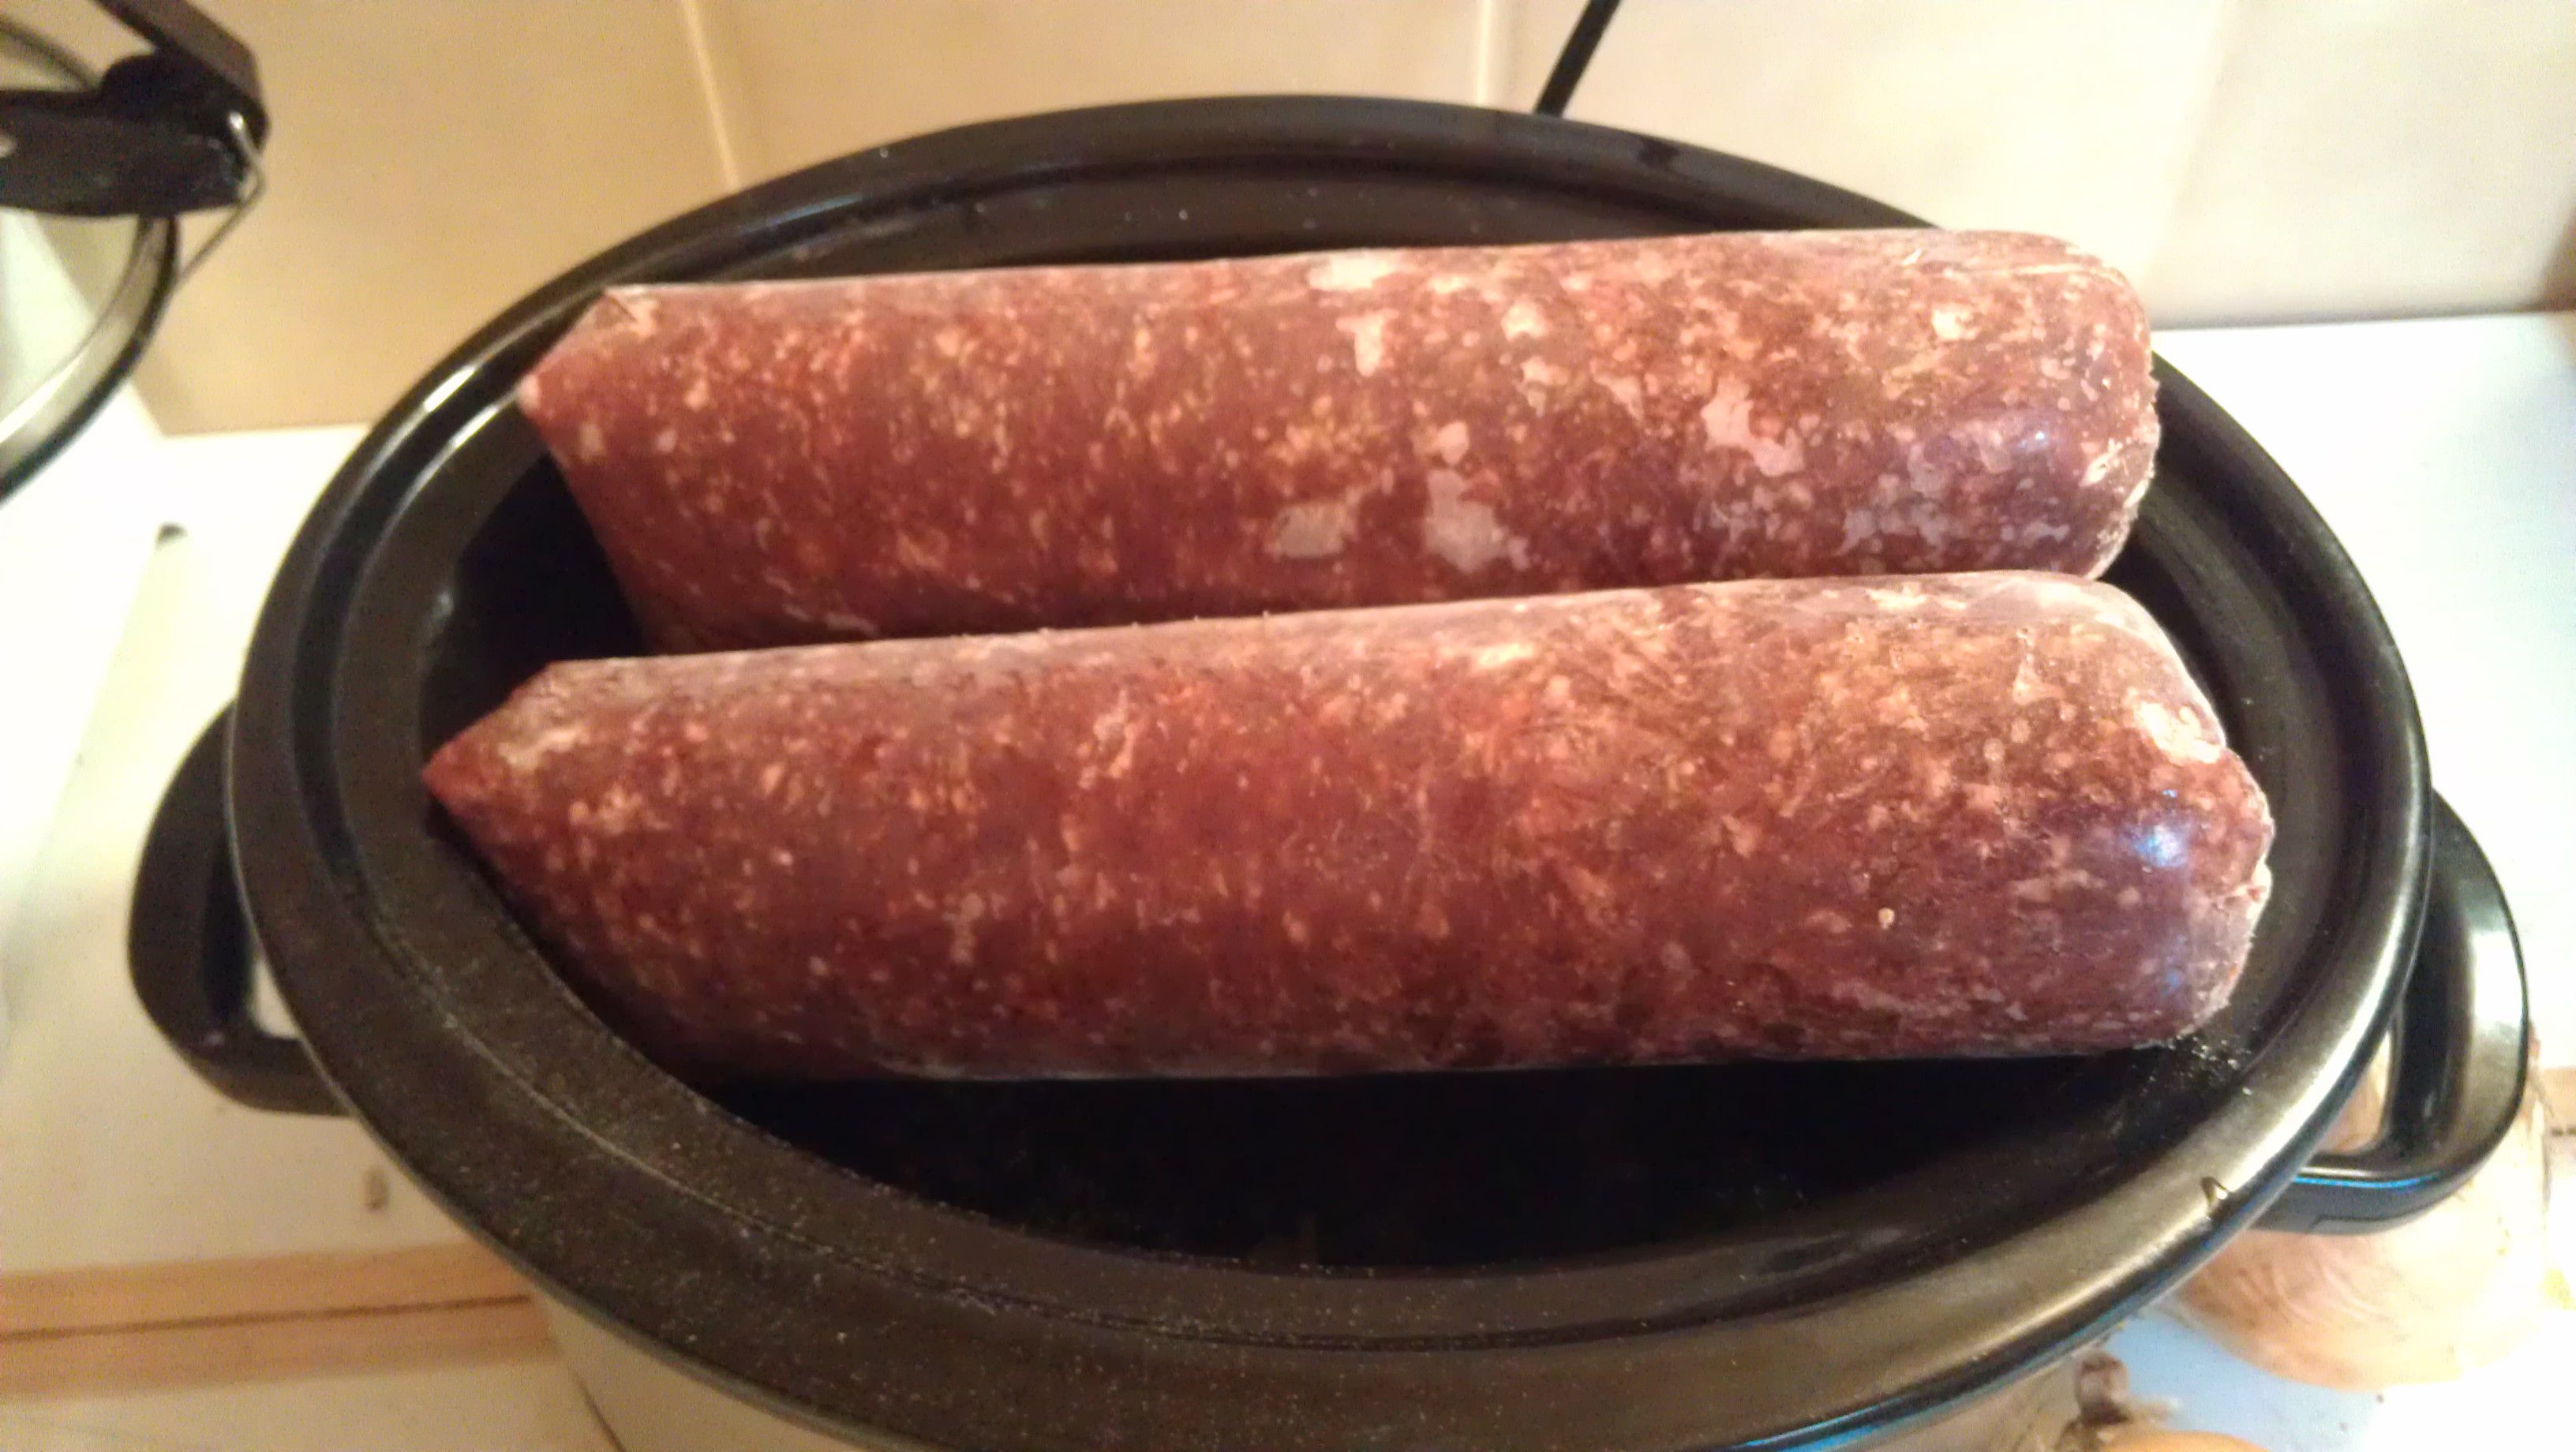
I unwrapped three 2 lb logs of frozen ground beef and stuck them into the slow cooker.  Then I added 6 cups of water, because I wanted beef broth.  To make the broth and hamburger taste good, I added 2 finely chopped onions; 1 Tbs of salt; 1 tsp of garlic salt; and 1/2 tsp black pepper.

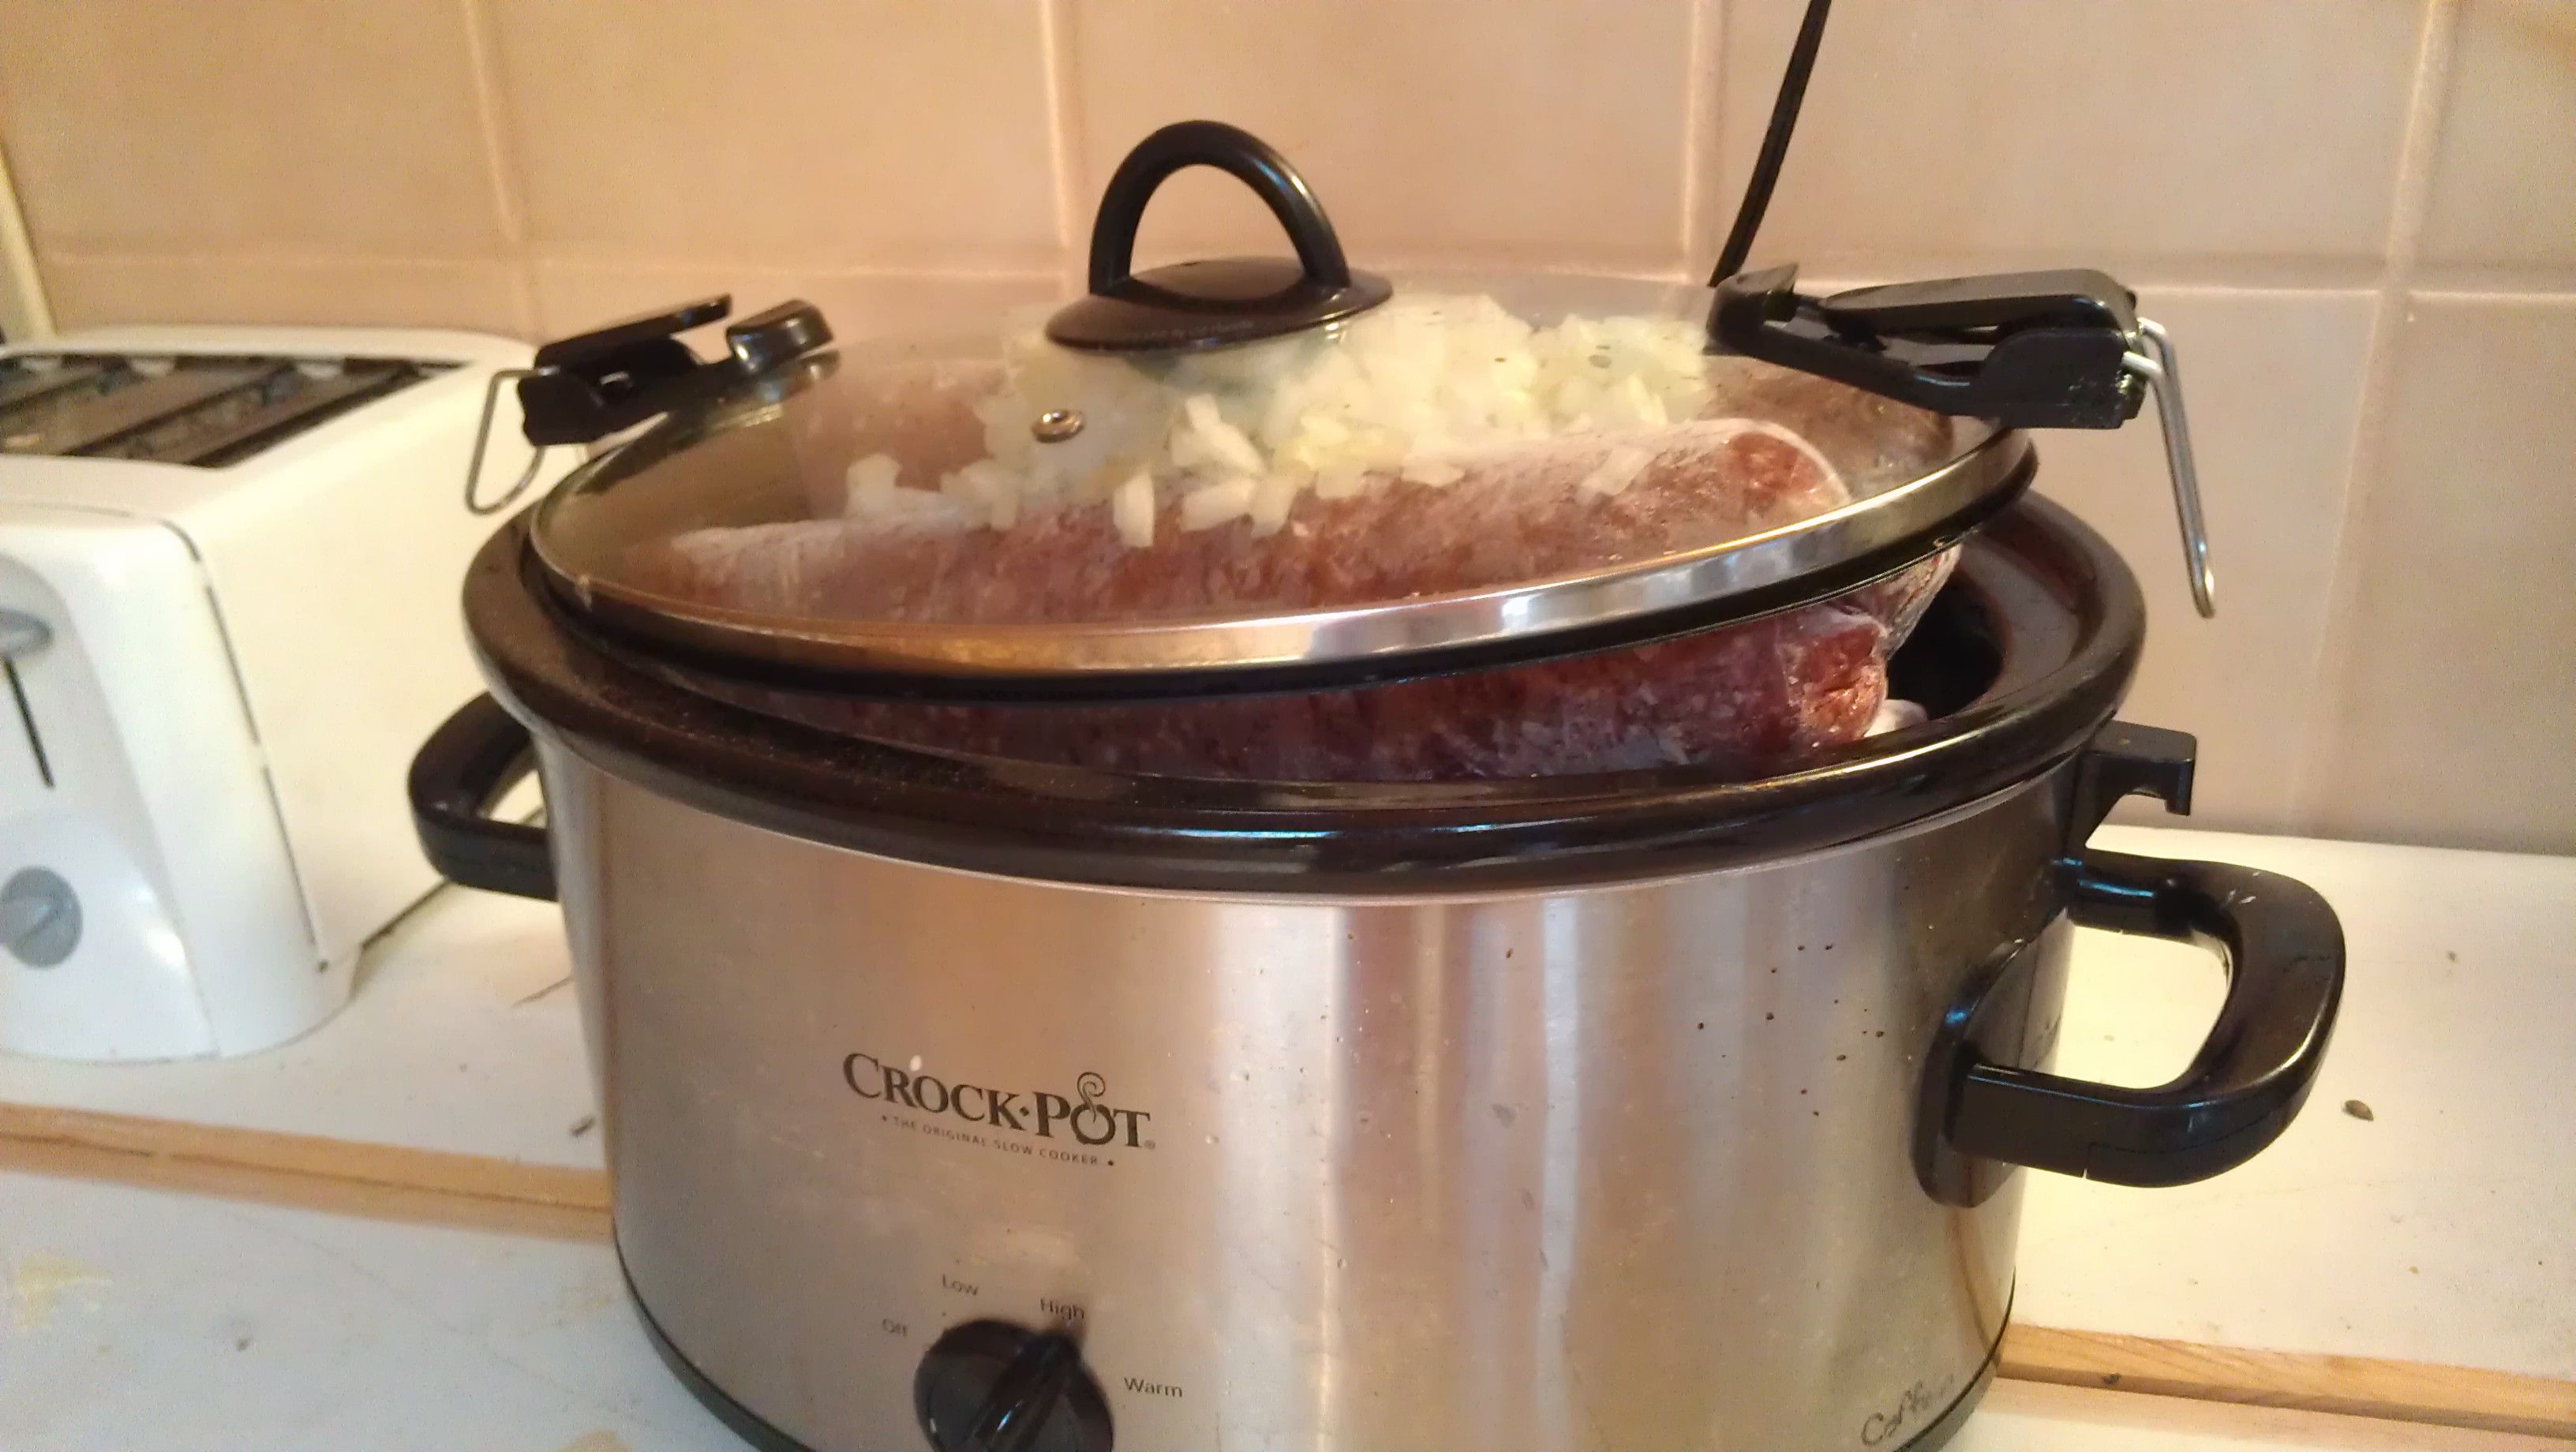
The lid wouldn’t close.  No worries.  I covered it as well as I could and cooked in on low overnight.  After about an hour, I could push the lid down.  That made me feel better.

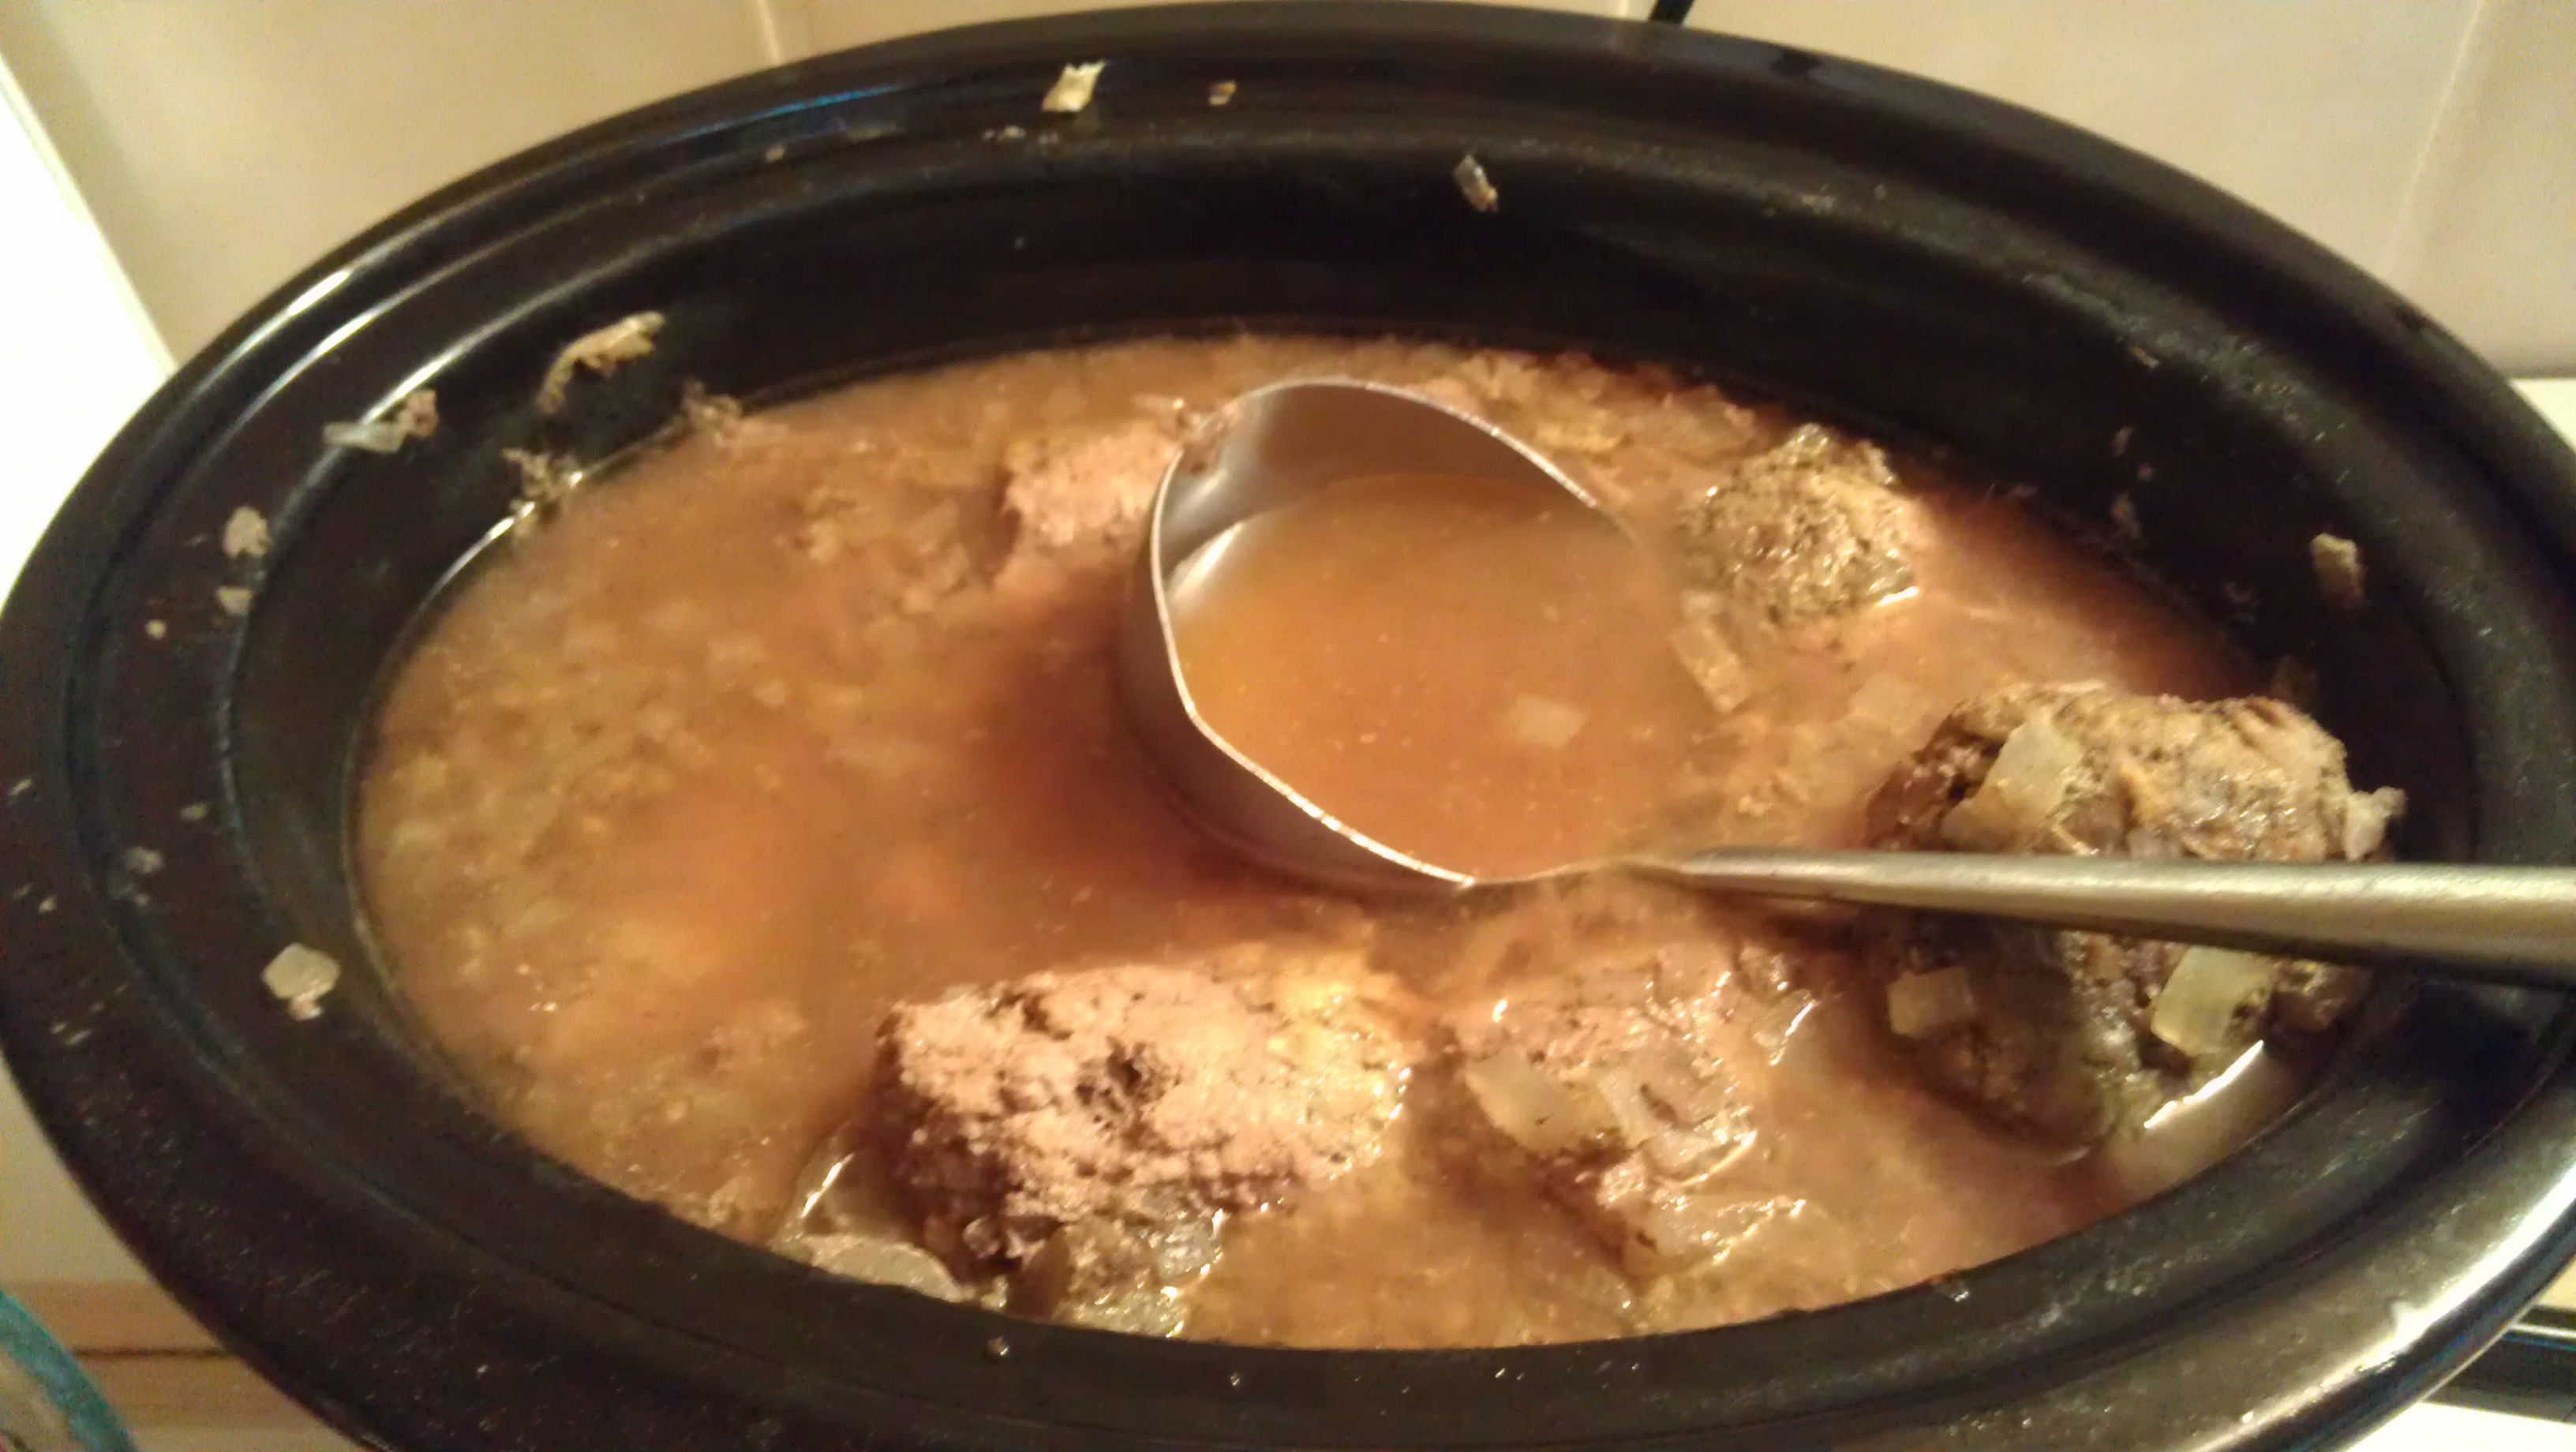
In the morning I had 3 logs of cooked hamburger–oh no!  I was hoping for it to form crumbles automatically while I slept. But the broth looked delicious.

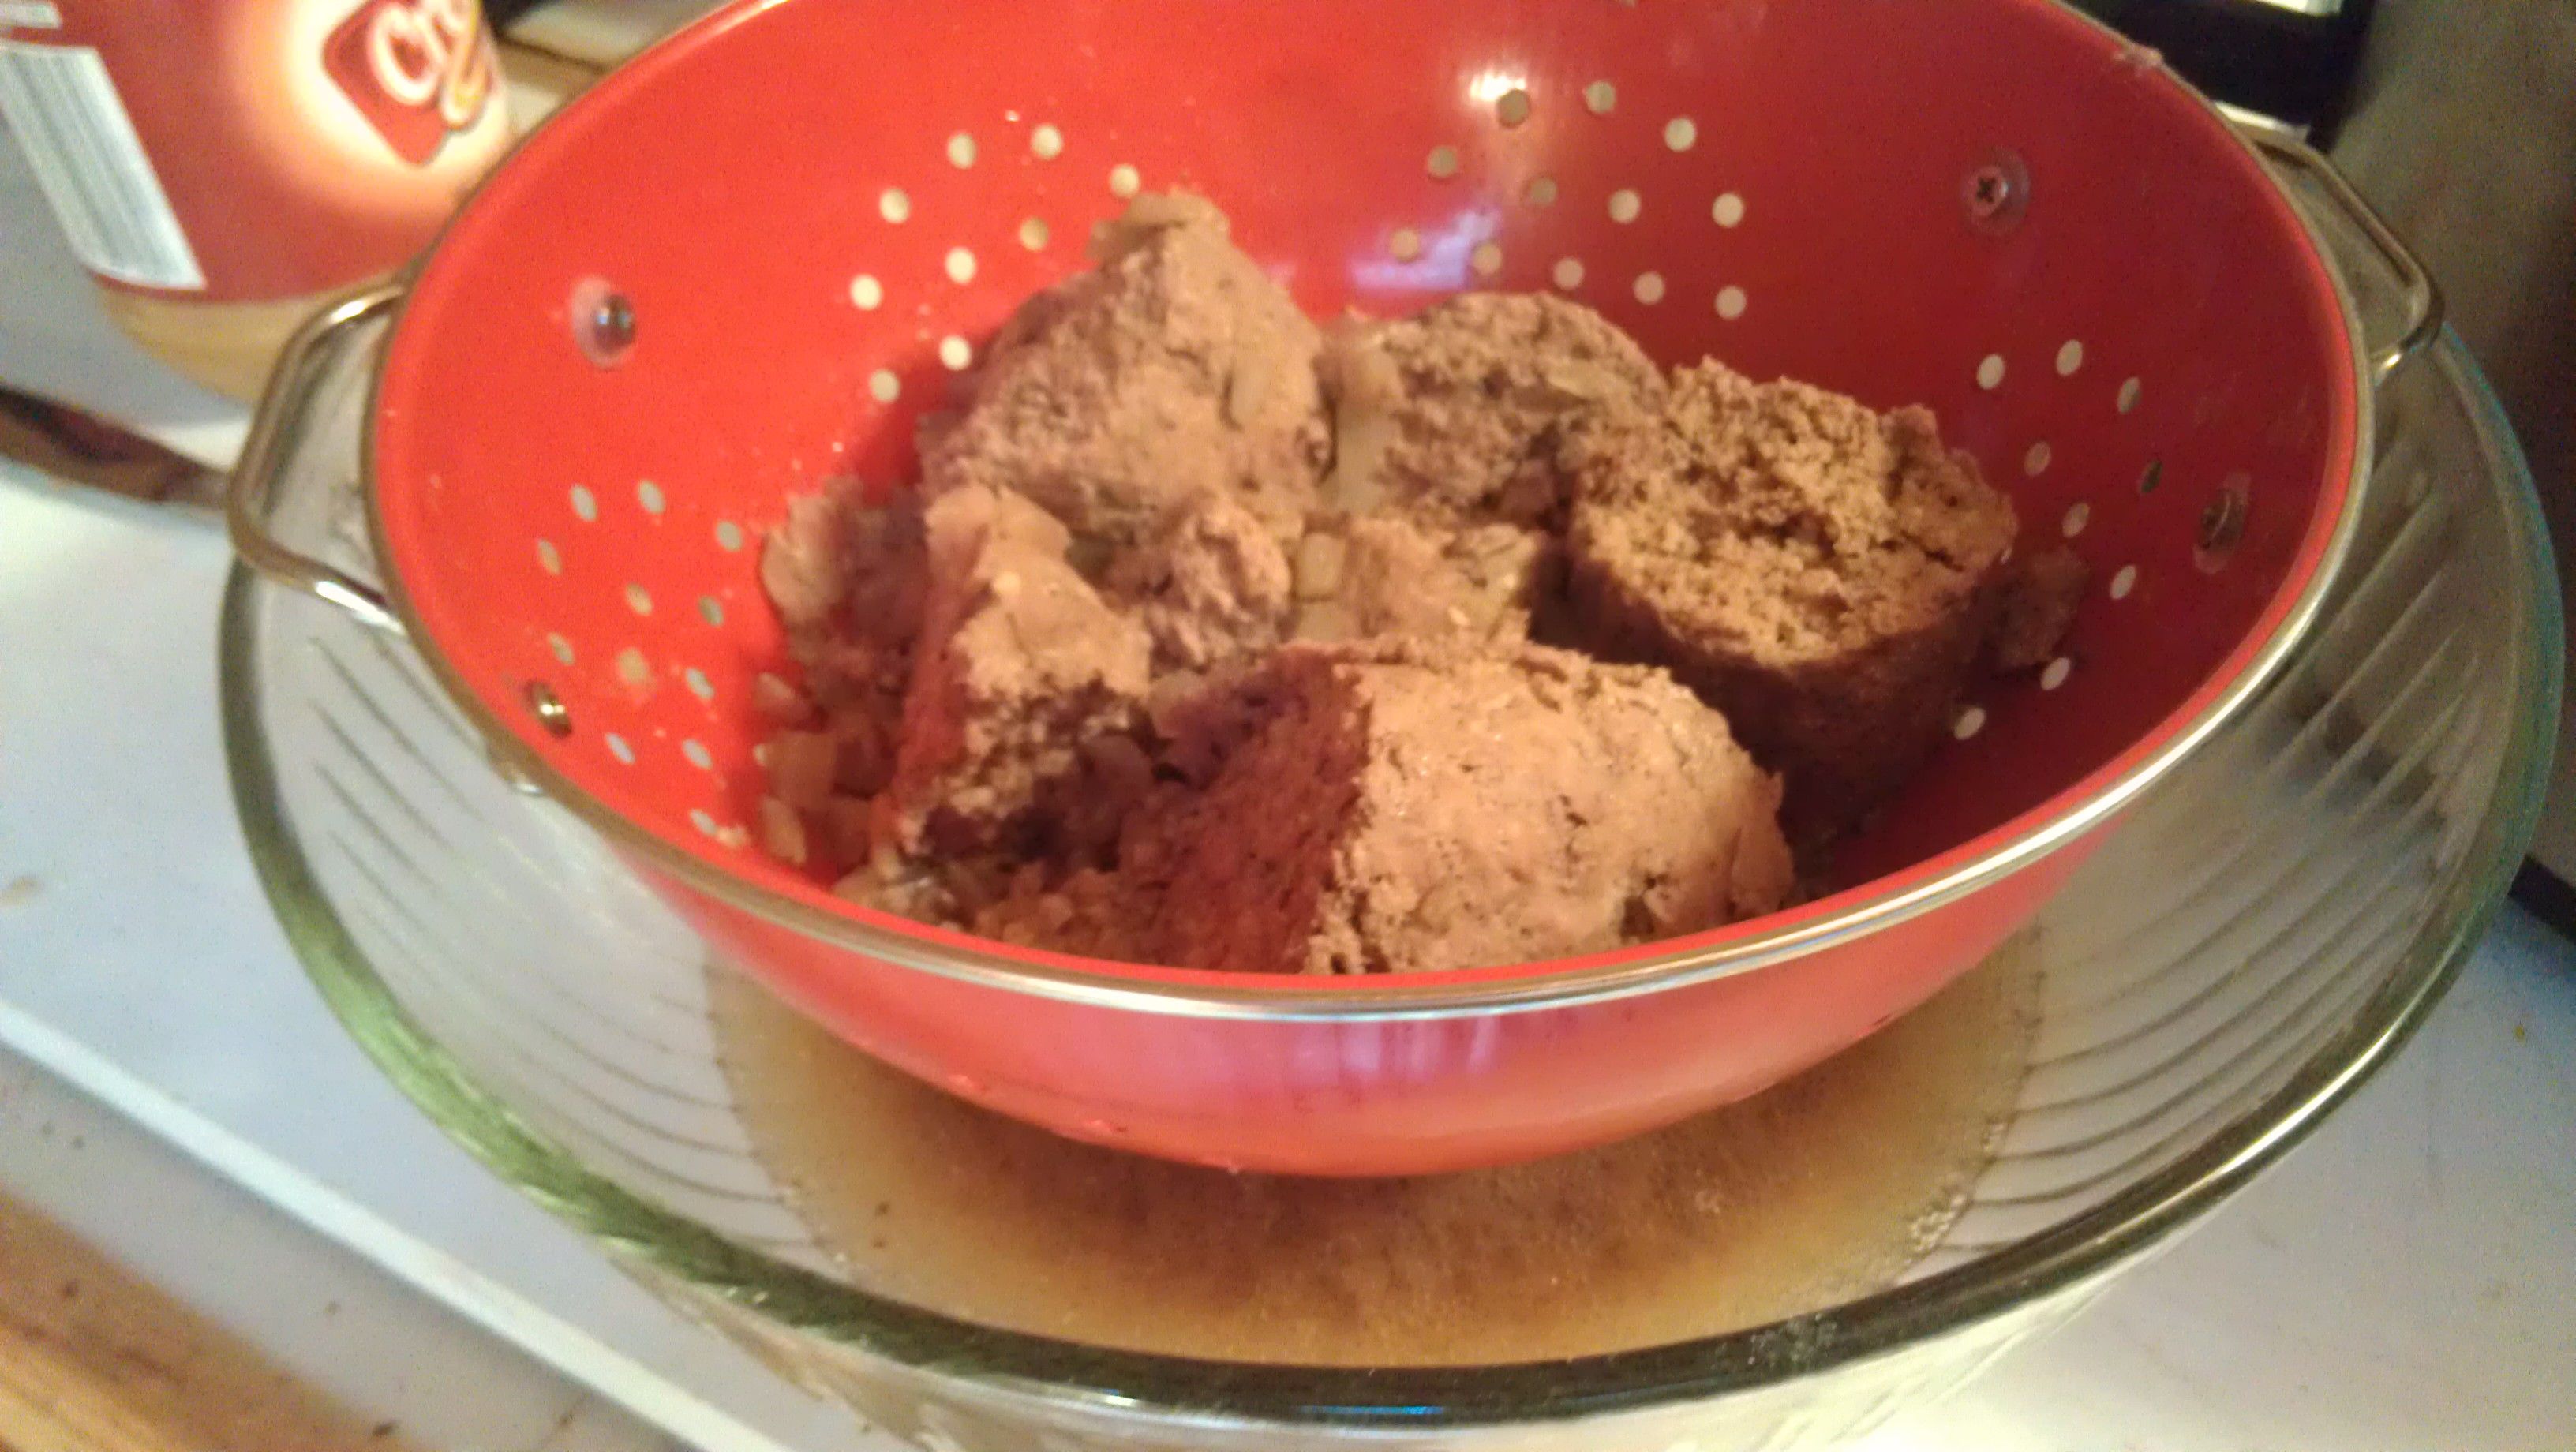
I chopped up the meat into huge chunks and then used a colander and bowl system to drain out the broth.

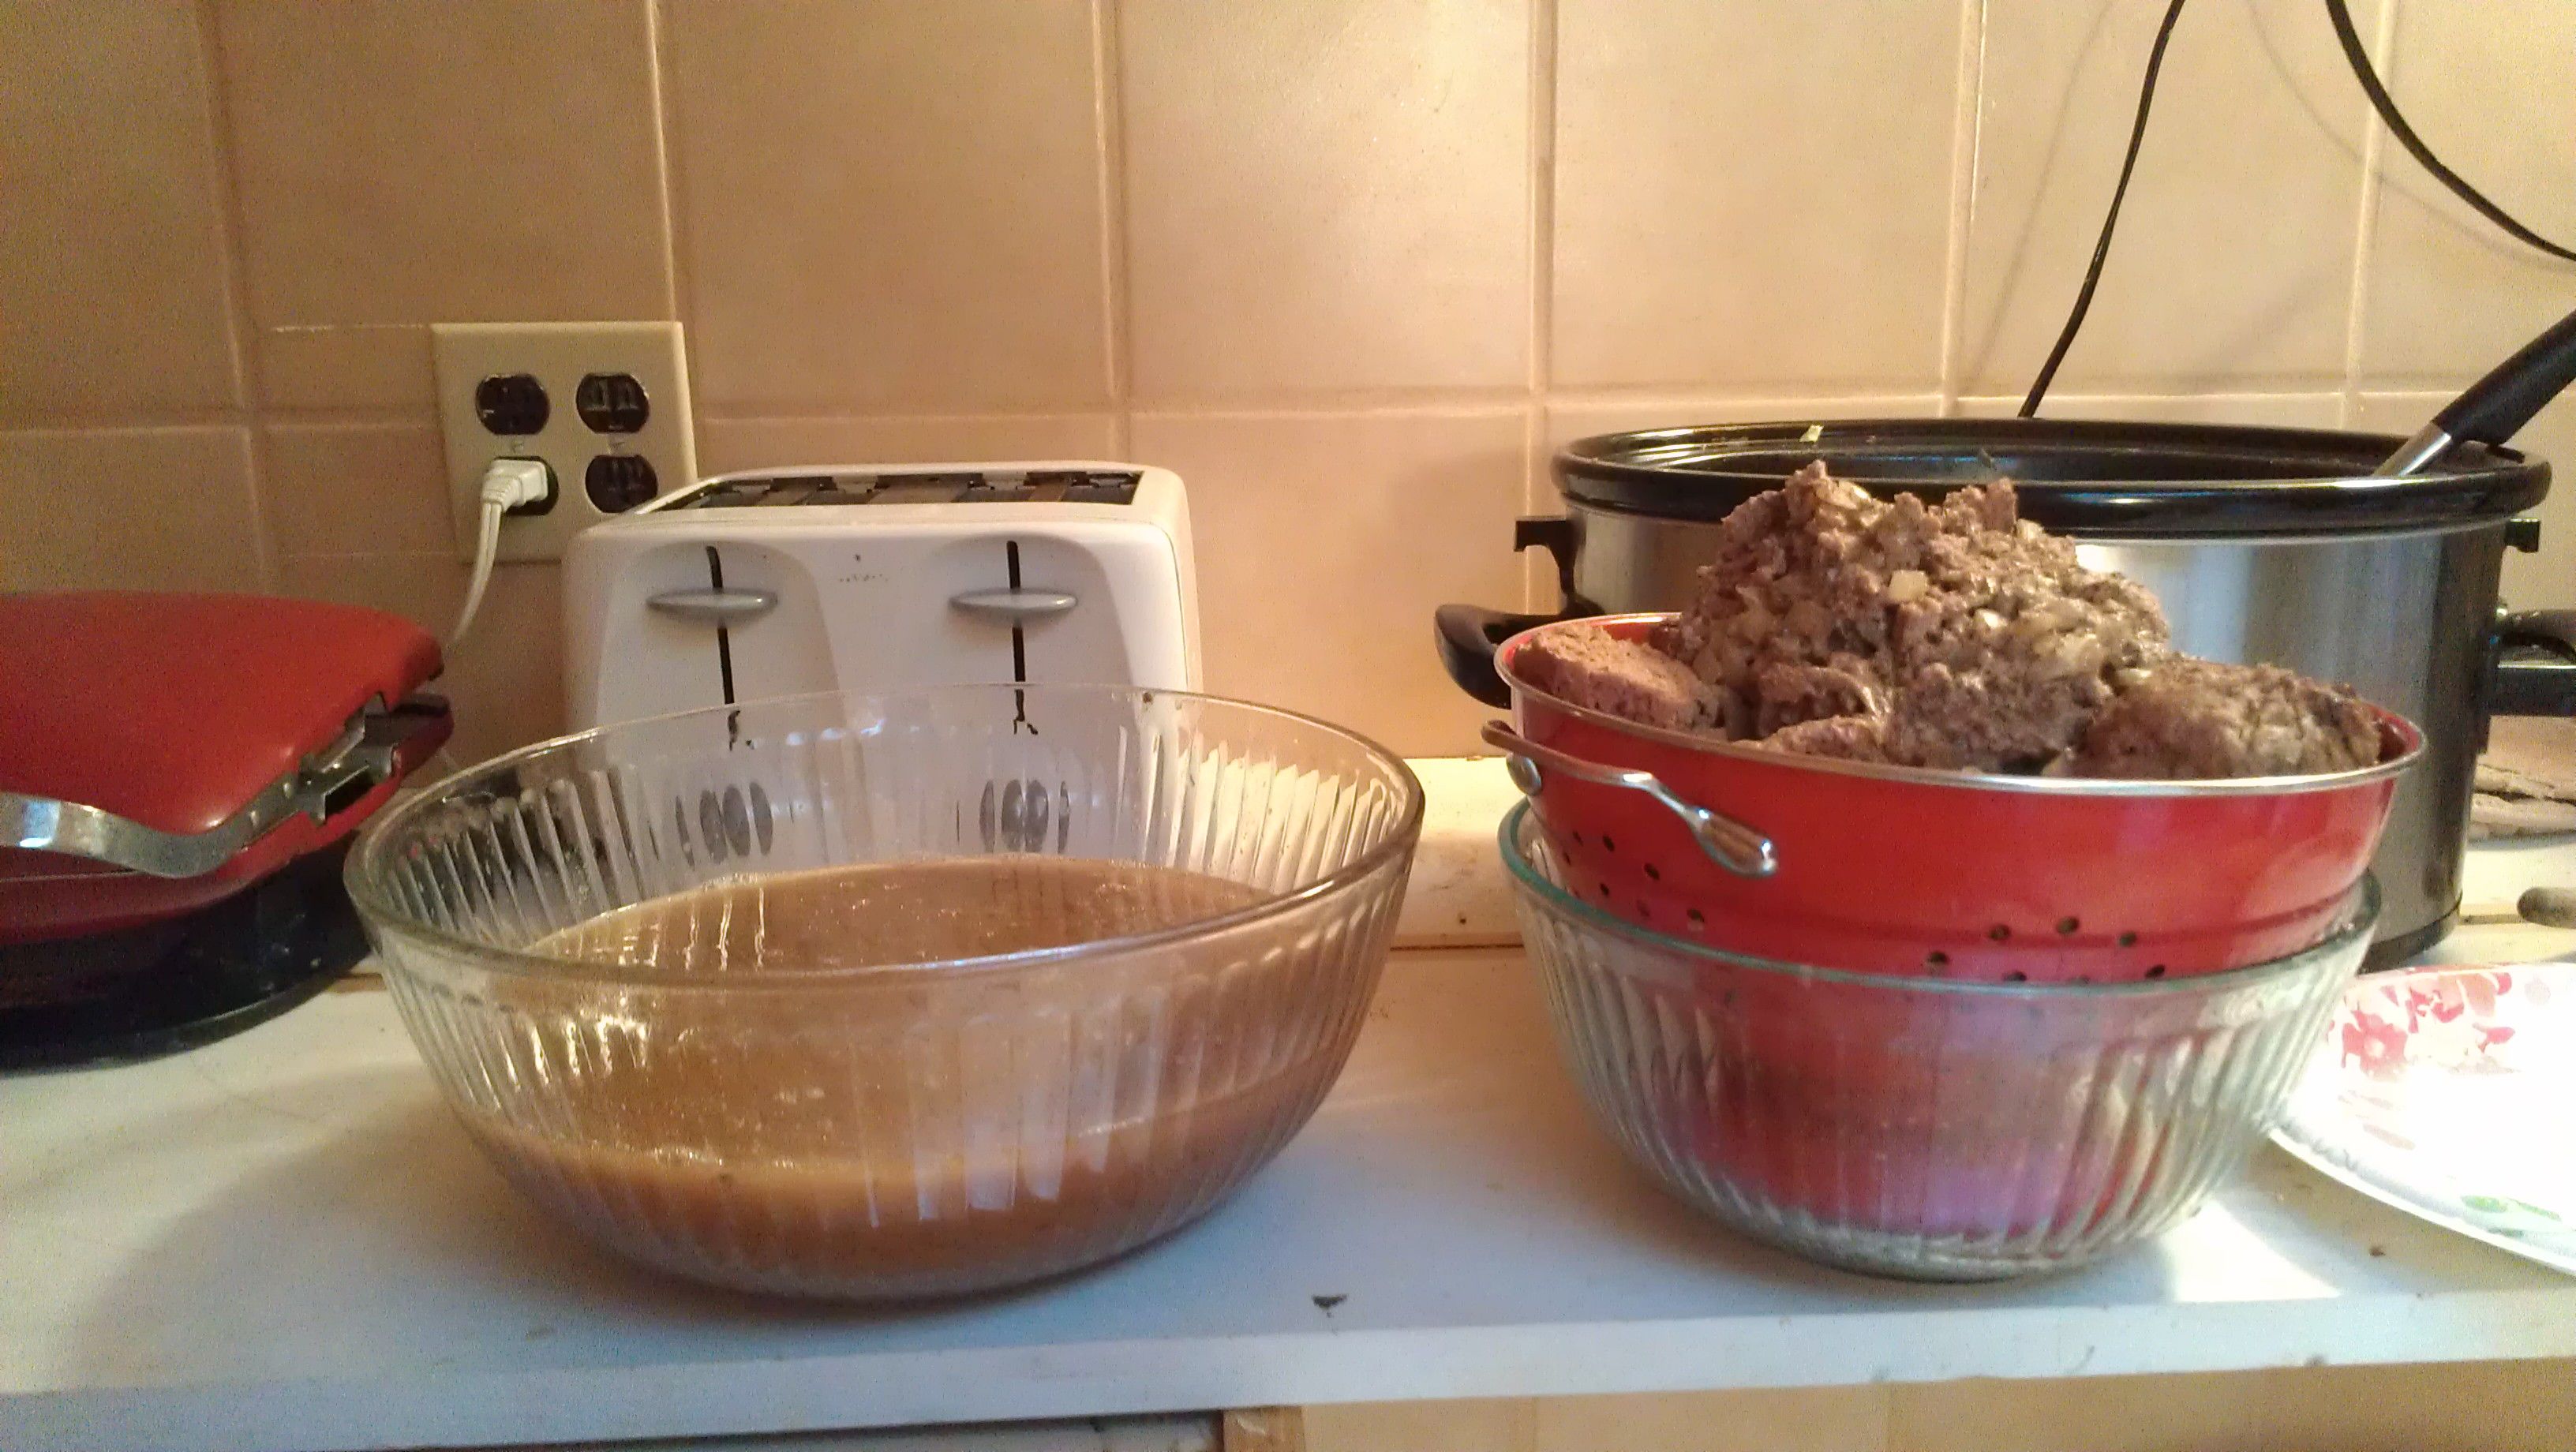
It had great color and smelled amazing.  I was surprised what little fat hardened on the top after it cooled.  This was grass fed beef direct from the farmer.  I could see the quality when cooked this way.

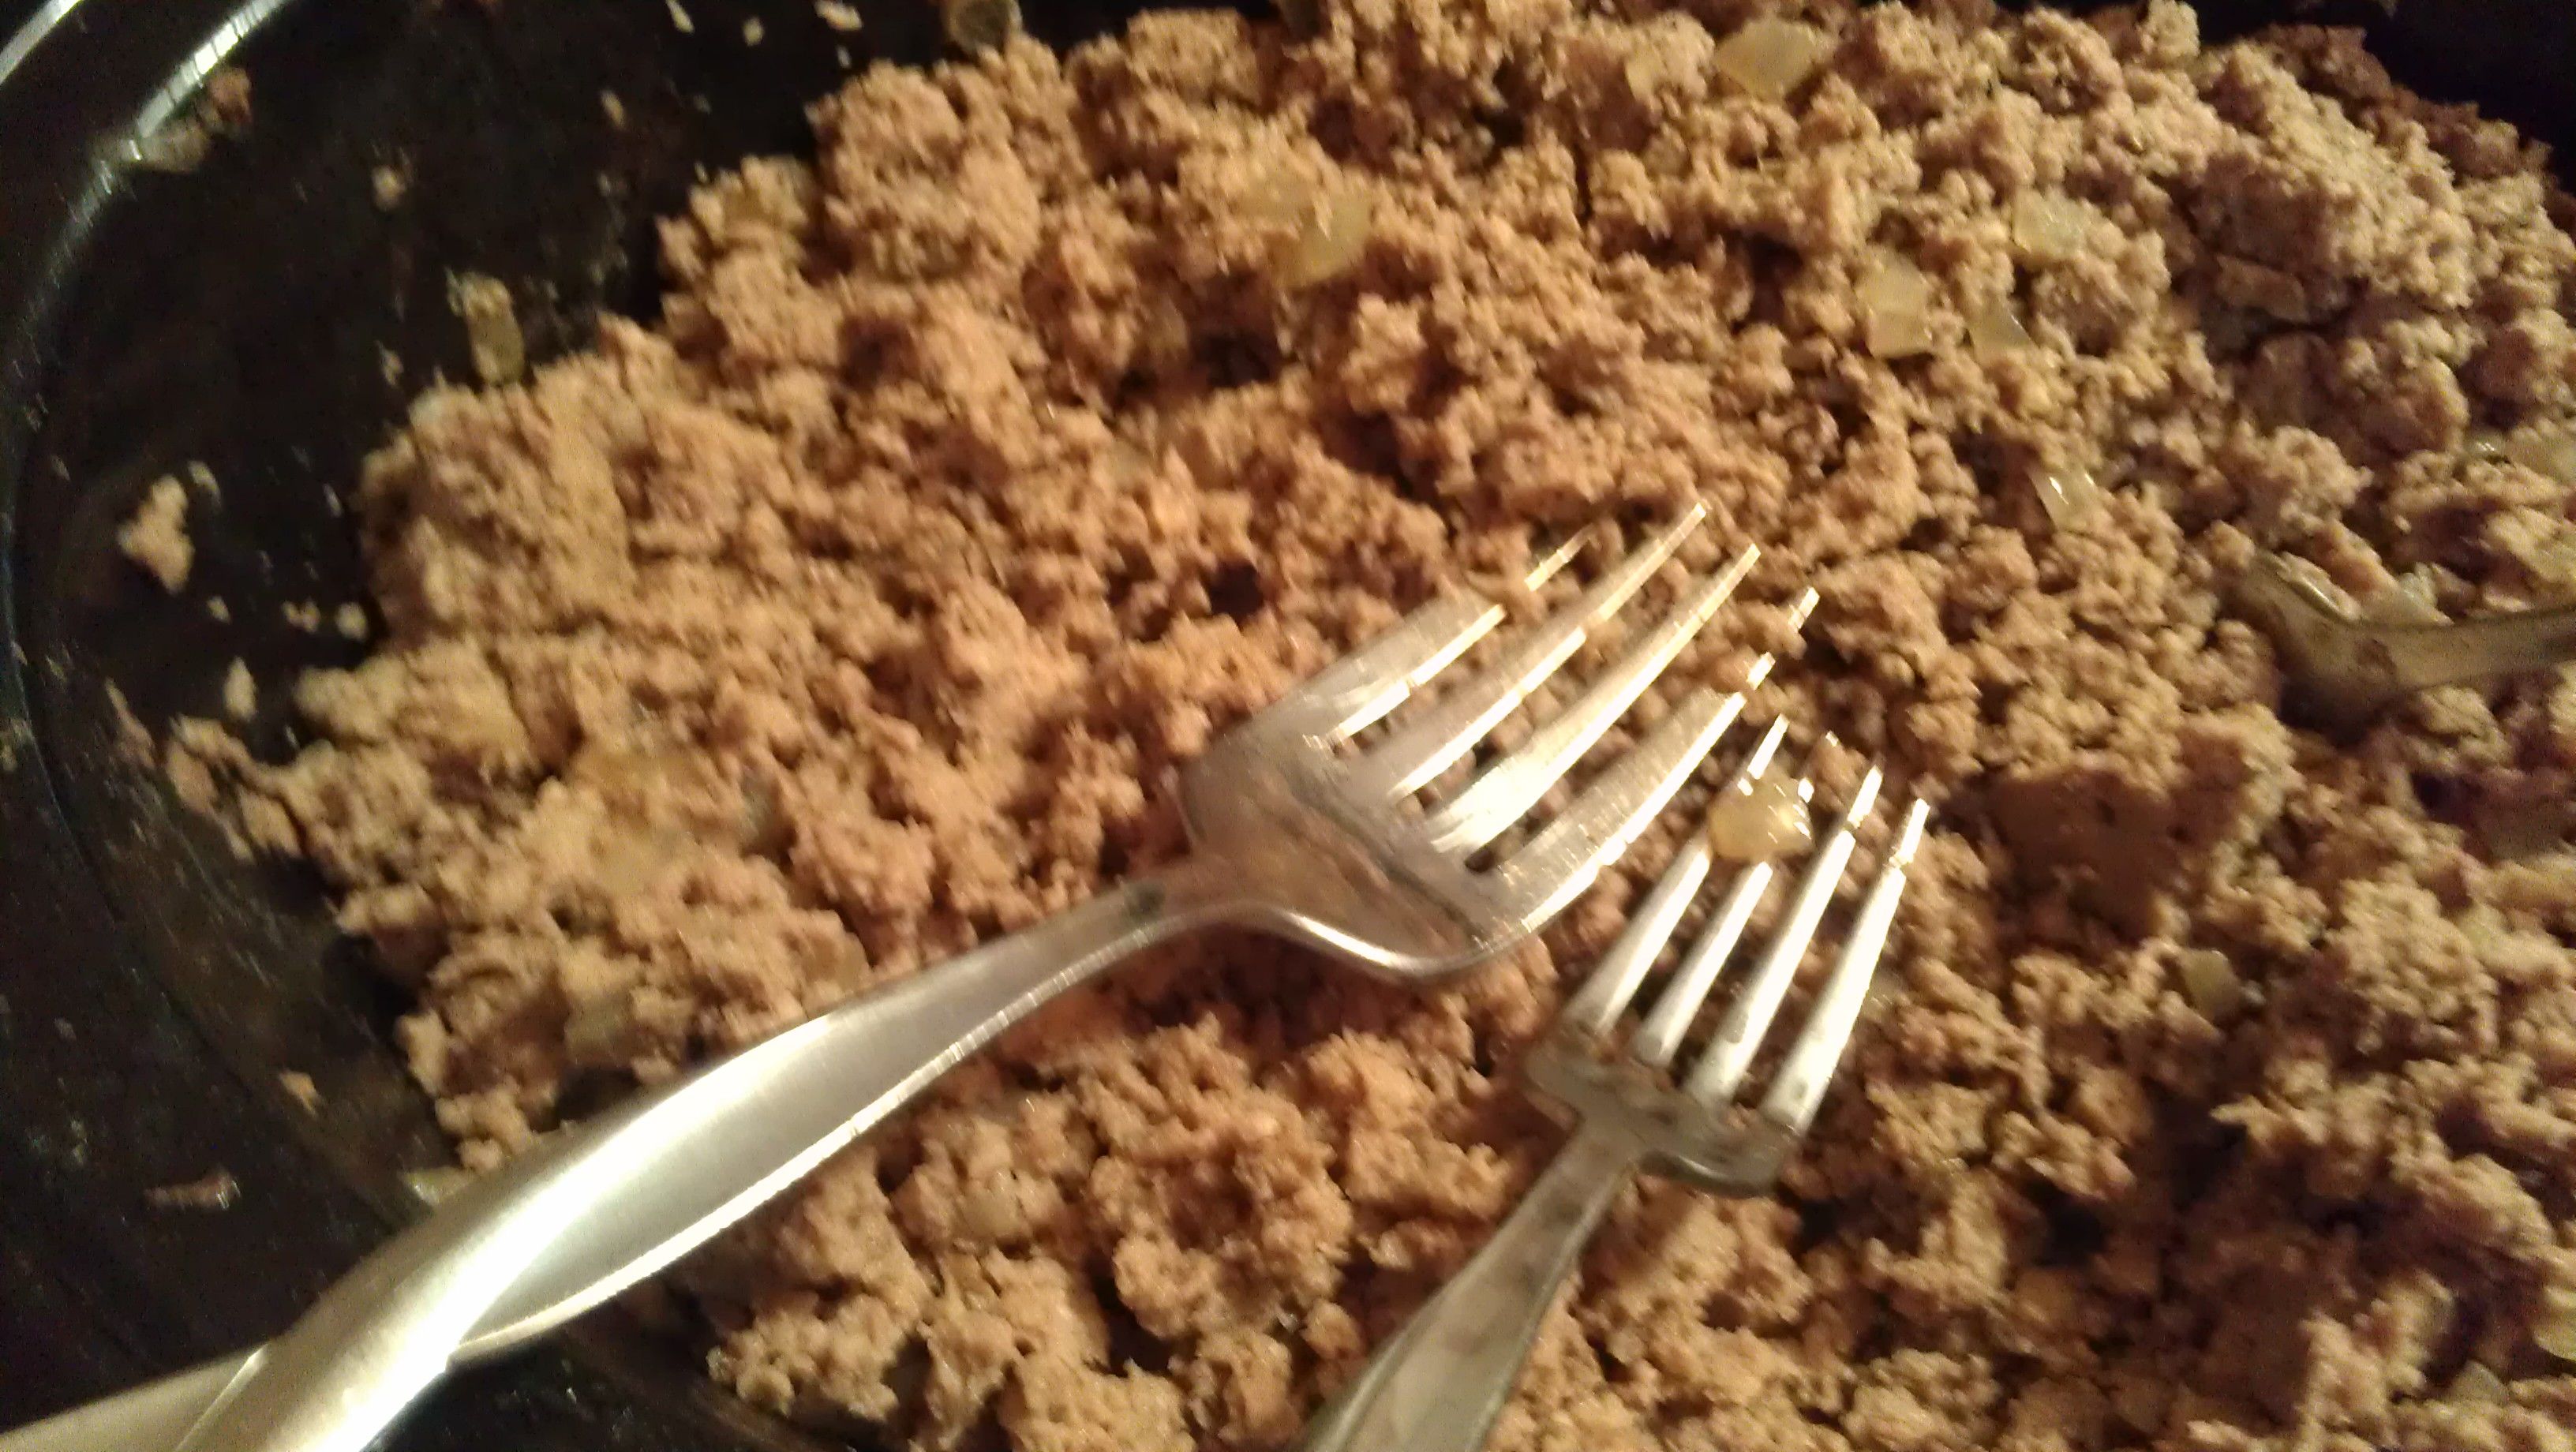
I was pretty sure at this point that it was all a waste.  But I decided to try the two fork shred method that I use on my pulled pork. I ended up mashing it with the back of a huge fork.  It worked beautifully–and fast. Perfect fine crumbles of ground beef!

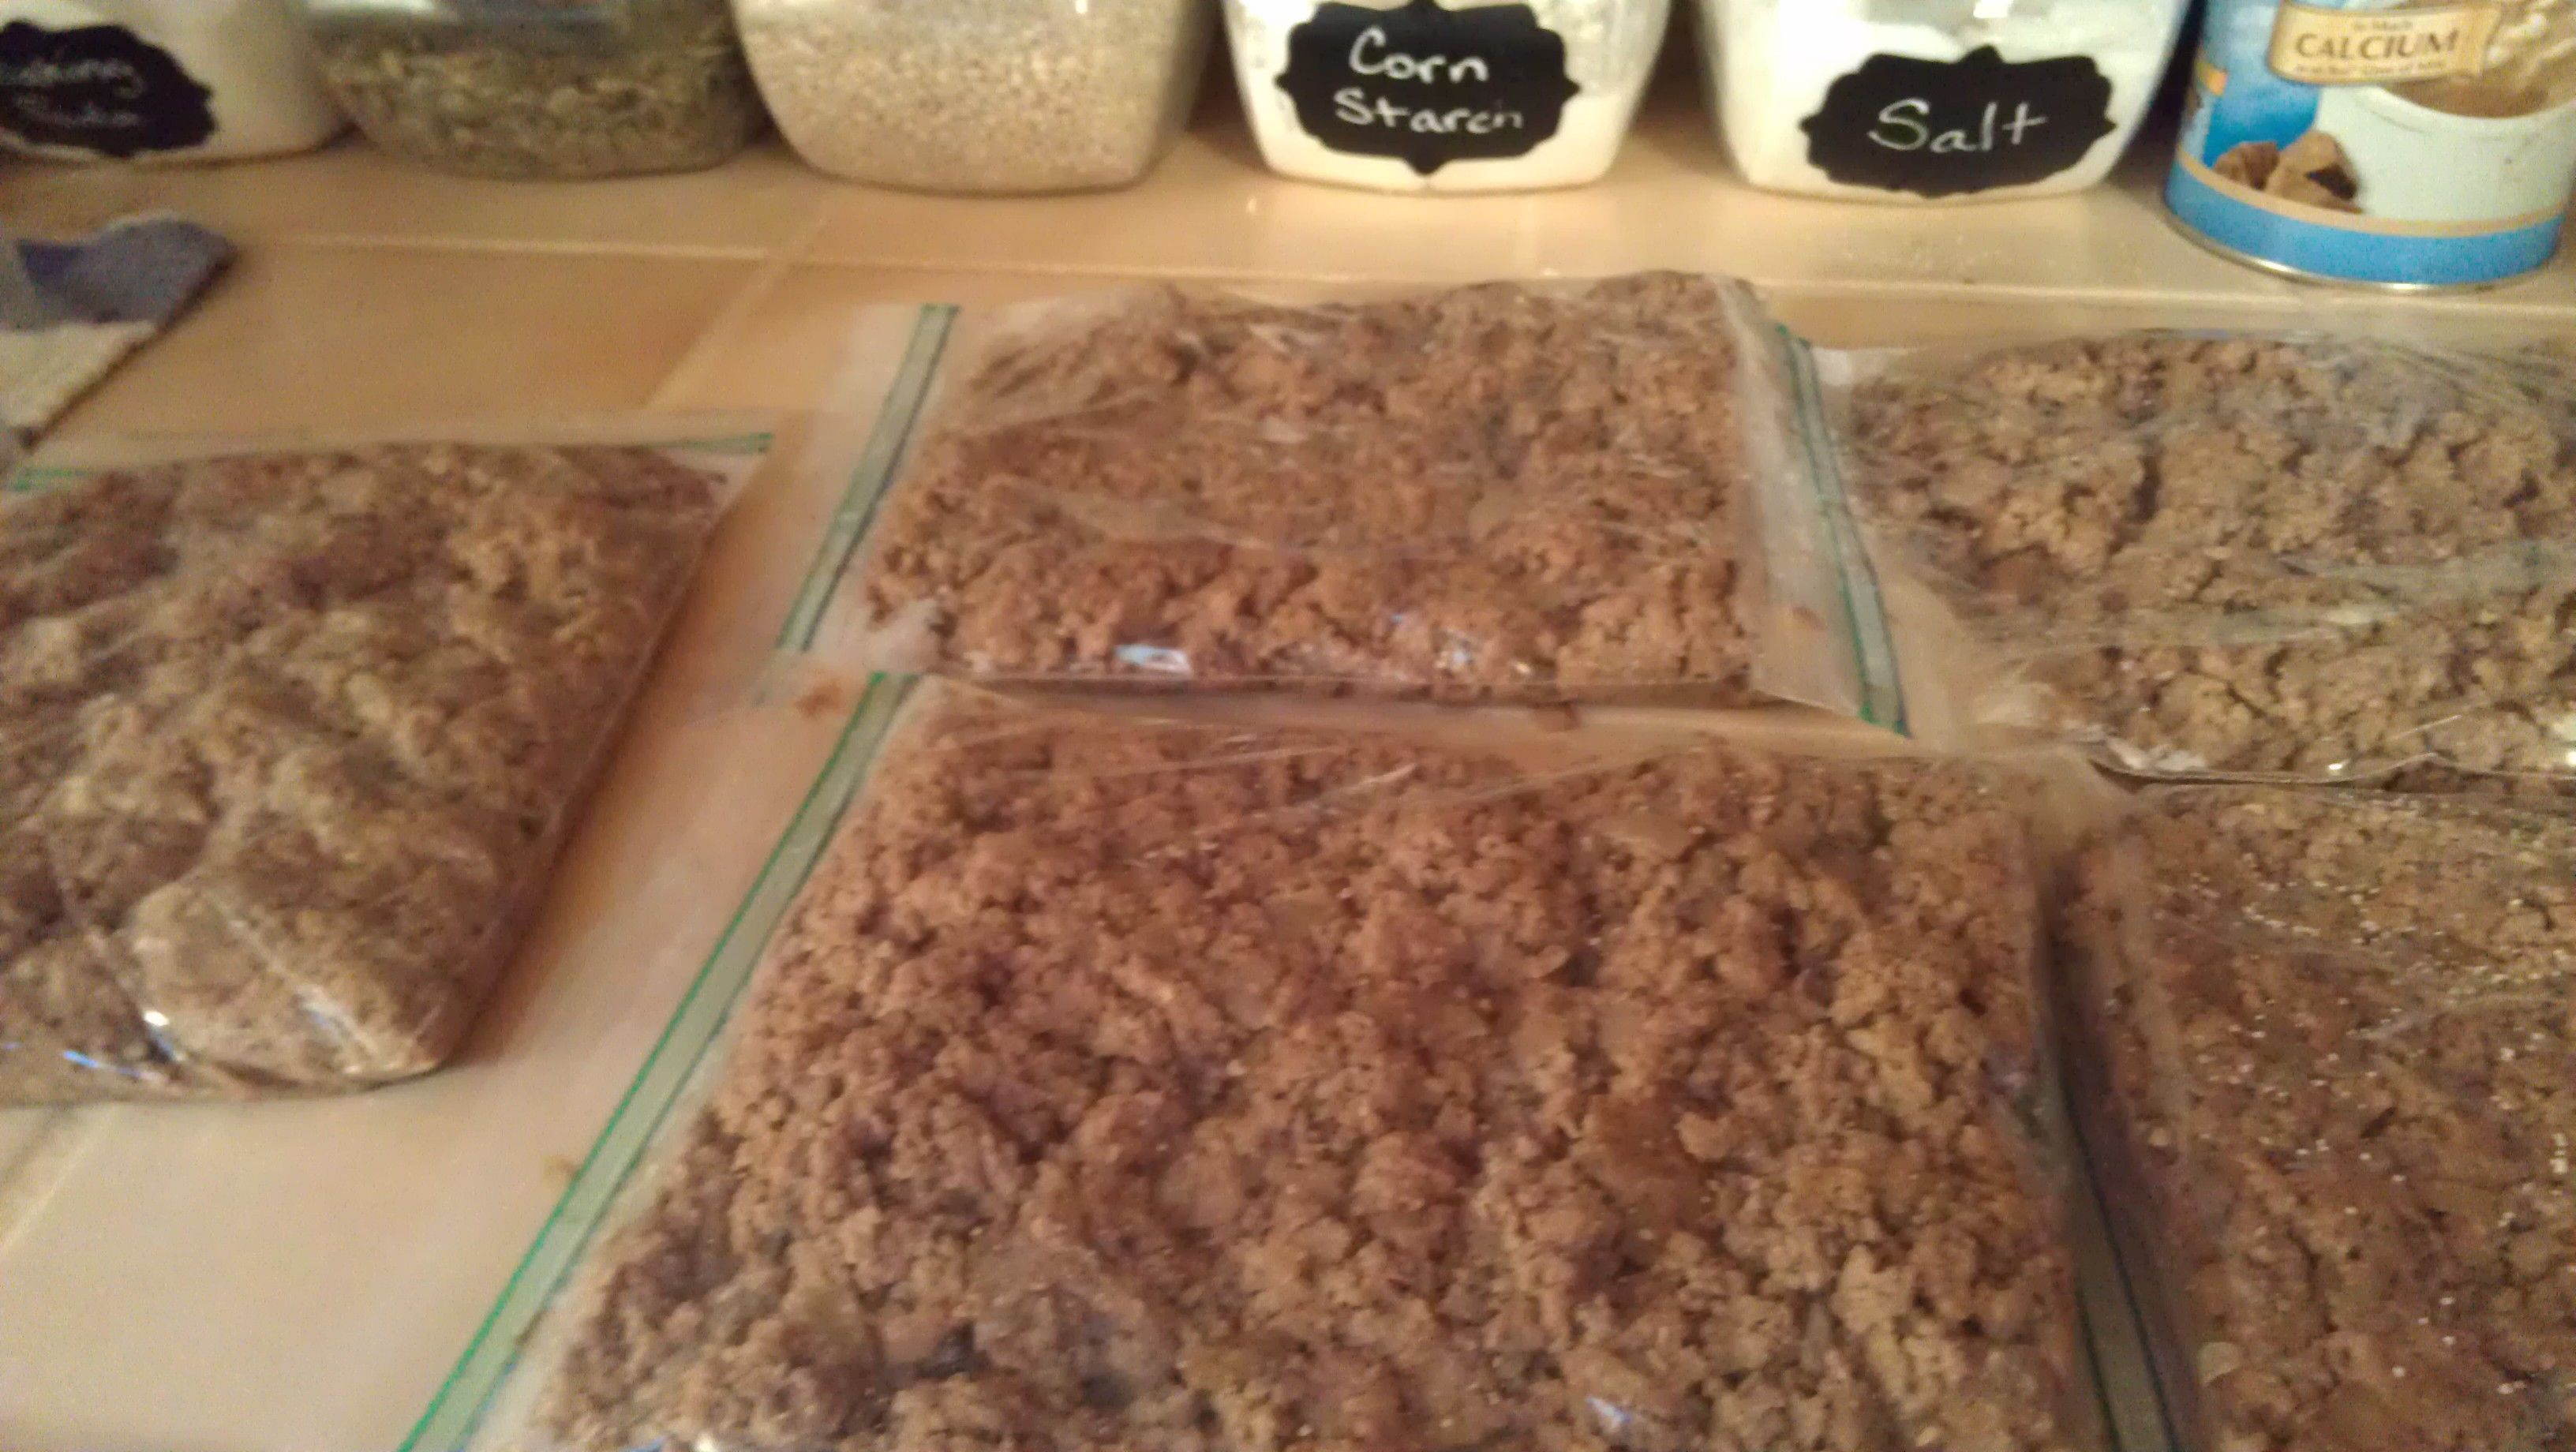
I divided up the meat into 5 freezer bags.  Each one weighed about 1.4 lbs. And pressed them flat.  Once they were cool, I put them in the freezer.  

I got about 2 quarts of broth also.  It smells and looks so yummy.  I’m definitely doing this again.  No more thawing meat, no more standing over a hot stove.  Win win win.


Homemade Push Pop Review

Last Fall we bought these:

And finally got around to trying them.  They are sturdy silicone and flexible.  The lids go on and off easily.  We filled ours with Great Value brand strawberry yogurt, the kind that comes in a 32 oz container at Walmart.  We laid them on their side in the freezer and since it was thick stuff, nothing leaked. If I were using juice, I’d prop them up in a glass or vase just to be safe.
DSC_0551

DSC_0553

The lids came off easily.  My 5 year old could do it without help.

DSC_0556

The pops were hard to push up until the heat from our hands softened the outside a little.DSC_0555 DSC_0554

Yummy.  Mess free.  And I know what’s in them.DSC_0562

“Do I get one too, Mommy?”


Cosmos ® 10-Piece Pink/Light Blue/Violet/Green/Orange Food Safe Silicone Ice Pop Maker Molds Set with Cosmos Fastening Strap

Kid Friendly Food: Cheeseburger Soup

Cheeseburger Soup 002Cheeseburger Soup 005 Cheeseburger Soup 006 Cheeseburger Soup 007 Cheeseburger Soup 011 Cheeseburger Soup 007Cheeseburger Soup 006Cheeseburger Soup 012

If you are on my menu subscription plan, you might have noticed in the cooler months  plan a delicious, innovative soup twice a week.  Why?  Soups are the most cost effective meals out there.  They are slow cooker friendly and all in one meals that busy moms can appreciate.  And the warm liquid fills up a hungry family quickly.

Here’s one your kids will love!

Cheeseburger Soup:

1 can or 2 cups of beef broth

8 oz of tomato sauce

1 can tomato soup

3 cups water

2 tsp stevia or sugar

2 tsp parsley flakes

1 tsp garlic powder

1 tsp onion powder (or 1 cup chopped onion)

1 tsp Worcestershire sauce

1 tsp yellow mustard

1/4 tsp celery seed (or 1 cup diced celery)

2 lb hamburger or ground turkey, browned and drained

4 carrots, peeled and sliced

3 potatoes, peeled and cubed

(Depending on your families likes chopped onions and mushrooms are yummy in this too.)

2 cups Shredded cheddar jack cheese

1 cup chopped dill pickles

8 slices of whole wheat bread or hamburger buns

1.  Combine all except cheese, pickles and bread into a stock pot.  Bring to a boil and reduce heat to a simmer.  Simmer for 15 minutes or until carrots and potatoes are tender. turn off heat and stir in cheese.

2.  Cut bread into cubes.  Spritz with canola oil or olive oil spray and sprinkle lightly with garlic salt.  Bake at 350 for 15 minutes or until golden brown and toasted.

3.  Dish soup into bowls and allow to cool to eating temperature.

4.  Put out bowls of extra shredded cheese, bread cubes, pickles, and shredded lettuce as toppings and let everyone top their own.


Amazing Black Rice Chicken Salad

Amazing isn’t a strong enough word for how delicious this salad is!  I used black rice because I saw it at Costco one day and thought I would try it.  It’s cheaper than wild rice and is a change of pace from my usual brown rice.  It cooks up a deep purple color and the rinse water turned purple right away.  I’ll admit that the first time I opened the bag, it looked like I had bought 3 lbs of mouse turds.   But that’s the last time I will mention that.

This recipe is gluten free, dairy free, soy free, egg free.  🙂 And definitely fitness plan friendly.

The recipe is for one serving, but you can multiply it as many times as you like for additional servings.

Black Rice Chicken Salad

1/2 cup cooked black rice

2 oz cooked chicken, flaked

1/2 small avocado, cubed

1/2 oz chopped almonds

3 baby carrots, sliced

2 Tbs chopped celery

2 Tbs green onion, sliced

2 tbs chopped bell pepper (red would have been beautiful)

2 Tbs craisins

dash salt

1/2 tsp stevia blend

1 Tbs lime juice

Toast almonds either in a skillet or for 90 seconds in the microwave on high. Stir everything together and enjoy.  I ate mine right away, but I imagine it only gets better chilled.

1 recipe has 498 calories; 25 g fat (from the almonds and avocado);26 g protein; and 34 net carbs (11 grams of fiber!)  You can reduce the calories by halving the amount of almonds and avocado. Replace the volume with fresh copped veggies. This saves 187 calories and 11 g of fat.

P.S.  I’m still working hard at my Fit Yummy Mummy nutrition and exercise program–but while the busy holidays are upon us, I’ll just highlight the best of the new recipes I’m creating–instead of writing down everything I eat. I think I’ll go back to that eventually since it really does help.  I do tend to eat a lot of the things I enjoy most over and over.


Restaurant Style Spinach Queso Dip Recipe

Heidi and Caleb are home after spending a week on the farm. It took about 2 days for me to get over how easy it was to set the table and put children to bed with 2 less and then really start to miss them. I’d think of questions to ask them, things I wanted to show them…and then realize they weren’t there. Sniff. When they showed up yesterday, Grant took turns grabbing their necks and just leaning in. It really made their day…and mine too.

School starts on Thursday for us. Wednesday is Heather’s birthday and we have shopping plans :). And I just signed on as our school’s High School music teacher. I’m super excited and nervous all at the same time. I have to leave in 5 minutes for my first staff meeting in 11 years. But first, I want to give you this fantastic recipe that I developed last night in honor of my children’s return.

Everyone in the family loved it. Even the picky non-spinach eaters. We used mild chilies and it was decidedly not spicy. You could use spicier chilies or add more cayenne if you like. But taste it first and adjust as you go.

2 cups milk

1 tsp salt

1/4 cup flour

1/4 tsp cayenne

1 tsp cumin

1 can, 4 oz, green chilies

2 cups finely chopped spinach (I used fresh, but frozen would work too.)

Whisk flour into milk and add remaining ingredients.  Cook and stir over medium high heat until thickened.  Stir in 2 cups of cheddar jack cheese (Costco has this in 5 lb bags for a bargain.)  Cook a little longer just until cheese is melted.  Serve with tortilla chips.

Getting Ready for the First Day of School

I know some of you have already started school.  But for the rest of you, here’s a fun idea via pinterest. I’m gearing up for packing lunches and hope to add a few more fun items once in awhile.  I’ve put my brainstorm of ideas into my latest eBook, Homemade and Healthy to Go. It will be available for sale on August 15th, After I give all current Grocery Shrink Plus subscribers their free copy.  Membership has its perks and if it’s not the 13th of August yet, you can still subscribe to the menus and get your free copy too.

This next idea isn’t mine, so isn’t in the book. Isn’t it adorable?  And Smarties are at Dollar Tree :).


Here’s the original pin:

Click the photo to find the original post and instructions


Here’s my version.  Definitely not as cute without the red and white polka dots!  I loved her scallops so splurged on the 3.5 inch cutter below since Joann had them 40% off.  It was still $15 on sale so I will be using these circles everywhere.  On place labels; birthday gifts; Christmas Gifts; baby gifts; cupcake picks…my family is going to get sick of paper scallops.

My color printer is on the fritz, so I opted to cut the scallops out of scrap cardstock, and print just the circles.  Glue dots stuck everything together quickly.

Homemade and Healthy to Go

I’ve written a new eBook!  And now you know why my blog has been a little quiet this summer.  It’s finished, but not quite available yet.  My Grocery Shrink Plus subscribers get the first peek, and they get it for FREE.  The book will sell for $10 to all non-subscribers and at 100 pages of ideas and recipes for packing frugal lunches, it’s well worth the cost.  But there’s no reason not to get it free.

I have more resources in the works and with school starting soon, will have more time to work than ever.  Grocery Shrink Plus subscribers can expect to get a free resource similar to this every month they stay members in good standing.  Now I call that an upgrade!  Not only do you get more recipes, more instructions, more value in your meal plans than any other service….you get free bonus’s too.

There’s still time to subscribe to the menu’s before the bonus goes out, but you need to subscribe before Monday August 13th.  I won’t be emailing out separate bonus’s to all late subscribers like I do the menu plans.  It’s a one time mail out to current subscribers at the moment I hit send.  No exceptions, no apologies.  Make sure you’re on that list :).

Meet a Winner and Her Winning Recipe!

Meet Nicole Cotts and her beautiful family. I could just eat them up!  But maybe instead I’ll fix some of her Mandarin Chicken Salad.  Before I reveal the recipe, I want you to get to know her better.


1.  Tell us about yourself.  What are your hobbies, interests?

I think the most important thing about me is I’m a sinner saved by grace.  Nothing beats that!  Next, I’m a wife of 13 years to my wonderful husband.  I’m a mom to three crazy boys, a lab puppy and a cat!  I work part time as an adoption caseworker, providing birth family counseling as well as doing home studies for adoptive families.  I’ve also just started selling Pampered Chef just for fun.  I love to bake, read, write and scrapbook but rarely have time for any of them!

2.  Tell us about your family.  Who are you cooking for these days?

I cook for myself and my husband as well as my three boys ages 9, 7 and almost 2.  I also make all of my puppy’s food as if I don’t have enough to do!

3.  Does your family have any dietary restrictions or fitness goals that affect your meal planning?

I’m a Fit Yummy Mummy so I definitely have to take that into consideration when planning meals and cooking.  I find it’s not that difficult to combine the two, but I do tend to spend more money than I would if I wasn’t trying to eat so much fresh produce.

4.  Are you a cook by the recipe kind of girl or just until it looks right?

I like to have a recipe to help me figure out proportions and give me an idea where to start, but I’m definitely an “until it looks right” kind of cook.  I often leave things out or use what I have on hand when I cook.  Sometimes it works, sometimes it doesn’t!  I’m not a very creative cook, I’m always looking for recipes on the internet and such that will give me an idea to start with.

5.  What is your favorite kind of food to cook?

I definitely enjoy baking, I love to make desserts!  Definitely my downfall 🙂

6.  What is a budget saving tip you use?

I like to use fresh produce early in the week and canned or frozen later in the week so there’s no waste in produce.  My husband always takes leftovers for lunch which saves a ton and I always freeze leftover breakfast items (pancakes, waffles, breakfast sandwiches, etc.) for him and the kids to grab and go in the mornings.  Then I don’t have to get up to cook for them and he doesn’t eat cereal!  My kids don’t like to wait for me to make them breakfast and I can workout in the morning before my breakfast.  I also like using coupons for things like toothpaste, toothbrushes, deodorant, soap, etc.  I haven’t paid a cent for these things in years!  Then I can use our grocery budget on healthy foods.

7.  If cost was no option, which food would you buy more of?

Nuts.  I love pistachios, pine nuts, almonds, pecans.  You name it!  I’d probably buy all organic chicken, too, but it’s just too expensive for all of us!

8.  Tell us about the recipe and how you came to tweak it.

My aunt sent me this recipe years ago when she worked at a cute little shop/lunch spot.  This was just when fruit in salad started to become really popular (at least in my little world!).  When I first started making it, I think I left the chicken in the pot too long and it always turned out dry.  I now add 2 cans of mandarin orange juice and cook it for less time.  This makes it juicy and so yummy.  Just recently I heard you can put the cooked chicken breasts in the kitchen aid mixer and it shreds it perfectly!  Honestly, the crunchy salad topping makes this salad.  I’m often out of sunflower seeds and make it with just the ramen noodles and almonds or whatever nuts I have on hand.  It’s still really yummy.  My kids love to put their salads together by themselves and they love the addition of the chow mien noodles on top.  I love that we can eat this salad all year long because it uses canned mandarin oranges, but in the summer I often add fresh strawberries to make it extra tasty!  Something else I do that makes this salad seem a little more like a restaurant salad is chop the salad in small strips.  It’s easier to eat looks prettier, too.  I hope you all enjoy it!


Mandarin Chicken Salad  My kids love this!

Salad Topping

3 oz. sliced almonds
1/2 c. sunflower seeds
2-3 oz. ramen noodles, crunched well
2 T. sugar
1/3 c. butter

Melt butter on medium heat.  Add sugar and all other ingredients.  Stir constantly until lightly brown.

Poppy Seed Dressing

3/4 c. sugar
1 tsp dry mustard
1 tsp salt
2 T. poppy seeds
1/2 medium white chopped  onion
3/4 c. oil
1/3 c. vinegar

Mix in blender.  Shake before serving.

Chicken

Put 2 lbs. frozen chicken into a kettle with juice from 1 can mandarin oranges.  Simmer until juice is gone (about 1/2 hour)  Cool and break into small pieces.

To put salad together:

Lettuce, crunchy salad topping, chow mien noodles, mandarin oranges, and chicken on top.  Serve with poppy seed dressing.

Time for a Recipe! Italian Stir Fry

We finally have an offer on our house!  It’s a terrible offer, insulting really.  But we took it.  We aren’t scheduled to close until August 29th–and a lot can happen between now and then.  If everything goes smoothly, it will be a relief to only own 1 home.

This recipe serves 1, but can easily be multiplied for  a family.  This is a typical lunch or dinner for me on the Fit Yummy Mummy program.

You can vary the vegetables to suit your taste.  I just grabbed what was on hand.

1/4 onion, sliced

4 oz Italian spiced ground turkey (I buy this from Aldi, and sometimes spice my own ground turkey with basil, rosemary and garlic salt, with a pinch of cayenne.)

3 baby bell peppers, sliced

1/2 cup summer squash, sliced and quartered

1 cup fresh or frozen green beans

1 cup spinach

Saute onion and ground turkey together until turkey is almost cooked through.  Add additional vegetables and saute until crisp tender.  Season with garlic salt.  You can also stir in 1/2 cup of marinara sauce at the end.  This is very filling, but very low in calories. 1 protein serving and 4 veggie servings!

Update on Summer Recipe Contest and Recipe for Crab Pasta Salad

I know I had set the winner announcement deadline for June 15th.  That was crazy.  I didn’t expect so many wonderful entries to sort through or think about what it would mean to take a family of 8 on vacation for a week and get put back together after, while doing my regular chores and still getting my weekly menu subscriptions out on time.

So now you can be super impressed that I have gone through half of the contest entries and am getting them organized by type of dish to compile in a fun ebook.  Everyone who entered a recipe will get a free copy of the e-book–hooray for you!  I’ll keep you posted on the progress.

Until then, here’s a delicious Summer Recipe:

Crab Pasta Salad

1 bag–12-16 oz tri-color rotini pasta, cooked according to package directions

1 bag–16 oz frozen peas, thawed

1 red onion, finely chopped

2 large carrots peeled and shredded

6 slices turkey bacon, cooked and crumbled

(add any other veggies you like such as bell pepper, zucchini etc.)

1–8 oz package imitation crab meat, chopped

Combine all ingredients and mix with 1 cup ranch salad dressing (purchased or homemade–light works well.)  Chill.  Right before serving stir in another cup of dressing.)

For gluten free, replace the pasta with 6-8 cups of cooked and drained navy beans–or use a combo of beans, such as navy, great northern, pinto, or garbanzo.)