Makeover Monday: Angela’s Kitchen

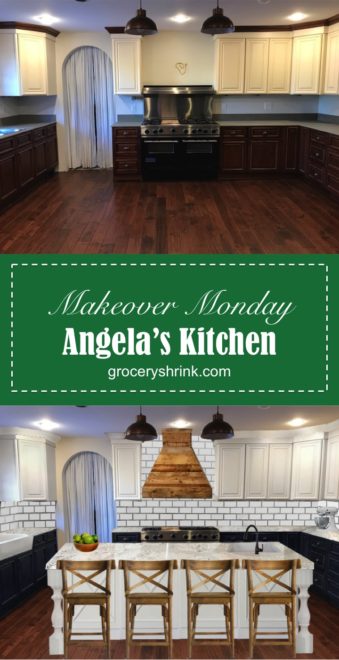
It feels a little silly writing a kitchen makeover post for myself, when we just gutted and redid our home about 4 years ago.  My mom is having a hard time imagining that I would consider painting 4 year old cabinets, when she wouldn’t dream of painting her 40 year old cabinets.  I can see her point, though I don’t share the guilt over painting good wood that she feels.

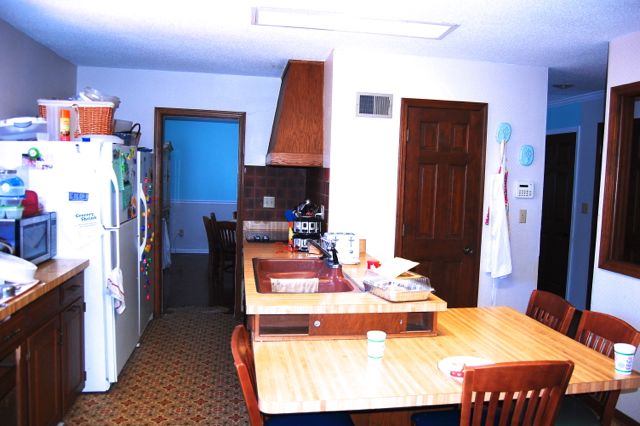
The kitchen in 2012 when we bought our house.  The door you see straight ahead is the old pantry, which I loved but removed anyway.  The blue top and gray bottom is the old dining room, which became the new kitchen.  Right through the doorway on the left, we cut an arched doorway in the dining room wall to create the entrance to the new laundry room and pantry. 

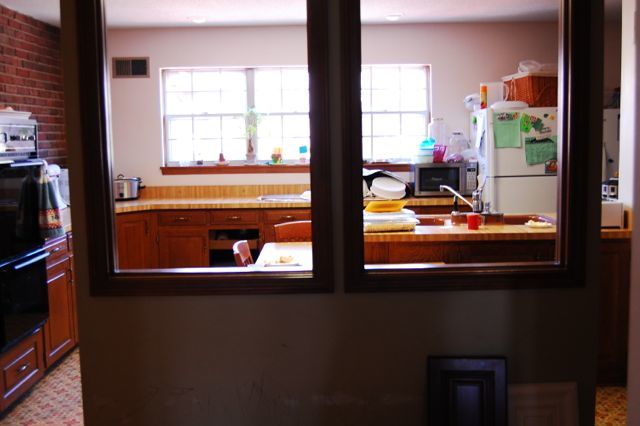
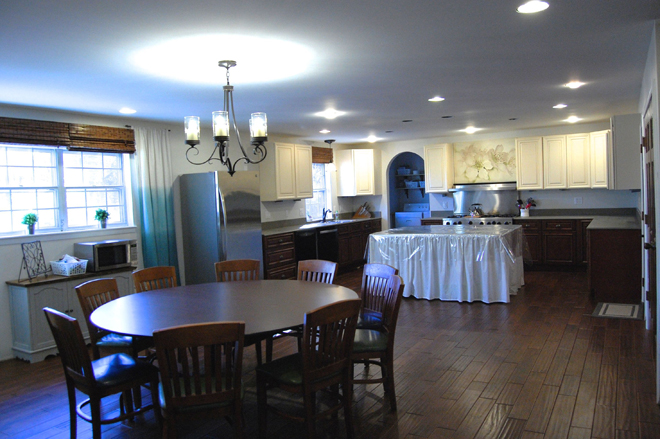
The kitchen in 2014 with the camera standing about 10 feet to the right, but pointing the same direction.  We removed several walls, and pushed the kitchen to the old dining room area making a large open space. Since this photo was taken, we’ve added the fridge cabinets, and crown molding.  Both tables are folding tables being useful while we save up for real furniture. 

A good friend told me, “Don’t ever feel guilty about painting something you hate.”  And while I definitely don’t hate my cabinets, I don’t love them either.  We ordered from CabinetGiant.com, because of their amazing prices and great quality and because we didn’t have an IKEA at the time or any hope of one coming soon.  (So glad to be wrong about that one.)  The doors, when they arrived, didn’t match the sample. They were much more yellow based in tone when we were expecting a brighter white with some glazing depth.   At the time, I had been without a kitchen for a solid year, cooking on an electric skillet and in a crock pot for a family of 8, and never eating out.  I also had a couple of toddlers, while trying to homeschool a struggling fourth grader, and teaching part time at a private school.  I was undone. Yellow cabinets were the least of my worries, so we put them in.

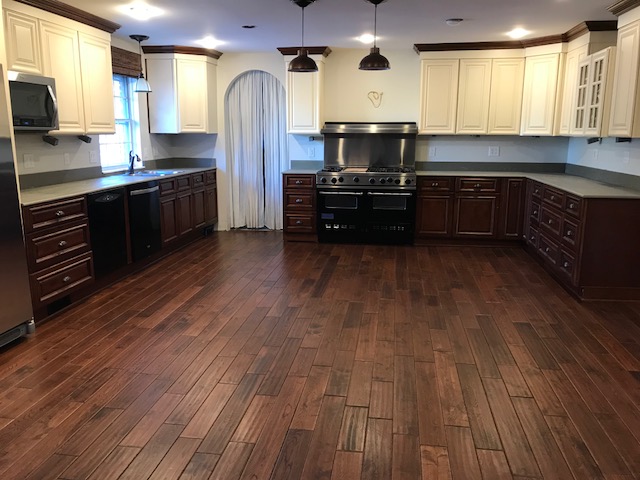
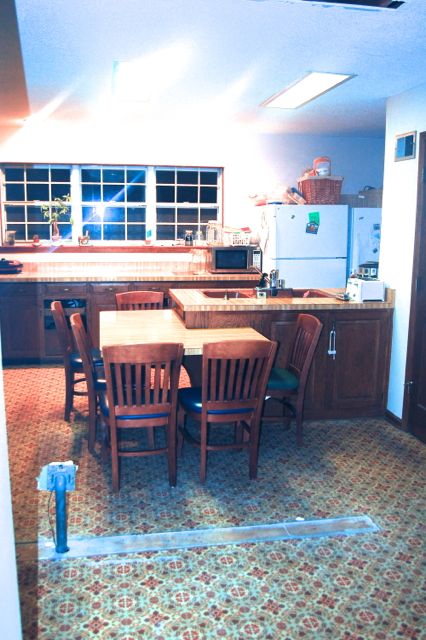
The kitchen today, quieted and the folding table island removed.  The thing that glares at me most about it, is the overwhelming amount of brown wood.  When we designed this kitchen, I thought the floors would be enough lighter than the cabinet lowers that it would be ok, but it’s not my favorite. 

It took me 2 years to even notice the cabinets clashed with my wall color.  At first glance it would be easier to repaint the walls than the cabinets.  The challenge is, the entire 5,000 square foot house is painted Behr Silver Drop and it’s all open concept, which means I’d have to paint the whole house to change the kitchen color. Painting cabinets started to sound easier.  Add the fact that I’ve never liked the cabinet color, and it’s a no brainer.

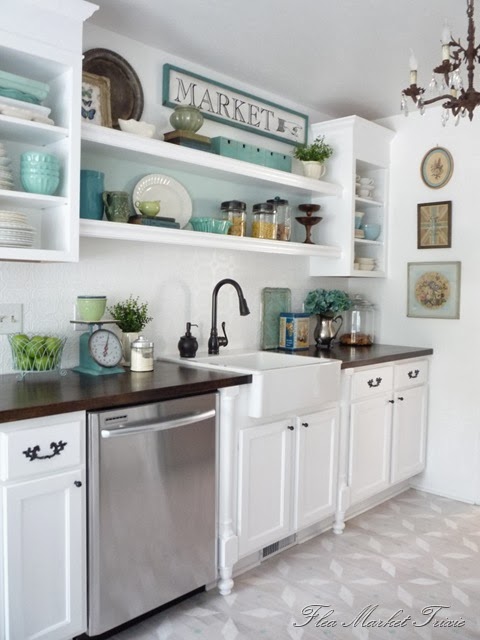
The whole kitchen was a compromise.  We live in the midwest, where decorating trends are a good 5-10 years behind the coastal states. So we were still enjoying the end of the Tuscan Beige era. I craved a bright white kitchen, but my husband had been dreaming of finally being able to afford a rich Tuscan Beige kitchen like we had seen in the nicer parts of town.  I didn’t hate that look, while he definitely seemed to dislike the white shaker style I preferred, so I compromised.

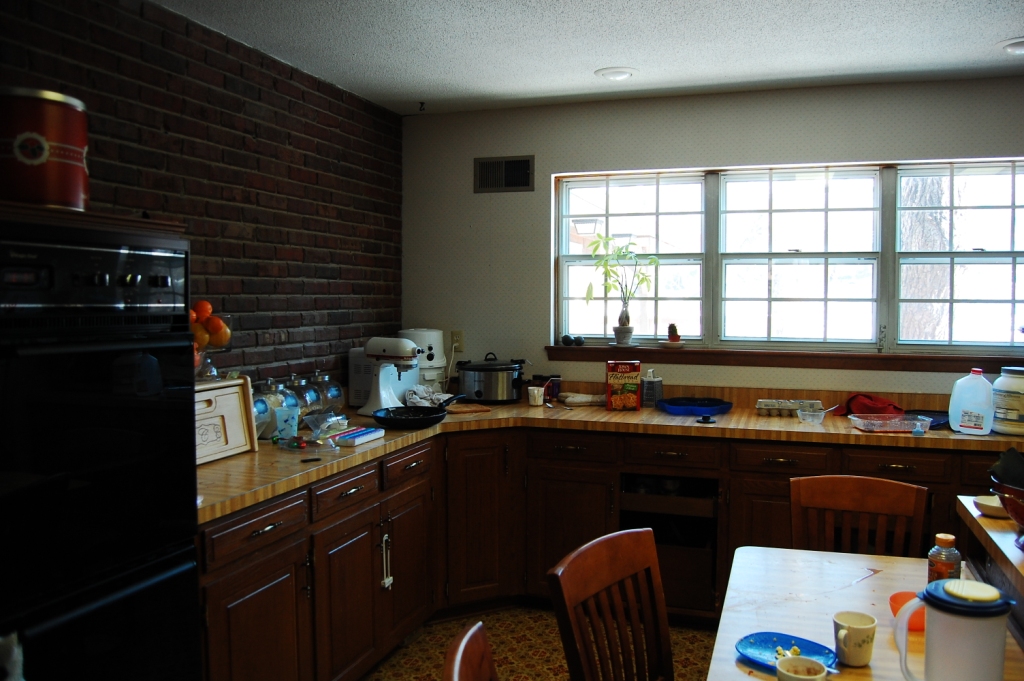
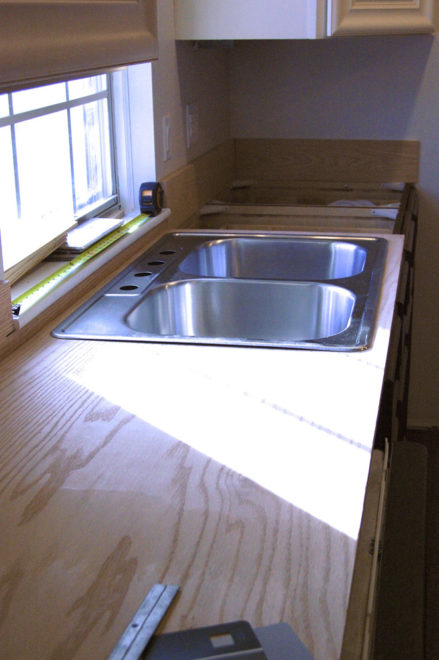
Then a blessing hit us, that I couldn’t see at the time.  We lost our life savings to a foundation repair which meant we couldn’t finish the kitchen. If that hadn’t happened, I definitely would have selected granite countertops that I would have hated in just a couple of years, and been stuck for decades because of the huge investment.  Instead we spent about $200 on hardwood plywood that we painted and sealed with marine poly.  They have served us for 4 years, though the seams split early on and the marine finish wore off after a few months of daily washing and they are now stained and showing signs of water damage.

I painted the plywood countertops a medium gray, hoping to bring the kitchen into the current decade, but instead it just drew attention to the fact that it didn’t harmonize.  It was a good lesson to me that if I can’t afford to fix the glaring problem, it’s better to work WITH it, then to ignore it or fight against it.

It’s finally time for us to finish the kitchen!  (Our bedroom comes first on the project list, but I like to decide on finishes far in advance so I have time to research prices and wait for sales.) Here’s our to do list:

  1. Break up all the dark wood
  2. Replace my double sink, with a huge single apron front sink.
  3. Install Countertops
  4. Install a backsplash
  5. Install a range hood
  6. Build an island with a sink.
  7. Choose counter-stools for the island
  8. To paint or not paint the contrasting crown molding.

I also may need to change the island pendant lights, but didn’t focus on that with this photoshop plan.

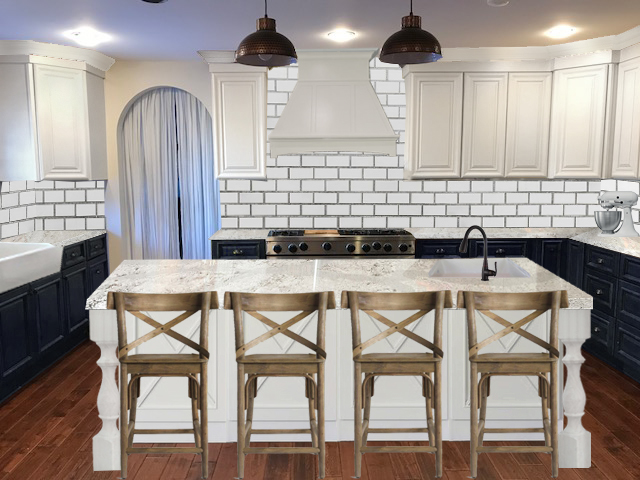
First, I tried navy paint on the lower cabinets and white crown, which I LOVE.  It broke up all the wood, but when I installed a white island, it gave the same affect without the need to paint all the lowers.  I’m all for less work, lol.

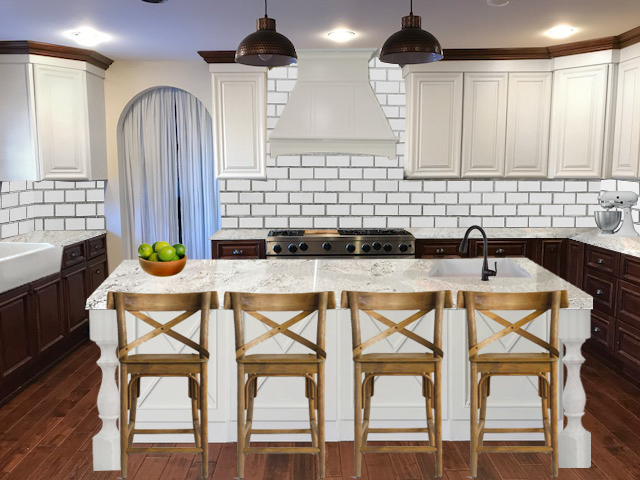
Here’s the same look with brown cabinets and brown crown.  I like this ok, but the stools (which I love the shape of) fight against the other wood tones and don’t relate to anything in the room. As much as I like the wood lowers better with the new whiter uppers, I still loved the navy more.  The original navy view felt a little too white, too sterile.  So I tried switching out the range hood for reclaimed wood.

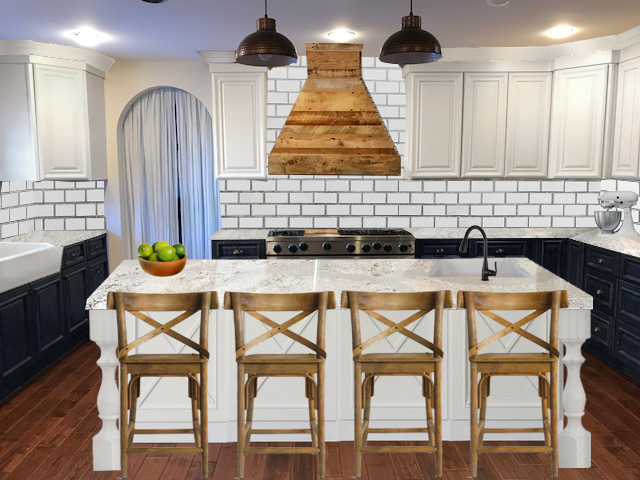
I like how the reclaimed wood had parts of the dark wood color from the floors, but brought in lighter wood tones too.  Then I thought I’d switch out these expensive stools that didn’t quite blend with the floors, with some low profile stools for 1/3 of the cost.

They are ok, but I’m going to look for a third option in a color that’s a perfect blend of the two, a lighter wood like the hood, that plays nicely with the redder floor tones.

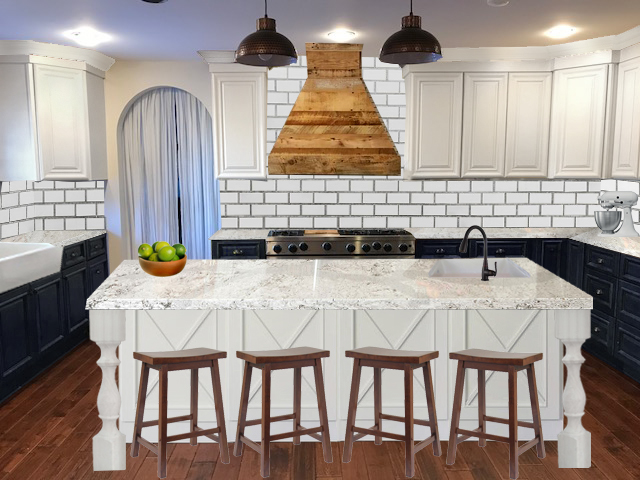
The last thing I wanted to try was painting the crown navy to match the lowers instead of white to match the uppers.  The risk is making the room feel short again. It’s 18 feet wide, so short ceilings are a minor issue.

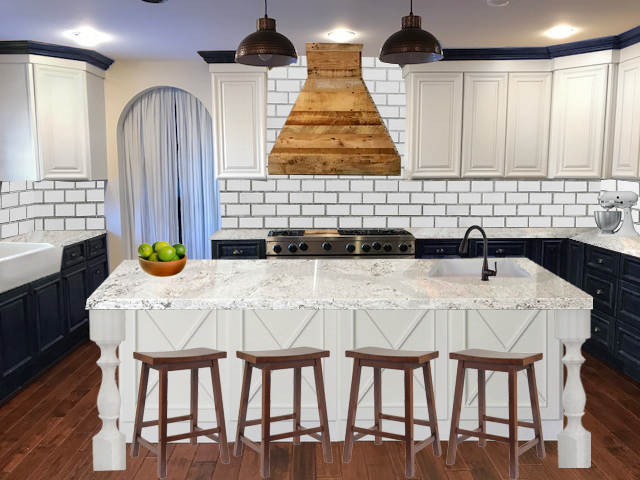
While I like this, I think I like the open airy feeling of crown that matches the upper cabinets better.

This exercise has me itching to paint right now.  I’ve had the upper cabinet paint on hand for over a year already. But I promised myself I’d finish some of the other projects I started and didn’t finish, like painting the foyer, first.

If this were your kitchen, what finishes would you pick?

Sources:

Navy Paint Color: Behr Starless Night

White Cabinet Color: Behr White Pepper

Island turned legs: Etsy Design59Furniture

Backsplash: 3×6 Mohawk gloss white subway tile

Countertop: Not sure on our final choice, but we are looking at Marble look quartz options.  I’m afraid the cost will be impossible.  I haven’t eliminated the possibility of a good laminate.


Moss Covered Monogram

In the Cozy Minimalist class, I learned that plants breathe life into the room.  My family room is land locked and light deprived.  Real plants wouldn’t survive a week in this space, so a little creativity is in order. (The plants in the picture are fake IKEA plants.  Cute…but too small for the space?  I’m looking for a frugal way to overflow that shelf with green.)

painted fireplace moss letter

After some looking around pinterest, I thought a moss covered letter  on the new painted fireplace would be perfect.  The space above my fireplace isn’t huge–22 inches total.  So I opted with a 15 inch letter.  I could have gone SUPER frugal and cut a letter out of cardboard.  In the end I paid $5 to have a ready made letter because I wanted the depth.  you can see the side of it from the front door and it looks better to be thick and sturdy.

The fireplace still looks bare, so I’m thinking about garland options. Maybe I’ll make this when we drive to Colorado. Or this.

moss letter 9

This project took me 1 hour including driving to Hobby Lobby to get the letter $5 (50% off from $9.99.) And the moss sheet $6 (40% off coupon from $9.99.)  I also used scissors and a marker.  The project would have gone faster, but those sheets are extremely sticky and I kept getting caught in it like a mouse in a sticky trap.  I regret my decision not to film it, because I think it would have gone viral for how ridiculous it was….you’ve been warned.

moss letter a

Unfold your moss sheet and place your letter in the center.  I drew the lines on it with the marker and cut along it with scissors.  Then peeled off all the paper backing.

moss letter b

I pressed the letter onto the sticky moss.  At this point, it’s good to mention that you want the RIGHT side of your letter face down.  This is pretty important if your letter is directional, like a B.  Thank goodness that C’s are good both directions because I wasn’t super careful.  As you go, SAVE YOUR SCRAPS.  You’ll need them until the very end.  Then if you want, you can throw the mess away.

moss letter c

Then I started pressing up the moss and sticking it around the outside, trimming off the excess so it would lay flat agains the wall.  Where it curved, I snipped it to the letter then folded it up overlapping the excess while keeping it smooth. The cool thing about this project is the moss is so forgiving.  If you end up with a hole you can just stick a scrap in it and no one will be able to tell.

moss letter d

To go around the inside curves I snipped it like the outside, but this time instead of overlapping it left gaps of triangles. moss letter 1

moss letter 2

I just cut little triangle scraps and stuck them in to fill in the gaps.

moss letter 3

The corner ended up with a triangle flap.  I just cut it off flush.

moss covered letter 7

TaDa!

moss covered letter 5

I went super fancy on the hanger and hot glued a paper clip to the back. It’s such a lightweight piece that a paperclip is just the right thing.

Fireplace and moss letter

The Risk of Painting Brick


There are a lot of things I love about our family room.  It’s open concept so we can see the kitchen from our comfy sofa.  It’s big with lots of options for furniture placement.  It has yummy hand scraped hardwood floors and French doors leading out to a sunroom and deck.family-room-2015

The room has a unique fireplace that was constructed from the bricks removed during the demolition of the old stock yards in downtown Kansas City.  The bricks are a good color tone with enough variation to give texture and interest without being gaudy.

fireplace-before

The room is dark.  It’s landlocked and even during the lightest part of the day, needs a light on for normal activity.   Even with the lights on it feels dark.

It was even darker before we painted over the dark olive beige with a pale gray.  Painted the trim white, and took down the wall between the family room and the kitchen.

dsc_0605

dsc_0613

My gut has been telling me the dark brick has to go if I ever want a light and bright space. It’s so massive that it absorbs a ton of light, and the inside is stained black from soot.  I’ve tried several methods to clean it up, but it’s deep into the porous surface of the brick.  I’ve lightened it some but the stain is still there.

white-french-doors

In a last ditch effort to save the brick, I decided to paint the french doors white to bring in as much light as I can.  It helped a bunch and every time I walked by my heart gave a little leap of joy.  As much as the little things we did improved the space, it only made the dark brick stand out more…and not in a good way.

fireplace-end

When we took down the wall between the rooms, there was an unfortunate seam in the brick never meant to see the light of day.  I was imagining seeing the cute exposed brick wall from the front doors….but that seam is NOT cute.   We plan to cover it with a floor to ceiling chalkboard with a wide white frame all the way around. SOOOO since I was going to cover it up completely, I took a risk and tested a white wash technique first.

I loved it and hated it at the same time.  My mom told me it looked dirty, but my online friends from the Cozy Minimalist class told me it was beautiful.  I finally got up the nerve to start on the part that would be seen.

brick-part-way

I spent a few hours painting, and then wore out.  You can see the top left corner and the inside has been done.  At this point, I was pretty sure my mom was right and I had ruined it.  Then I remembered The Nester telling us, “You can’t ruin something you already hate.”  It took several weeks for me to find the nerve to finish the project.  I decided if I hated the whitewash look I would paint it solid white.

fireplace-and-moss-letter

The paint I chose tends to settle during the painting process, so the fireplace got lighter and lighter as I went on.  I had to go back over the places I started with to make it blend with the rest of the brick.  It ended up lighter overall than I had planned, but I love it anyway.

This is just an iphone picture, and doesn’t do the space justice.  The brick finally feels like it goes with the rest of the room.  I quick made a moss covered monogram to hang on the new whiter brick, and have plans to style up the space more with inspiration from here and here.

I’m KEEPING the original brick on the backside where it is exposed in the dining room.  Here’s a picture of the back side of the fireplace back during our construction phase.  I can’t believe I’ve never taken a picture from this direction “finished.”  Ok, we aren’t finished yet, my buffet table on the brick wall is still those stacked flooring boxes with a tablecloth on it. But we’ve made progress since this.

dsc_0672

Choosing the type of paint for the brick was a challenge.  Brick is hard to strip paint from, no matter what.  Latex paint CAN be removed from brick with this stripper or this one, but latex paint is not heat friendly.  My fireplace has a gas insert, and while it is too expensive for us to use right now, we have hopes one day to make it more efficient.  We didn’t want to permanently eliminated our option of ever using the fireplace again.  I thought about using latex only on the outside and using heat proof grill paint on the inside, but it only came in black.  Painting the massive inside of the fireplace black would fight against my goal of light and bright.

While searching for paint that is heat friendly, I came across milk paint.  Milk paint is permanent on brick. It soaks into the pores and becomes one with the material.  It doesn’t bubble, crack or peel when exposed to high temperatures.  And unlike traditional lyme white washing, milk paint won’t rub off on hands or clothes once it’s cured.  Going with this option meant never being able to go back to raw brick again.  That’s scary for me, because I’m kind of fickle when it comes to decorating.  I took the risk because letting fear trap me into keeping a look I hated was worse than never being able to go back.

There are lots of different brands of milk paint.  I chose this one because it keeps longer than the rest while still being REAL milk paint. Some milk paints are only good for 24 hours after mixing up, but this one lasts 6 weeks.  (I loved having a time limit though, or I might not have finished even now.)  The paints that are “like” milk paint but not really made with milk, I didn’t trust.  I wasn’t sure they would have the heat proof quality I was looking for.

The paint instructions say to mix it equal proportions with the powder and water.  I did that first to make sure the powdered mixed up well, then added 2x more water for a whitewash look.  My finished formula was 1/2 cup paint powder to 1 1/2 cups water. I brushed it on with a natural bristle brush, stippling it into the texture when necessary, then used an old flour sack tea towel to wipe it off.  The wiping off part was key to an even texture and removing brush strokes.

Just for fun, here’s a before and after:

fireplace-before-and-after

P.S.  Thank you for making it safe for me show you my imperfect house and imperfect pictures.  I’m holding back the urge to point out all the flaws. I know no apology is necessary–because we’re friends like that.


3 Budget Saving Fixes

Oh, Girls!  I am in such a good place right now.  My adrenals are almost completely recovered. I have energy and life doesn’t feel overwhelming.  I know the blog has been quiet, but it’s not because things aren’t well here.  I’ve been enjoying my family and working on things behind the scenes at Grocery Shrink Plus and organizing our home.  I will be posting pretty randomly as I finish up some big projects.  If you are subscribed to the blog (form on the right), you’ll get an email when a new post is up.

I’ve made a few updates to the kitchen.  We are back at Baby Step #2, building our emergency fund, after our foundation repair last year drained it.  I’m content with letting the kitchen be unfinished for as long as it takes to get that emergency fund done.  It helps me to be patient now that the space is functional for cooking and family meals.

As I finished up a little project in the kitchen today, I noticed several things we did as temporary fixes to help us rebuild our savings.  I thought it might be fun to describe all of those in a video and show you our space.

Compared to where we started, this kitchen is a dream!  Oh my!  It’s so big and so much counter space.  I really love it.  Here are a couple of  before pictures:

Here it is after gutting the area, right before the cabinets and floor went in.  (We were having a party anyway!)

And here’s the most current view, taken standing beside the fireplace.:

It really is the same space and the same angle. We took down a few walls so it can be hard to realize it’s the same view.

I know the plastic cover on the island is “Grandma Chic,” but I don’t mind.   I have 6 kids that are good at rubbing mustard and chocolate into pretty things, and then feeling terrible about it, so the vinyl makes us both happy.

After I finished the video, I thought of a few things I didn’t put in there, like our big round folding table that we use for our meals. It was left in the basement when we bought the house.  We were excited to find it because it seats 10–which means a couple of kids can have a friend over and we can still sit together. In our previous house the table only held 6 and we took turns standing during meals.  I’m wondering if I could add some kind of skirt under the table similar to what I did to the island, except looking like a pedestal?  It would hide the folding legs and make it look more like permanent furniture while still letting us get our legs under comfortably.

The chairs around our round table were salvaged from a restaurant that closed.  We got 15 chairs for $100 a year or so ago.  They are pretty ugly right now and covered in food bits, but the padded seats are comfy and I like the craftsman style.  A little scrubbing, paint and upholstery will make them amazing.  It’s on my project list, probably over the summer.

Have you ever made a temporary fix while you saved up for something nicer?  Tell me about it in the comments.

House Remodel Update

Have you ever been pregnant almost 2 weeks past your due date and someone asked, “Have you had that baby yet?”

“Um, look at me.  Do I look like I’ve had this baby?”

I know people are just trying to reach out, to make conversation and say “I care about you.” What an overdue mama really needs to hear is,”You are beautiful.” “Can I bring you a meal?  Can I scrub your kitchen floor?  Are your kids available to come over and play? I’m dying to scrub someone’s toilet besides mine….can I come over?” “Have you had that baby yet?” makes her feel like she messed up or something.

I feel like that whenever anyone asks me about my house progress. Only, the kitchen is not 2 weeks past it’s due date, it’s a year past, lol.  That’s how remodeling goes sometimes.  But I do have some progress to show you.  The last update was here.  We were getting ready to paint our countertops gray and still had some hardwood floor to finish on the kitchen side.  The counters now look like this:

Insert the picture here, if you ever get your counters clean enough to photograph

DSC_3205 DSC_3206 DSC_3208

They work really well.  I wish I had just painted them and not tried to stain the wood, that I had sealed the seams ahead of time with paintable caulk and then sealed the whole thing with Annie’s soft wax.  We used marine sealer which added a yellow cast to the color that I’m not a big fan off.   I plan to sand, caulk, paint another layer and reseal, but I’m not in any hurry.

The kitchen floor is done, and we (and by we I mean, Darren) still need to finish the floor on the family room side.

Darren leveling family room floor

That part of the huge room as been especially difficult since the floor was so unlevel.  Nailing hardwood to unlevel floor can cause splitting and cracking and squeaky floors.  He has been creating an intricate puzzle of shims, wood shingles and plywood to get as perfect a level as a perfectionist can get. Darren promises it will be all done by the end of August and I’m super excited to put a rug and furniture in that room and reclaim the other rooms that have been storing it all.

Insert Current Pantry Photo here if you ever get all your laundry folded

The pantry has been framed in and painted and our carpenter is coming back this week to put in the plywood countertops.  I plan to finish those the way I wish I had done the kitchen ones and see if I like it better–only with gel stain instead of paint. Here’s an inspiration photo:

pantry inspiration


The two BIGGEST updates to my kitchen are our new fridge and dishwashers.

all fridge

It’s just a fridge, no freezer, so we have more space for food for our big family.  We have a chest freezer in a built in closet right across the room and we love everything about the arrangement, EXCEPT we miss the ice machine. We are saving up money to put an ice machine in our island which will be built right across from the sink. For now we keep a pitcher of water in the fridge, but it’s really not the same.

DSC_3211

The other AWESOME addition is a 2nd dishwasher.  After feeding a family of 8 for a year with no kitchen and NO dishwasher I’m really digging having 2.  I think mountains of dishes is the most overwhelming part of a kitchen remodel.    They are both running several times a day. They still need to be framed in and secured but for now they are running great.

My friends at Young House Love do a great job making a list of all the projects they needed to do in their house and then showing where they are in the progress of it all.   (Ok, we’re not friends, I just stalk them via their blog, and pretend.)  So here’s our similar list for the whole house:

Heidi’s Room:

Peel Wallpaper

Paint and Carpet

Sew Duvet 

Sew bed pillows

Create an upholstered corner daybed like this one:

upholstered corner daybed

Improve her picture gallery wall (The frames still have the pictures that came in them….it’s been a year….hanging head in shame.)

Remove popcorn ceiling (At first we decided not to do this and just painted it, but I’m planning to remove all the popcorn in the house eventually. This room will be last.)

Heather’s Room

Heather's Room

This room is done for now.  You can read all about it here.

Family Room:

Finish floor

Paint French Doors

Paint French Door Trim

$$$ Move bedroom door

Repair drywall, paint

Put in floor trim and TV shelf trim

Hang 4 clipboards on other side of mirror

$$ Throw pillows on sectional (navy and spa blue)

Clean and Organize fireplace and TV stand (put back shelves)

Kitchen

Call Cabinet giant about order mix up

Install remaining cabinets

Install fridge surround

Install crown molding on cabinets

Install kick plates

Install floor trim

Frame in dishwashers

$$$ Install microwave

$,$$$ Build Island

$$$ Build deck stairs

$$$ Cut out 3 windows and install sliding glass door

Pantry

Paint lower shelves

Order 14” board and cut out, sand and paint corbels

Hang upper shelves

Hang wrought iron brackets and shelves over washer and dryer

Install oak countertops

Stain countertops and seal with soft wax

Sew and install curtain (handkerchief?)

Entry

Remove Carpet

Sand, stain and seal steps

Paint stair risers, spindles, and trim white

Move armoire into living room trade with console table

Clean and Grout Renew floor

$$$ Paint walls Silver Drop (hire the high parts or buy scaffolding)

$$ Add art

Girl’s Bathroom

Remove popcorn

Mud and repair ceiling

$$ Install new light and exhaust fan

Paint floor trim and vanity

Remove wallpaper

Sand peeling paint off walls and repair cracks

Paint room

Living Room

Remove Popcorn Ceiling

Drywall repair and paint ceiling

Paint walls Behr Silver Drop

Remove carpet

Level floor

Lay underlayment

Lay Hardwood floor

Add Moldings

Caleb’s Room

Strip wallpaper

Paint

Remove Popcorn Ceiling

Remove Carpet

Sand down reclaimed wood

Level Floor in Closet

Face Nail Reclaimed wood floor

Use Reclaimed wood scraps into an arrow wall art border

Install roller shade

Curtains

Install lego organizer

Replace desk with a big boy version

Remove my stuff from his closet

Attic Bedroom for Dub

Rug for under the bed

Navy Dust ruffle

Insulate and cover hole in the wall behind the bed

Paint wall behind bed green

Make navy headboard from foam board and attach with Velcro

Curtain off room to keep it cooler in summer

Turn mini blind into a Roman Shade (I’m thinking white with gray ribbon trim.)

Install lego and desk organizer  in hallway to the left of the bed

Turn pit beside bed into a reading pit with a gigantic beanbag (will order if goes on sale Labor day.)

Bring up dresser and put it in one side of the closet

Put a hanging bar in other side of Closet

$$$ Couch and rug where hope chest is, use hope chest for coffee table (IKEA)

$$$ 2 chairs for other side of sitting area (IKEA)

Move boxed books downstairs and create a library in basement or living room

Use the sitting area shelves to organize Dub’s Toys

Replace bed side lights

Master Bedroom

Move bedroom door from the family room to the entry

Move closet door

Wall off bathroom

Add toilet room

Add tub

Tile shower

Add double vanity

Add sliding barn door with windows to block off bathroom

Paint walls and trim

Replace flooring

Replace ceiling fan

Add lots of recessed lights

Make tufted headboard

Add curtains

Add foot stools at the end of the bed

Replace rocking chair with a chaise lounge

Darren’s Office

Use pine paneling to complete ceiling and walls–or take it all down and drywall

Paint walls silver drop

Paint trim white

Retile hearth in front of fireplace

$,$$$ Lay laminate wood floor in both halves of the basement

$,$$$ Seating area around fireplace (IKEA)

Desk and filing system

Find a place for a large glass dry erase board

New door with full glass panel

Under Deck/Backyard

Remove wide walls on deck

Build wooden deck floor

Insulate ceiling and cover, paint

Stain wood

Outdoor furniture—sitting area

Outdoor eating furniture

Remove Rose of Sharon volunteers, dig roots

Mulch play area (get free mulch from Independence)

Build 4 more garden boxes (fill with stuff from the farm)

$$$ Build swing set

$,$$$ Build fort on stilts

Upper Garage

Repair garage door opener

Paint walls, white

New curtains

Move food to pantry

Move metal shelves to basement or lower garage

Remove all storage items—either put away or donate

Build locker system for kids

Put down an outdoor rug, cut into a runner ($17.88 home depot)

Angela’s Office

Paint paneling white or hang new beadboard plywood sheets on ceiling

Remove carpet

Lay laminate floor

Trade desk with sofa

Replace ceiling fan light fixture

Sell cutting table and mat

Sell lots of misc supplies/fabric

Lower Garage

Tear out wood storage in the middle and middle work bench.  Open area up.

Improve lighting

Replace door between two garages

Insulate garage doors

Repair garage door opener

Designated storage areas for:

Camping

Garden

Paint

Wood work

Plumbing

Bikes

Sports equipment

Lawn mowing equipment

2 Spaces to park cars

Workout Area

Paint paneling

Lay laminate floor

Hang permanent mirrors

Move light switches in storage room

Replace pegboard walls in storage room

Finish bathroom wall

Redo shelves to look more finished

Organize free weights; balls; videos; and other equipment

Make a floating shelf to hold dvd player with Netflix device

Move pool table to garage area

Add a seating area with a pull-out bed for guests to use with the new bathroom

Basement Bathroom

Move wall out to accommodate larger space with sink and toilet

Redo tile work

Redo lights

Redo storage

Make it all very cleanable

Plan a space for massage table

***************************

I’m still glad we bought this house, but if we ever move, I’ll never take on a project this big again.

It’s happening….

Heather Vision Therapy

I’m sitting in the Vision Therapy office today.  We have two children receiving therapy right now and life is full.  This is the first week I’ve found a wifi signal at the office, and am using some of this hurry up and wait time to write to you.

Brandon and Grant Playing at Vision Therapy

While I am here watching Grant play with the office toys, the plumber is at my house :). He’s installing a kitchen sink, a dishwasher, and a couple of toilets.  I’m beyond excited.  And a little scared.  When I didn’t have anything to work with in the kitchen, I could be less than amazing and have a good excuse.  Now that I’ll have a sink again…it’s time to step up my game.  Maybe I won’t feel like being amazing anyway.  I think I’m ok with that.  If my family gets basic healthy food and the kitchen is mostly clean…that can be it’s own kind of amazing.

RB birthday

Last night we had a tiny birthday party for our friend, who is staying with us for a short time while she makes some transitions in her life.  It was a total blast. Just silly fun around the table with some friends.  And then she came with me to ballet class.  It’s like having a sister for reals, and the kids adore her.  We have the same maiden name, and even though we aren’t technically related….I can pretend.

DSC_2710 DSC_2694DSC_2696 DSC_2697 DSC_2699 DSC_2701

So this kitchen thing is scary.  We dreamed about it for over a year before digging into the process and then 9 months later are finally coming near the end.  I wanted it to be perfect, but really in life what is?  Our new floor is already scratched, some areas pretty badly.  The cabinets already have dings and blemishes from use. I had in my mind that one day I would have a brand new kitchen all finished and in that moment every piece of it would be new and perfect.  The reality is, We’ve been working at it and living in it for 9 months. We have 6 kids.  My family is better than a perfect kitchen any day.  It’s good for me to stop and remember that sometimes, because when I forget I enter freak out mode.

DSC_2705

Freak out mode is when I wail that my floor scratches aren’t repairable because a prefinished floor has a finish that goes an 1/8th inch deep and nothing sticks to it (like stain or repair crayon.) It’s when I complain that the cabinet company went down in quality, so our new cabinets aren’t what we expected or thought we paid for. It’s when I stress because my counters turned out splotchy and I realize that it’s likely that I’ll still have these countertops when I’m a grandma.  In the amount of time it would take me to save up for granite, I’ll need to put a couple of kids through college, plan a wedding, and hope that grandbabies will soon follow.  To be honest, all that stuff is more important to me than a perfect kitchen.

DSC_2702

Rachel told me the counters looked great when I wasn’t sure.  “It’s the perfect color,” she said.  “Maybe try a second coat.” I just needed to hear some validation for my choice to be able to relax inside and go with it.  Sherry and John over at Young House Love did a similar color in their countertop refresh yesterday, but theirs is a concrete overlay.  Which looked like a LOT more work than what we did. I love the look in their kitchen. It made me feel better to see they had a backsplash too.  After I saw Carmella’s backsplashless countertops and undermount sink, I totally wished I had held out for that.  Just the discussion about it turned very LOUD, since DH was convinced both were impossible.   In the end, it was more important to remove some stress from DH’s shoulders than to fight to get exactly what I wanted.

A second coat on the counters made things better, but I’ll have to show you that tomorrow 🙂

Plywood Countertops

Update:  To see the finished countertops click here.

When we first started planning our kitchen remodel, we did it sitting at this table:

The space was so full of walls, cabinets, stuff–that it made it hard for our big family to function day to day.  We studied the original blueprints, looking for support walls.  Then planned the removal of everything we could to open up the space. We picked out cabinets and dreamed of granite countertops.

After unexpected foundation issues wiped out or cash reserves, we wondered what to do about finishing the space. It was definitely time to think outside the box, since granite wouldn’t be a possibility for several years. We talked about lowering our expectations and buying formica laminated countertops, but the big box stores were surprisingly proud of these options.  The prices still weren’t affordable.

Then we looked at plywood.  First we looked at the $25 a sheet stuff.  Not bad.  Paintable, but not stainable.  Right next to it was gorgeous oak plywood.  It was double the cost, but we only needed 2 sheets (Since we could rip one sheet in half for 16 feet of counter.) Still affordable and this option would be stainable.  If we grabbed some trim for the edge it would look more finished.

We briefly considered buying oak 1×6 boards and fastening them together to make homemade butcher block.It would be prettier, have finished edges, and be possible to use an undermount sink. The extra steps and skill level required scared us.  We are on a deadline now and weren’t confident we could finish that in time.  The city has determined if we aren’t done by the end of the month, they will charge us a permit renewal fee.  This is dragging out so long because we ran out of money….charging us a fee would really help with that, thanks.  Government makes soooo much sense some times.

I settled on an overmount sink, which will be a little more water friendly with the wood.  I prefer undermount sinks with a passion, but Darren reminded me when we buy the granite in a few years, they’ll throw in an undermount for free. We bought 4 of the oak 1×6 boards to use as a backsplash. Since the ripped plywood would only be 2 feet wide (traditional counters are 26 inches wide, we used the backsplash and trim to make up the difference in the length.) We also researched a sealer that would dry to a non-toxic finish (food safe) and make these countertops sturdy enough for a family of six–enter Waterlox Marine Sealer.

Next, I needed to decide on a color.  I wanted to let the wood grain show through whatever we did so that the wood looked intentional.  I already have a lot of contrast built into the room with the light upper cabinets and dark lower ones.  The floor is a shade variation of the lower cabinets and doors in the room.  That’s plenty of that color in the space. I wanted something different without adding so much color we look like a circus.

I loved the color of gray on the folding tables we are using for our temporary countertops. Maybe something similar would be the thing? I grabbed a can of weathered gray stain and did a test board from the piece cut out for the sink hole.


It looked like dirty wood.  The board to the right is the untreated oak.  The lower piece on the left, is the weathered gray stain, one coat.  I really wanted something more gray.  So I headed back to the store and grabbed a $3 sample pot of Olympic Dover Gray.  I added water until it was half water/half paint and used it like a wood stain.  That’s the sample to the back on the left.  Perfect!


This week, we plan to finish cutting the plywood to fit, then install it with the trim and backsplash.   With the goal to have it ready to stain and seal on Saturday.  We will stain and seal it in place after taping off the wall and lower cabinets. We’re hoping the weather is good enough for open windows, since we expect it to smell pretty bad.

Here are some of the inspiration pins I used to convince myself wood countertops would be ok. Click the picture to go to the source:


Buffet Before and After

I’m guesting over at DecorChick today, where we’re talking about cutting grocery budgets.  

A few years ago I ordered this buffet from Home Decorators Collection from their clearance center.  The description read “antique white with a honey oak top.”  When it arrived it was puce green with an orange top.  Whenever I looked at it, or someone said something about it, I would repeat, “But it was cheap.” As if that fixed everything.

Buffet Before

I used it for a few years after crafting a super simple cover for it.

Before and After Bustled Table Cover

I loved the look of the cover, but it made the doors harder to use. Fast forward to our total kitchen remodel.  The buffet has been sitting in my bedroom for 9 months.  It is used as a collector of papers and homeless items. Our board games are in the attic where they never get played with, except when the baby sneaks up there and dumps them all out in a pile and scrambles them up–game soup.   The children gravitate towards Netflix instead of other more stimulating activities and I’m looking for alternatives.  I decided to sacrifice our stuff collector to create a game center in our new dining room.

Low Boy Game holder
Saturday, was a sunny 70 degrees.  Heidi helped me carry the buffet out to the deck.  Darren worked on setting our last few cabinets and cutting the sink hole in our new countertops.  (Ooh, I’m excited to show you those later this week.) I really couldn’t do much to help Darren so instead I started a brand new project that had us working side by side.  It makes him crazy when I start new projects before the old ones are finished, but he was very patient with me.

DSC_2674

I started by using gel stripper to remove the orange top.  I wanted to stain it a dark walnut to match our floors and cabinets (which turned out to be not as red, but it blends ok.) Using what I had on hand (no new money spent), was the most important thing to this project. Turns out the top was oak and stripped beautifully, but the molding was mdf, was a booger to strip, and took stain in a strange way.  I decided to love it, since I was too tired  to fix it.

DSC_2673

Ooh, She’s already looking better.

DSC_2672

I found some Annie Sloan’s Chalk Paint in Paris Gray.  I worried that it was a little too thick from previous use and too blue for my space….. It won out with it’s no sanding or prep work appeal, especially after stripping the top. I added enough water to the paint to fill the can back up and stir, stir, stirred it in.  I think stirring in the water was the longest part of this project. It really didn’t want to mix and I was sure I had ruined it.  Eventually, I ended up with a nice smooth paint.
DSC_2675

Even with thinning the paint back down, it covered that puce in one coat. I painted right over the hinges, but took off the knobs to save the antique bronze patina. The inside of the cabinet is still puce, partly because I’m thinking about using a contrasting color on the inside.  Mostly, because a freak snow storm was blowing in. It went from 70 degrees to 30 degrees in just a few hours! We had to move the party inside.
DSC_2683

We quickly felted the bottom to protect our floors and carried it into place.  I put dark wax on the top and clear wax on the bottom to protect the chalk paint, since it’s not durable at all without a top coat of something.  While the wax was still sticky, the kids started moving their games in.

DSC_2684

Now I can keep an eye on those games.  No more game soup, Grant!
DSC_2682

 Here’s to more family times around the table with some board game fun.

Yesterday I reposted this on Facebook, and was a little shocked to read one comment extolling the virtues of spending a Saturday watching the same movie 5 times, and another woman saying she’d rather her kids watch TV than spend a day outdoors with their dad….Seriously?  I enjoy a good movie as much as the rest, but we were created to build relationships.

Is there anyone out there who values family time over TV?  What are some ways you find a balance and encourage face to face time?


Stenciling a tiny bathroom wall

Paint the vanity, don’t paint the vanity?  Indecision kept me from taking action for far too long.  This bathroom has sat here for months with bare walls and a peeled ceiling and floor. Gross. I looked closely at the wood finish on the vanity.  It was 43 years old, scratched and pitted, dry.  I didn’t love the color.  I tried updating the hardware–meh.  It is mine.  We aren’t planning to sell this house.  I can do whatever I want. And paint is strippable if I hate it.

Bathroom before

So I painted it.  The color is Behr, Misty Mountains.  It is outdoor paint that I bought to paint my shutters to match our new front doors.  I only needed a tiny bit to do the vanity, so I borrowed a from the shutter project while we waited for the weather to be warm enough to paint outdoors. The first coat looked a little army green and I was tempted to snow shovel my way to the hardware store for a sample of something different.  But two coats turned into the yummy shade of gray I was hoping for. The sink top is a little washed out here, but it has olive green grain in it.  It’s pretty awful, but the painted vanity makes it look brand new.  My mom thought we had replaced the top when she popped over for a visit.  I love paint. (Since this photo was taken DH has put in a new oil rubbed bronze faucet and caulked all the seams perfectly.  I’ll show new pictures later this week.)

DSC_2263

I didn’t sand the wood, but I did use liquid deglosser, then a coat of Zinser primer and 2 coats of paint.  The new hardware is from our new kitchen cabinets.  I bought contractor packs from Amazon so we would have enough to update the vanities in the house.  Bonus: they were a lot less expensive than similar ones from the big chain hardware stores. I also bought some oil rubbed bronze spray paint to update the hinges.  I never would of thought of that until I read how Young House Love did theirs. I plan to use the same paint to update the original big brass vanity mirror.  I already love the size and shape.

Next I painted 3 walls in Behr Silver Drop (a beige/gray color) and painted the ceiling and back wall bright white. In a room this tiny painting was super fast.

DSC_2276

I wanted to stencil the back wall to look like wallpaper, and then have it reflect in the mirror over the sink on the opposite wall to look like I had done more than one wall.  I used DH’s laser level above (that’s the state of our family room right now–jealous?) to make sure the stencil was centered and level.  They are too expensive to buy just for a project like this but since we had it on hand already.  It made the job really easy.

DSC_2267

The stencil is from Sarah M Dorsey Designs on etsy.  It was a big splurge for me, but I justified it by pricing wallpaper and promising that I would use it more than once .  I bought it over the summer and thought I would be using it way before now. (#procrastination) I used the same Silver Drop wall paint that was on the other walls and a cosmetic sponge to do the job.  A foam roller might have been faster, but we were snowed in and I was working with what I had on hand.

DSC_2271

The secret to getting clean lines without bleeding is to not use too much paint.  I’d dip the sponge in the paint, then tap it off on dry places on the tray to get off the excess.

DSC_2269

 Perfect!  I love it!

DSC_2277

After the first pattern dried, I could overlap and keep going.  This went much faster as I went along, because one side would dry as I worked on the other side.  I could bounce from side to side and not have down time for drying.  I got 12 patterns done in about an hour.  I think another 3-4 hours and I’ll have it!  I can’t wait to see the whole room come together.  And have a bathroom with a door that shuts.  It’s the little things that I’ve come to appreciate.

I want to choose an accent color to break up all this neutral. What would you do?  Literally anything could go.  I would bring in the accent color with towels and art.  I’m a fool when it comes to picking out art. Do you have some favorite pieces?

Caleb Cooks

He’s all that and dimples too. But he’s mine.  I’m not giving him up for a while yet.

DSC_1884

It was Sunday after church.  Daddy was gone to preach in South Missouri and took a sister and a brother with him.  Another brother went home with a friend.DSC_1881

That left only 4 for Sunday lunch.  Hardly enough to break a sweat over.  “Let’s just have cold cuts,” Heidi offered.  “We can save the spiral cut ham for when the whole family is together.”DSC_1880

“Or,” Caleb said, “That bread with the egg in the middle.”

“Huh?  You mean Toad in the Hole?”DSC_1879

“Yes, that’s the one.”  I love that the kids aren’t discombobulated about our remodel nightmare.  They just jumped right in and took charge of fixing the meal.  Then stuck with me until all the dishes were washed, dried and put away.

Toad in the Hole

Ingredients

  • 4 slices of bread
  • 4 eggs
  • 4 tsp butter

Instructions

  1. Butter bread, then use a glass or biscuit cutter to cut a hole out of the center.
  2. Preheat griddle or frying pan to 350 degrees.
  3. Place bread buttered side down on the pan, then bread an egg in the center.
  4. Cook for about 3 minutes or until egg is partially set. Flip and cook the other side.
  5. Cook until yolks are thick but still soft. About 3 minutes. Season to taste with salt and pepper.
http://www.groceryshrink.com/caleb-cooks/